At Home with Tech

Unlock the power of all your technology and learn how to master your photography, computers and smartphone.

Category: photography

Finding Fluidity in the Frozen

If you’re feeling an uncontrollable urge to break out, a little snow may be exactly what you need. Time to move!

The season’s first snow can be a welcome time to refresh one’s perspective, especially this year. But you’ve got bring the right attitude.

Concern over possibly losing electricity at home or frustration with having to shovel heavy snow isn’t it.

Fortunately, I’ve got my ten-year-old son to remind me where to find magical moments during a deep freeze. 

It’s about breaking through and finding opportunity. And I’m amazed how kids often do this so effortlessly.

During this past week, my photographic eye was led by my son’s instincts. It was a lesson and a gift. And it’s everything I need for the holidays.

Please take a look. What do you see?

Chaos or Discovery?

Silliness or Self Portrait?

Too Difficult or Just Right?

Danger or Lesson?

Cold or Warmth?

Why or Why Not?

The next time you’re feeling a little frozen, it may be helpful to tap into your inner child to help fuel more fluidity and forward motion.

Happy sledding on whatever slope you choose to conquer.

Cancel your Deal with Zoom’s Virtual Background Devil

Fabricating the illusion of a faux background for your Zoom calls may seem like a good idea, until you realize what you’re giving up. Here’s why it may be a bad deal.

I once believed the goal for Zoom backgrounds was to try to mimic a uniform environment, like walking into an average conference room. Or even better… attempt to mimic that clean, all-white background that Apple is famous for.

That would be so much better than revealing the cluttered background of my home office.

The Lure of Using Fake Zoom Backgrounds
So, I bought white and green pop-up screens and tried squeezing them into the space behind my desk.

But most of us don’t live in an empty 30’x30’ TV studio where this type of staging is easier to pull off.

I eventually succumbed to the reality that using a big enough green screen to pull off a full-shot chroma key during my iMac’s Zooms rendered my home office unusable. There just wasn’t enough space!

The only reasonable choice was to use the standard Zoom keying option that doesn’t take advantage of a green-screen background. And though it’s pretty amazing that Zoom can pull a key at all without using a green screen, the trick just doesn’t work as well.

As a result, you can almost always tell when someone is using a virtual background on Zoom. You can see that eerie black glow around someone’s head. And there’s that sudden, momentary disappearance of a hand. You’re not really fooling anyone when using a digital background. By now, I think we’ve all gotten used to that fake Zoom look.

Some of us even flaunt it when they place nature shots or outer space behind them. Yes, it’s a neat trick… once or twice, but eventually you need to come back to earth. I think you should have an image behind you that doesn’t make you look like you’re in a video game.

In Search of the Almost Real
I experimented with using photos of other rooms in my house as my Zoom background in the attempt to maintain some sense of visual authenticity that’s true to my real environment. I eventually landed on a reasonable shot of my living room.

Yes, you could still tell I was using a virtual background, but at least I wasn’t hanging out in someone else’s home!

Offer More of Your True World
While using a photo of my living room did meet my bar for authenticity, I still felt restricted Zooming in a virtual space. Ultimately, I just wasn’t comfortable. The tradeoff wasn’t worth it.

So I cleaned up the clutter of my home office the best I could and turned off my virtual background.

Yes, I went cold turkey on virtual backgrounds. And you know what? It’s felt so much better. The shot represents more of my true life, warts and all.

So here’s a radical suggestion:

  • Even if you believe your space is a disaster and unfit for your video conference viewers, if you do some preproduction staging, I think you can create a look that you’ll be comfortable with.

Unless you’re stuck Zooming in your bathroom, there’s probably a corner in your home that you can make work. Yes, any number of disturbances from your life may be only a few feet away. And we all want to minimize visual and audio interference that may prevent us from communicating clearly.

That’s different than trying to hide from your own environment.

By now, everyone expects visual imperfections on Zooms. The opportunity is to turn your world’s imperfections into an authentic experience. And that can ultimately be such a refreshing change up for your viewers.

Maximize your Reality Instead of Fabricating an Illusion
Showing it like it is means you’re sharing a more personal experience. And I think your Zoom viewers will really appreciate that.

Unclick the virtual box and stop the illusion. You don’t have to hide anymore.

It feels wonderful.

How to Decide which Lifetouch School Picture Package is Best for You

Buying School Picture Day photos doesn’t have to feel complicated. Here’s how I determined what to order…

Our son is in fifth grade, and I’ve been faithfully ordering Lifetouch School Picture Day photos for years. Each time, I pledge to only buy what I really need. Invariably, I realize there are compromises to be made that have necessarily increased the price point. This year is no different. But this time, I think I got it right.

At the end of the day, all I really want is a digital file of my boy’s school portrait. I can then print additional photos at home. I don’t need Lifetouch’s more expensive prints. (Although I do understand that’s the foundation of its business model.)

Also, the photo’s background needs to reflect that this is a school photo and display my son’s elementary school grade. Otherwise, it’s really just another generic posed photo which holds little value for me. The photo has to clearly be his school photo. (I’ve got plenty others.)

If you have a similar perspective, here are my suggestions on how to get the best deal when ordering your Lifetouch photos (assuming there’s still a school picture day scheduled in your neck of the woods during this year so affected by COVID-19).

Order the Basic Package
I really don’t want all of the extra prints that are part of the more expensive packages. (A few prints are just fine.)

I’m looking for the one digital file with the correct background. (And my son’s class photo would be nice too.)

The good news is the Basic Package gives you:

  • 1 8×10
  • 2 5×7
  • the class picture (size unknown)
  • and the digital file! (available as a download via Shutterfly)

All that costs $14.99.
(That’s a much better price point than the forty bucks I’ve been spending in previous years.)

BUT…

You only get access to the generic background with the Basic Package.

Then, Add to the Basic Package
There is a workaround, but it’s an analog solution…
(shudder)

You can add on an extra printed photo to your package and then choose the background you really want for that additional print.

The next step is to simply digitize this physical photo when it shows up. (Scan it or take a picture of the picture.)

Then, you’ve finally got what you wanted in the first place. No, your digital copy won’t look as perfect as the original photo file, but if you order an 8×10, your scanned version should be fine for most uses.

And the price for that extra 8×10?

  • $14.99

So add that to the original $14.99 Basic Package for a new new total of $29.98 (plus tax).

Consider the Plus Package
If you don’t want to go through the trouble of MacGyvering your purchase to save money, your next choice is to go with the Plus Package for $44.99. That officially unlocks the option to choose your own background(s), and it also provides a whole lot more prints that you may or may not want. (In this smartphone age, does anyone even use 2×3 wallet photos anymore?)
Here’s what you get:

  • 1 -8×10
  • 4 -5×7
  • 2- 3×5
  • 8 -2×3 Wallets
  • the class picture
  • and the digital images via Shutterfly

Plus, you get the name and grade on all prints and basic retouching.
(I’d already have the grade as part of the background. As for the photo-retouching… I think that’s unnecessary for kids.)

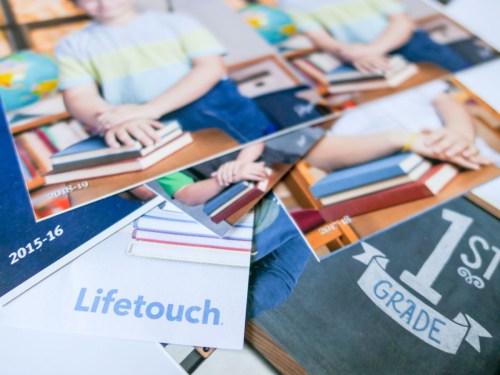
Barrett’s 2020 Lifetouch School Picture Day Purchase
There are a couple of other packages that offer additional combinations of physical prints, but that didn’t move the needle for me.

I kept my focus on Basic vs. Plus. And it boiled down to this:

  • Spend $15 more for the Plus Package to easily choose your photo backgrounds (and get more prints)
  • Or keep it ‘Basic’ and order the extra 8×10 print with the right background. And then scan that print.

I took a look at my past purchases, and I’ve always gone Plus.

But I have a confession to make. I have a cabinet at home filled with photos that have yet to find a final destination (album or frame). In it, there’s a folder containing years of Lifetouch prints I’ve never used. There were just too many. It’s a painful reminder that I never needed all of those photos in the Plus plans.

Sure, spending a little more for the Plus Package provides all of the ordering flexibility you’ll want. But if you don’t use what you buy, that’s not good value.

So, I decided to keep it basic this year:

  • The Basic Plan for $14.99
  • Plus the extra 8×10 print for another $14.99 with the background that says 5th Grade

Click.

Buy What You Need
Future Barrett might laugh at me for going through all of this effort to save $15. But Future Barrett might also nod approvingly at my ability to finally get the equation right for my actual needs.

I think that’s called progress.