At Home with Tech

Unlock the power of all your technology and learn how to master your photography, computers and smartphone.

Category: Tech Diary

How to Protect the Camera Lenses on the Back of your iPhone

If you worry about destroying your iPhone’s three camera lenses, you might want to consider buying a case with a lens cover.

In many ways, the most prominent feature of an iPhone is its camera system. Being able to make a phone call these days is almost an afterthought. And those three camera lenses on recent iPhones are fairly large. Long gone are the little lens dots on the back of smartphones.

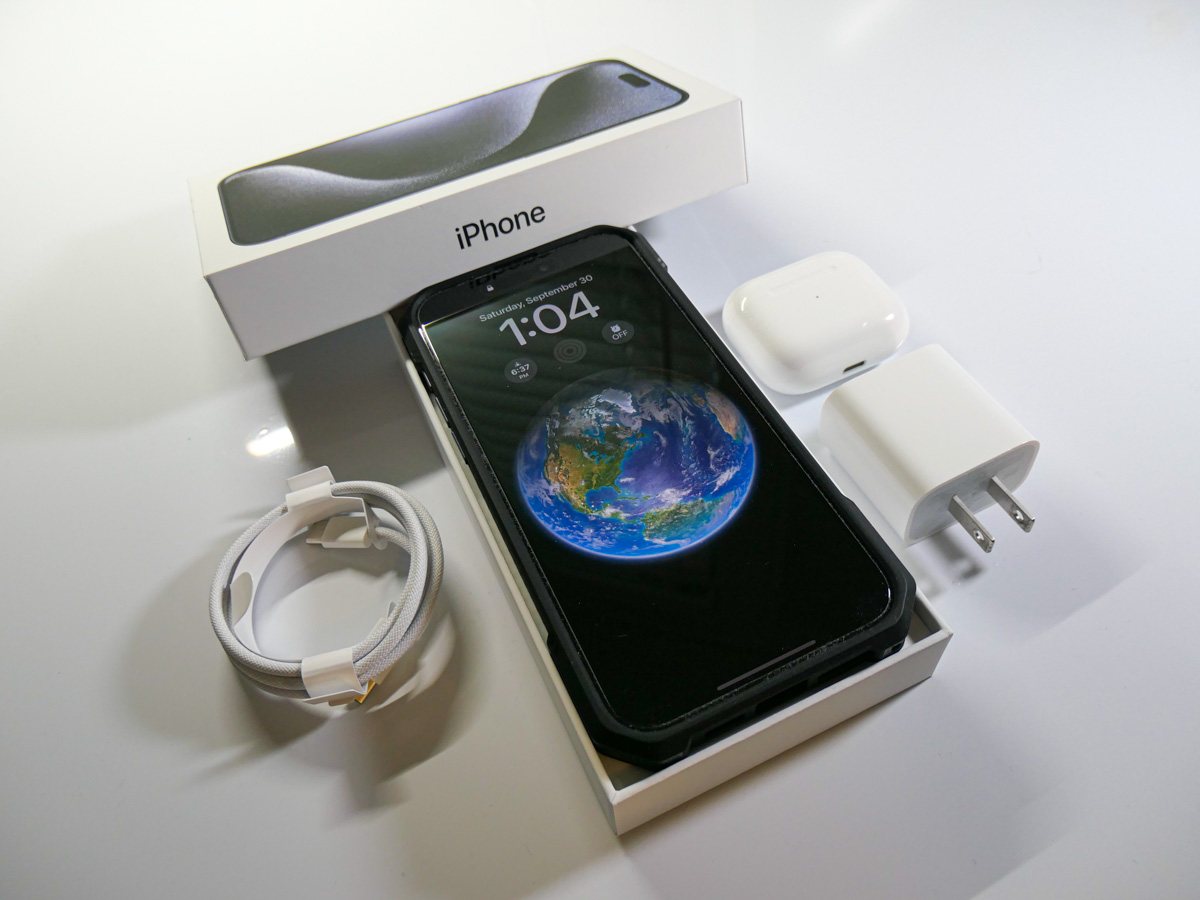
As I began to consider my daily life with my brand-new iPhone 15 Pro Max, I thought about how to best protect its three lenses from damage. Of course, I know I’ll be constantly placing my new iPhone on various surfaces facing up to maximize its ‘always on’ trick. (Love that!) And in practicing this technique, my iPhone will always rest on its camera lenses.

That doesn’t feel quite right.

A Standard Case Won’t Cover Every Danger
Sure, many iPhone cases have a lip surrounding the lenses that prevent direct contact. Other cases can even out the back side of an iPhone, so it becomes one flat surface without the lens bump. Then, they won’t protrude at all.

But those three lenses are still unprotected and exposed to the grimy elements.

You wouldn’t mistreat any other camera lens that way. You’d have a lens cap for it, right?

What happens to those three iPhone lenses after daily contact with any number of surfaces? Wouldn’t that eventually smudge and scratch them, affecting the optics of all your photos and videos?

Sure, the little camera lenses are natively constructed with sapphire crystal lens covers. Does that make them impervious?

A Genius Perspective
So, I brought my concern to a couple Apple Genius’s when I picked up my iPhone 15 Pro Max at the Apple Store.

One mostly brushed off my question as irrelevant. He said that he simply wipes off his iPhone’s lenses for smudges and they’re ready to go. He said otherwise, he “doesn’t think much about it.”

Whenever I visit an Apple Store looking for answers, I often quiz multiple Geniuses. So, I kept going…

I found another Apple Genius who appeared more analytical. (Maybe it was the glasses.) He told me that all flat clean surfaces were safe to rest an iPhone on. I should just be mindful of avoiding gritty surfaces. Those “might” scratch the camera lenses.

I felt a bit better with that answer. But life isn’t flat and clen. Life is gritty, especially when you least expect it.

An iPhone Case with a Lens Cover
The standard solution of simply wiping off my three little lenses with a microfiber cloth (or my sleeve) just wasn’t going to cut it. I knew I wanted a more comprehensive plan.

Question: Had any iPhone case manufacturers yet designed their cases with a dedicated lens protection solution? After a little quick Googling, I realized that in fact, yes… some of them had.

Though I may be in the minority for wanting this extra protection, I decided to buy an iPhone case that offered a protective lens cover.

Cases for new iPhone models take time to enter the market. So, I looked for a quick and dirty solution to help my iPhone’s lenses avoid the grit.

I found two types of cases built with little plastic covers that shielded the camera lenses. They moved one of two ways:

  • Sliding over and away (left to right)
  • Folding over and back (like a little door)

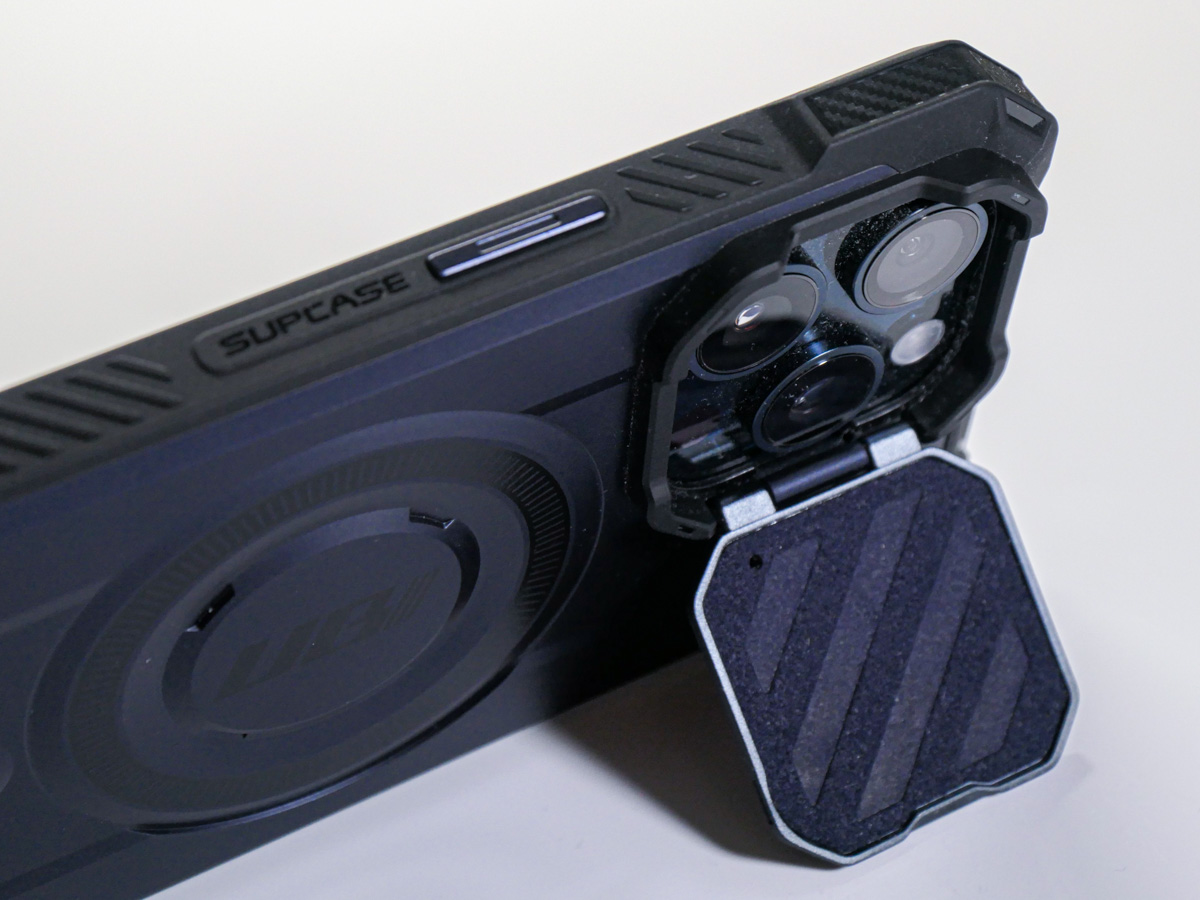
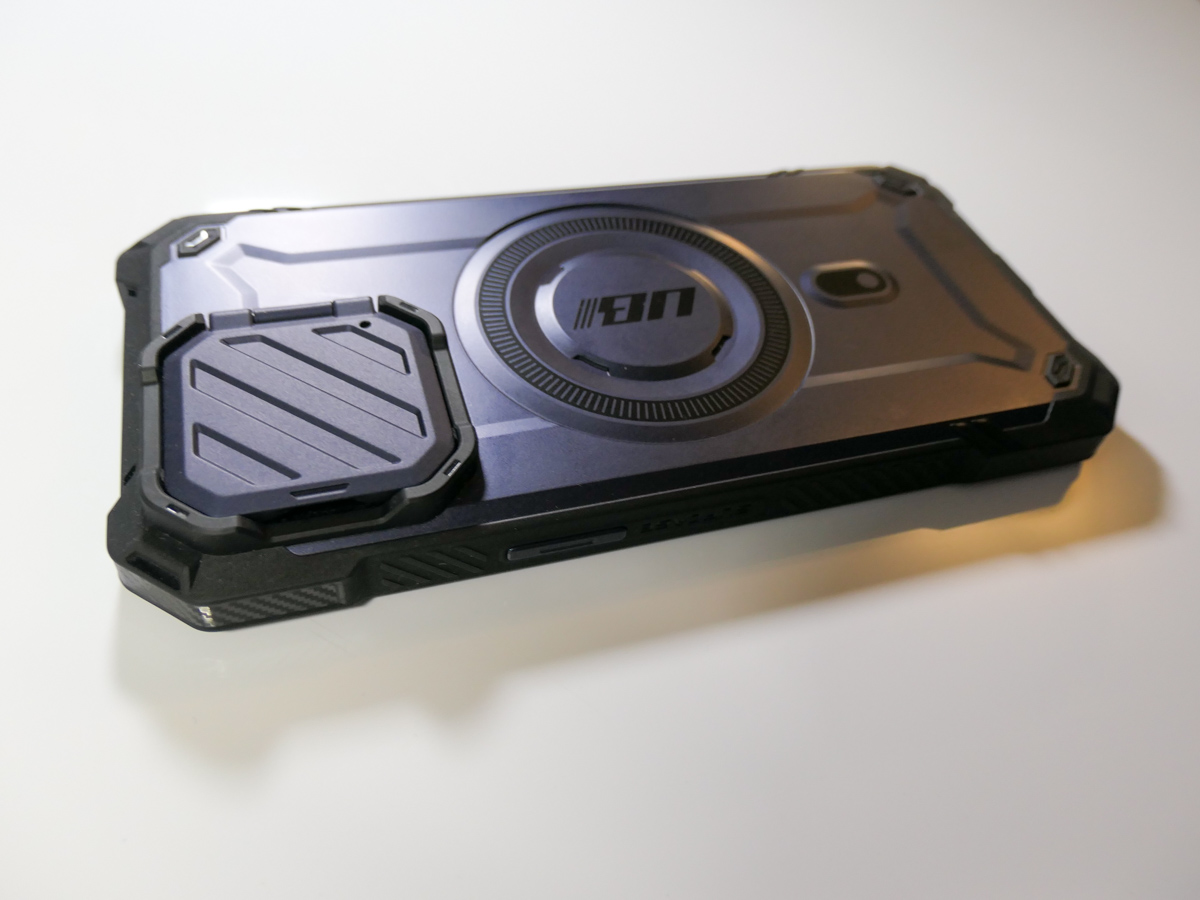
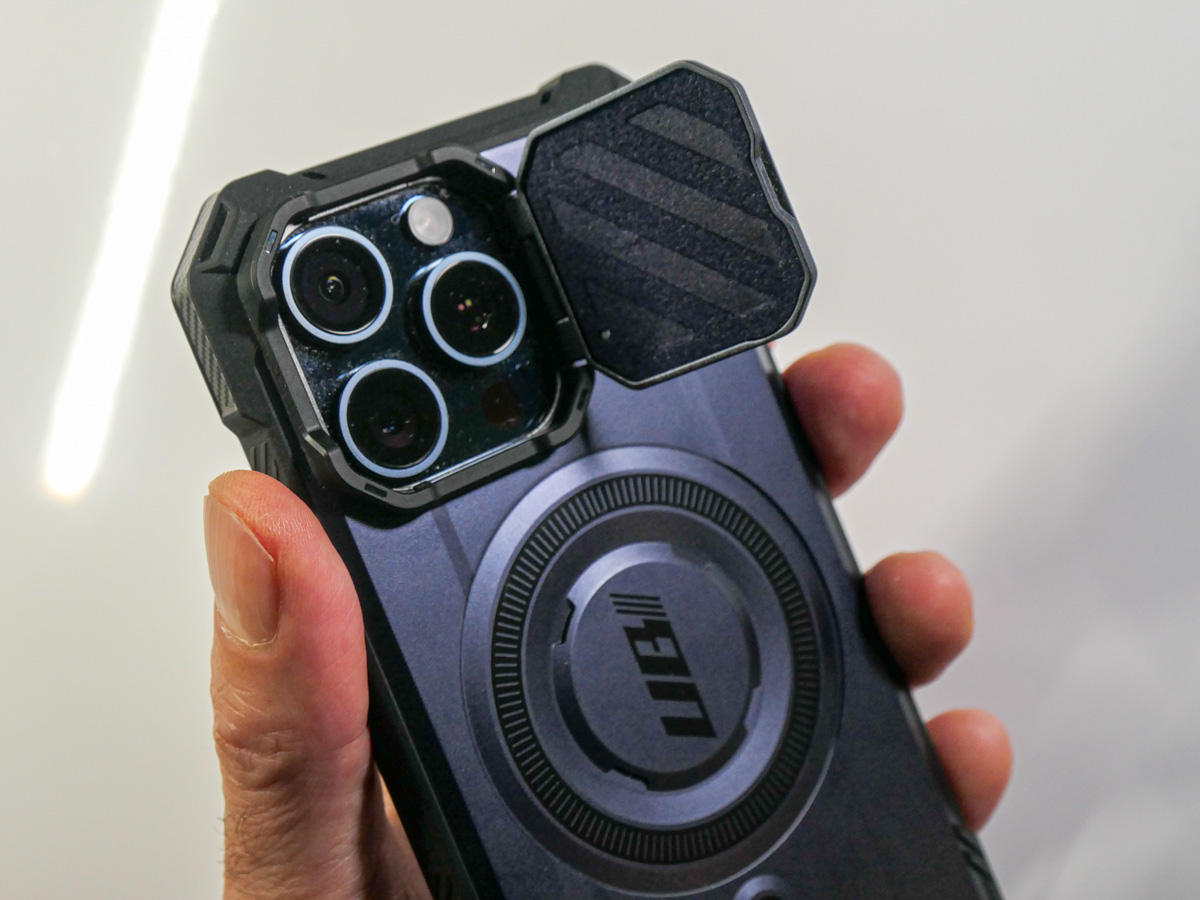
SUPCASE Closed-Door Solution
I ended up trying out the tiny door concept with the SUPCASE UBMag XT Case.
Amazon has it for $26.99.
The little lens door locks in place when it’s closed and is appropriately stiff as you move it. (The plastic flap doesn’t swing around when it’s open.) The door can also double as a kickstand for your iPhone.

The SUPCASE allows for MagSafe charging and magnetic grip, and functionally works just fine.

Most importantly, the “closed door” gives me peace of mind as I move my iPhone and its three camera lenses around.
All this said, the lens cover does require the extra step of opening it before taking a photo. So, in those spontaneous moments, you’ll inevitably lose a second or two before getting off your first shot.

Cautious Optimism
I wanted immediate protection for my new iPhone, and for a case in the sub $30 category, this was a solid choice. It’s a good way to begin ahead of other iPhone 15 Pro Max case options entering the market.

Does that mean I’ll eventually upgrade to another case? Perhaps. No case will last through your iPhone’s expected lifetime. My iPhone cases have all shown wear and tear long before that. But isn’t that the whole point?

The case takes the licking, and your iPhone keeps on ticking.
(Wait…that’s another brand.)

Bottom line: My three new camera lenses now have their extra layer of protection. Do they actually need a cover? Who really knows for sure…

But the idea of it certainly makes sense to me.

Case closed.

8 Ways to Quickly Get your New iPhone Up to Speed

I’m the proud owner of my new iPhone 15 Pro Max. Beyond the basic set up, here are the next steps I took and extra purchases I made to quickly unlock my iPhone’s full potential.

Buying a new iPhone and setting it up is easy. But integrating it into the daily routines of your old device is not as simple as you might expect. Sure, migrating apps and data over is straight forward, but’s that’s not everything you need to think about. There are other steps to take and more decisions to make surrounding your core purchase.

It’s been five years since I bought my recently departed, beloved iPhone XS Max, and I found myself a bit rusty on remembering everything I needed to take care of surrounding my iPhone 15 Pro Max purchase.

Here’s my guide with eight tips to help speed the entire process and get you quickly up and running with your next iPhone.

#1
Be Sure to Join the Virtual Line Early on Launch Day
If it’s time to upgrade to your next iPhone, then it makes sense to buy one the day it’s released to maximize its twelve months of being the ‘latest and greatest.’ I bought my iPhone 15 Pro Max online at 8:20am the day of its launch. It arrived a week later, and I picked it up at the Apple Store. Sweet.

But that happy story first required 25 minutes of frustration, persistence and I think a dash of luck.

I sat down at 7:55am EDT in front of my Mac Studio on launch day and promptly waited for the Apple Store to open for business. (Yes, it’s usually down during the hours ahead of a new iPhone going on sale.) The Apple Store didn’t open (for me) until 8:05am. And then it took another fifteen minutes of multiple failed purchasing attempts (as I fought others around the world to be among the first new iPhone owners) before the transaction finally went through. (I’ve had the same challenge over the years when buying an iPhone on day 1.)

Apparently, I just squeaked through before the delivery times began to slip into October and November.

So, it clearly pays to be prompt and close to the front of your virtual line.

#2
Buy More Storage than You Think You’ll Need
Five years ago, I wrote my blog post, “Why Do You Need an iPhone with 512GB of Storage?” And while I recommended the idea of having what was at the time a ridiculous amount of storage, I ended up sticking to 256GB. This time, 512GB was a no brainer for the extra $200.

The choice was whether to spend another $200 on top of that for 1TB.

While I’m enamored with the idea of recording Pro Res video clips, I no longer feel the need to permanently house every piece of media I generate locally on my iPhone. With that strategy, even 1TB storage would eventually not be enough.

The truth is you can’t carry around every digital media file you’ve ever created. And I would also argue why would you? That would be a crippling number of videos and photos to manage.

Sure, I’m always impressed when a parent can pull out their iPhone and quickly flip through tens of thousands of photos to find that one cute photo of their kid from a decade ago. That’s a superpower I don’t have. And I’m willing to bet that no one will be able to retain that capability forever. You can only flip though so many files before your finger falls off.

#3
Buy the 20W USB-C Power Adapter
Apple’s 20W USB-C power adapter is the new norm. Goodbye tiny 5W adapter (though it will still work slowly in a pinch). Unfortunately, you don’t get a 20W adapter in your iPhone’s box (just a USB-C cable). So, you’ll need to buy one separately if you don’t already have one.

#4
Replace your Lighting Cables
I’m sure you know by now that the Lightning connector is out, and USB-C is in for the iPhone 15 line. Yes, you do get one USB-C cable in your iPhone’s box, but that’s not going to be enough, right?

You’ll have to replace your existing arsenal of Lightning cables to maintain your new iPhone’s power/charging stations.

And if you intend to continue using your old USB-A chargers, you’ll need to buy some USB-A to USB-C cables.

#5
Buy a Case with a Camera Cover
Choosing a protective case for a new iPhone can easily become a complex decision. Unless you take the path of least resistance and go with an Apple case, it could be weeks of research before you come to a decision (guilty).

I wanted a case ready to go for my iPhone 15 Pro Max (essentially as a temporary solution, if need be). So, I took a chance and ordered one on Amazon before my iPhone arrived. That’s way early, because case manufactures are still guessing a new iPhone’s physical specs at that point. But I did okay.

The case fits really nicely, and its distinguishing feature is its little folding door cover for my iPhone’s three camera lenses.
Protecting those little lenses was on my mind, and this quickly took care of that concern!

#6
Unpair and Pair your Apple Watch
Your Apple Watch is an intensely faithful device. It sticks to only one iPhone at a time. If you think that by simply cloning your old iPhone’s identify into your new iPhone, your Apple Watch will gleefully follow along, you’d be wrong.

Your Apple Watch needs to literally break up with your old iPhone and then marry your new iPhone. So that means first unpairing it. And then pairing it again.

It’s not an especially quick process. So, set aside a half hour or so for this.

#7
Sign Back into your non-Apple Apps
Yes, your iCloud apps will be ready to go. But for everything else… nope.

You’ll need a chunk of time to sign back into the rest of your apps.

#8
Add a MagSafe-Compatible Charger for your Car
And then there’s your iPhone’s car interface. No matter how you connect your iPhone in, you’ll want to consider how it’s positioned in your car (perhaps mounted to your dash). A MagSafe-compatible solution is a good idea for both positioning and charging.

I picked up Belkin’s Magnetic Wireless Car Charger that’s MagSafe-compatible and mounted it to one of the air vents on my dash.
The magnetic grip is plenty strong. The vent mount slides in fine, though it does feel a bit ‘MacGyvery,’ (which in fact it is).

Technically, it’s not an official MagSafe mount and thus doesn’t charge as fast. (Belkin’s upgraded MagSafe model is the real deal, but it’s quite pricy at a hundred bucks!)

This one works just fine.
Click.

For the record, I also saved some money on my Belkin charging mount by buying a used one. I clicked on Amazon’s “Saved with Used – Like New” icon for $41 bucks (same model). It really was like new, and I saved almost twenty bucks. So, if you see that purchasing option, I think it’s a good idea for this type of support tech.

One other note… Some magnetic mounts are just that… magnetic. They don’t offer charging. So, check the fine print when reviewing your choices.

Doing the Work Pays Off
Getting your new iPhone back into the groove of your old device takes some planning and additional spend. Sure, you may have the latest and greatest in your pocket, but no smartphone is an island. It will also need its own accessories to be able to keep up in your orbit.

You’ve taken years to curate the experience you want from your iPhones. Only when everything is literally back in place and properly supported will your next iPhone really feel like… yours.

I recommend making this a weekend project. That’s what I did.

It’s time well spent, and let me tell you, there’s no better feeling than starting a Monday morning with your gleaming piece of new Apple tech operating at its full potential.

How We Scheduled our Alaskan Vacation out of Anchorage

When you’re trying to figure out how to vacation in Alaska, be realistic on how much you can see. Here’s our 10-day itinerary.

When I first told my friends that my family and I were going to Alaska, they usually asked, “Are you taking a cruise?” If you’ve checked out my past few posts on our Alaskan adventure, you know that we followed a different vacation path. We took a Backroads’ family tour out of Anchorage that transported us throughout the Kenai Peninsula. Though we spent a day cruising through parts of Prince William Sound exploring glaciers and sea kayaked on Kachemak Bay, we spent the rest of our time on land, hiking and biking. It was all simply spectacular.

The Need to Narrow our Itinerary’s Scope
When we first thought about taking an Alaskan vacation, the big challenge was figuring out where to go and how to maximize our geographical coverage during our 10-day trip.

That was the wrong question to ask, and we quickly realized that, because Alaska is so huge. Any attempt to drive between the key sections would take up too many days and doom the trip to endless road time.

Even taking a train to Mount Denali was a complete day right there, and then that choice would set up extended travel days from point to point in that part of Alaska.

It’s ridiculous to even try to cover Alaska in one trip, unless you’re hopping on a plane every other day.

The only solution to our itinerary, of course, was to pick one ‘small’ area, and then stick to it. (And that’s what Backroads provided us.) Even doing that required two to four hours of driving on almost every day. (Fortunately, we were comfortably driven around in our Backroads’ van.)

Hello, Kenai Peninsula!
So, we explored the Kenai Peninsula south of Anchorage, and believe me, it felt like just that small sliver of the state was a separate massive planet. We covered plenty of miles, even though it’s just a fraction of Alaska.
If you’re planning for your own Alaskan vacation, and you’re trying to figure out your own itinerary, here’s what we did:

Our Alaskan Vacation Itinerary

Day 1
Fly to Anchorage
Settle into your hotel. Unless you’re starting from the west coast of the United States, it’ll be a full travel day.

Day 2
Unscheduled
Go through your jet lag (as needed).
We visited the Anchorage Museum and took a trolly tour (very touristy but fun). The key to this day is to make it a buffer day. There would have been no way for us to easily turn it around and begin our Backroads’ tour that morning. Not as a family.

Plus, what if your fight gets delayed or canceled the day before? (It actually took three hours for our plane to get out of Newark, New Jersey due to weather restrictions and the need to find a new flight plan!)

Day 3
Travel to Girdwood
Stay at the Alyeska Resort
This was our first Backroads’ day, and it began big with a cycling adventure. We biked along the amazing Turnagain Arm.

We eventually ended up at the Alyeska Resort midafternoon. We didn’t have a whole lot of time to enjoy its immersive salt-water pool, but we did squeeze in a late-afternoon dip. (If you can spend an extra day here, I’d recommend it.)

Day 4
Travel to Whittier
Take Prince William Sound Glacier Cruise
Getting to Whittier required driving through the 2.5 mile portage tunnel through a mountain. That, by itself, was an experience. As for our glacier cruise, it was as dazzling as it sounds.

After our cruise, we jumped back in our van and headed to Seward.

Day 5
In Seward, Drive into Kenai Fjords National Park
Hike the 8-Mile Harding Icefield Trail next to Exit Glacier
We hiked up this trail right next to the glacier. (We were on solid earth the entire way.) The summit of the trail is 3,512 feet.
Yes, it was a wicked-challenging hike with a steep incline, which reminded me of my family’s New Hampshire mountain hikes that topped 4,000 feet.

For the record, I was the last one up and the last one down the Harding Icefield Trail. Yes, I was slow, but I did it!

Day 6
Drive to Homer
Bike the Spit
This was our second cycling day, and we biked into Homer (after our van took us most of the way from Seward) and through the Homer “Spit” that extends out into Kachemak Bay. Our hotel (Land’s End Resort) was perfectly located at the end of the Spit. You could also reverse engineer this idea and bike the spit after you settle into Homer.

After dinner, we enjoyed a brilliant sunset over Kachemak Bay. (In the summer, the sun doesn’t go down until around 10pm.)

Day 7

Stay in Homer
Go Sea Kayaking in Kachemak Bay
As soon as I woke up and got dressed to get my morning cup of Joe, I took a peek outside and saw the opportunity to capture a striking sunrise over the water. So, I stumbled out of our room with my DJI Osmo Pocket and GoPro to begin some timelapse recordings as dawn was breaking.

After breakfast, we took a water taxi to Yukon Island and suited up for our all-day kayaking exploration.

Again… stunning. Even our time on Yukon Island offered breathtaking views of Kachemak Bay.

Day 8
Explore Homer
Drive back to Anchorage
In the morning, we visited the inspirational Dean family farm and art studios. After lunch, our group headed back to Anchorage. This last leg of our Backroads’ tour took five hours, the longest driving stretch of our vacation.

And that was the end of our exceptional Backroads’ tour. But our Alaskan vacation wasn’t over quite yet!

Day 9
Stay in Anchorage
Take a Glacier Flightseeing Tour in a Cessna
We started our day with a little more bike riding, this time around Anchorage. (We rented from Downtown Bicycle.) Along the way on the Tony Knowles Coastal Trail, we ran into a few moose. (Well, they almost ran into us!)

In the afternoon, we took our Knik and Colony Glacier Flightseeing Tour (by Regal Air) from Lake Hood. This two-hour roundtrip flight through Chugach State Park in a tiny Cessna was the perfect way to wrap up what was already an unforgettable vacation.

And as if our flying over glaciers wasn’t thrilling enough, we also landed on a strip of dirt in the middle of it all to ‘stretch our legs’ before embarking on the second half of the flight. (Cessnas are amazing little planes.)

Day 10
Hang Out in Anchorage
Fly Home
Our flight back to Newark wasn’t until 8pm (a red eye and the only non-stop). So, we had much of the day to still spend in Anchorage. As it was raining, we focused on indoor activities. We visited Alaska Escape Rooms and then headed to the Alaska Aviation Museum before taking a free shuttle to Ted Stevens Anchorage International Airport, only ten minutes away.

A Few Final Travel Tips

Bring your Raincoat
It rains a fair amount in this part of Alaska during August. So, you should expect some. The fact that we experienced perfect weather throughout our entire Backroads’ tour was unusual (and certainly enhanced our overall experience).

Make Dinner Reservations in Anchorage
Yes, Alaska has a total population of only 732,000 people, and Anchorage feels accordingly empty by comparison to other cities. But there are tons of tourists moving through to take their cruises. And the restaurants totally fill up by 6pm. So, plan ahead for your evening meals.

Focus your Photography Wide
Of course, everyone wants to spot some wildlife, and yes, we ran across our fair share: some moose, black bears, mountain goats, seals, sea otters and one giant sea lion. And I got off a few good tight shots. But the majority of photo opportunities on this kind of trip is to capture the vast and incredible landscape. That’s where you’ll find your visual magic moments.

Go!
Visiting Alaska was certainly a bucket-list trip. And to fully experience our 49th state, you really need to see it from both the water and land. And if you can swing it, get in some flightseeing time in too!

It all makes for a trip of a lifetime.