At Home with Tech

Unlock the power of all your technology and learn how to master your photography, computers and smartphone.

Category: Tech Diary

Three Ways to Massively Improve the Quality of Your Family Video Shots

I’ve got three big tips that will help jump-start your action videos of your family members...

Let’s face it. Few of us would mind if Steven Spielberg showed up with his camera crew to immortalize our next family event. All of that talent poured into the visual capture would undoubtedly generate amazing imagery. (I don’t care how disruptive a large film crew would be!)

Unfortunately, I know that scenario is also a fantasy. But instead of dreaming about how you might improve your home videos, I’ve got three ways to upgrade your video talents to the next level…

#1
Steady Does It

Shaky jumps and bumps created by an unsteady hand are sure signs of amateur video. The good news is technology is making it easier for you these days to create steadier shots, especially when covering action.

Digital stabilization is now common in consumer camera tech, but a real game changer is consumer-grade ‘gimbals.’ These are 3-axis stabilized handheld devices.

You can mount your smartphones to these stabilizers to create silky-smooth cinematic videos.

DJI makes the Osmo Mobile 3.
$119.00 on Amazon Prime

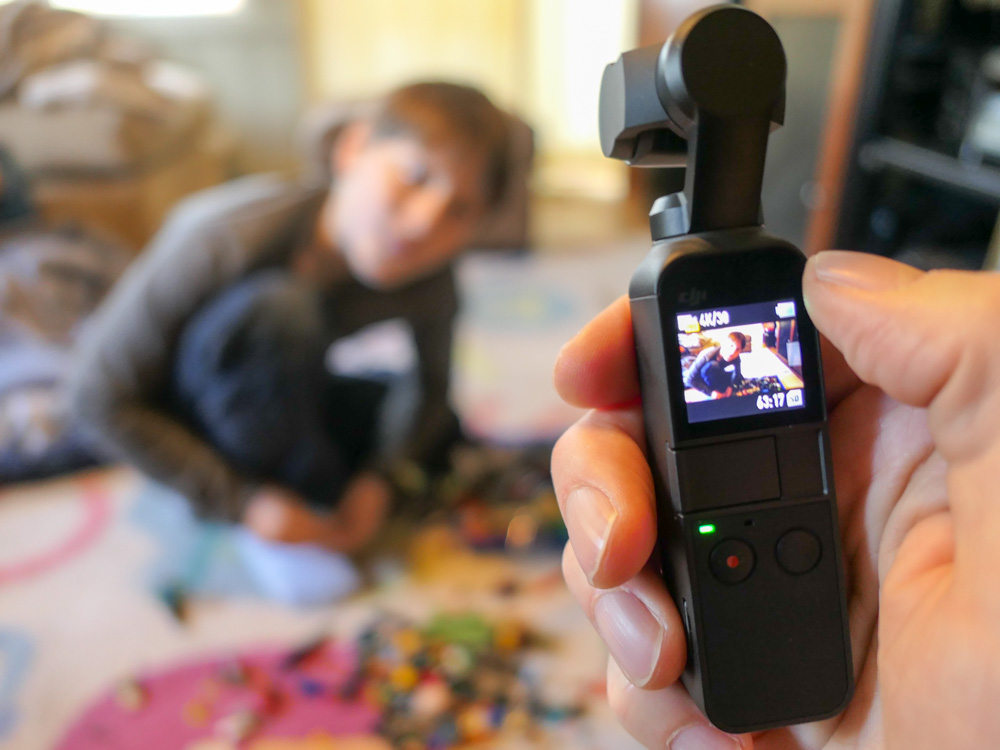
Or you can go with the DJI Osmo Pocket, which is a tiny, all-in-one camera/gimbal that can create amazingly smooth action from the palm of your hand.
$349 on Amazon Prime

I use the Osmo Pocket, and it maximizes many video opportunities to keep up with my active nine-year-old son.

#2
Slow It Down

I know I’ve recently taken a deep dive into the value of shooting in slow motion, but I think the point bears repeating.

When not overused, slow motion video can really add emotional impact to your video storytelling. It can also help you extend a significant visual moment which goes by too quickly. 

All you need to do is shoot at a higher frame-rate. Today’s smartphones are entirely capable to handle this trick with a tap of a setting. 

If you’re not already a slow-motion believer, just give it a try. You’ll see what I mean.

#3
Let There Be Light!

Sure, you can buy expensive gear to help shoot in low light, and the results can be strikingly beautiful. But why confront this difficult challenge if you don’t have to? 

Instead, simply look for every opportunity to record in good light. Either take advantage of the outdoors or a well-lit room. Simply avoid those infamous backlight problems that come from bright windows or the sun in the background. 

And always remember to keep the brightest light in front of your subject!

Show and Tell

Here’s an example of these three tips in action… I used my DJI Osmo Pocket to ‘smoothly’ document my son’s participation in a community fun run on a bright, cold weekend morning.

I recorded these clips at 60 frames per second and then slowed the motion down a bit while editing them in Final Cut Pro X on my iMac. I added in a little rhythm from Apple’s GarageBand and threw in some white flashes to finish off the sequence.

Put It All Together

Steady, slow and the use of lots of light will help you take a significant step forward as the family videographer. 

(I believe my post’s title says, “massive.” I’ll stand by that.)

If you incorporate these strategies when capturing action, you can create clips that will turn lots of heads.

All right, maybe just a few… but I expect the ones that matter to you!

Five Ways to Enjoy Your Metro North Commute to New York City

If this is a snapshot of your world every weekday morning, you may need a few tips to help you on your commute. Good news…

How hard is the commute into New York City on Metro North? Well, the train experience is not exactly a walk in the park. But there are ways to ‘smooth out’ the trip. If you’re a novice suburban commuter trying to make it to Grand Central Terminal every day, I’ve got five tips that should improve your trek.

#1
Never Buy Your Ticket on the Train
This is rookie-mistake stuff. The conductors charge a significant surcharge to make on-board ticketing especially painful. So plan ahead and keep more money in your pocket! And now with the MTA eTix app for smartphones, you can always buy yourself an e-ticket before the conductor shows up.

#2
Get Used to the Center Seat
If you’re traveling during rush hour, usually only a few seats will be left when you show up. And I guarantee they will be center seats. There is absolutely nothing wrong with politely asking the person sitting in the aisle seat to let you in. Otherwise, you’ll be standing for the entire trip, and how fun is that? I know some may say their personal-space requirements prevent them from squeezing into the center seat. If you’re going to be a regular rush-hour commuter, I’d recommend you try reducing the size of your personal-space bubble. After a while, you’ll find it isn’t as uncomfortable as you’d think.

#3
Expect Weak Cellular Spots Along the Way
Once upon a time, you’d see an ocean of open newspapers during the morning commute. No more. Now, everyone is on a digital device, many of them streaming movies and TV shows. If you don’t have work to do, streaming your favorite content is a great way to spend your time on Metro North. The only challenge you’ll face is the reality that the cellular signal is not evenly strong along the way. (There are multiple 1-bar pockets.) So, you’ll need to rely on buffering to keep your show playing smoothly. That means you shouldn’t randomly jump in and out of watching your content. Once you begin, keep going! If you happen to receive a non-critical text while streaming the last episode of “Stranger Things” on Netflix, I highly recommend that you wait to respond until after that end-credits scene is over.

#4
Admire the Great Work the Conductors Do
I’ve watched a variety of Metro North conductors in action across many years. Without exception, each one has brought professionalism and a friendly attitude with every commuter interaction. That doesn’t mean they’re not sometimes tough when they need to be if a commuter gets a little out of line. It’s clear that the conductors are always in charge. That psychological hierarchy maintains the necessary calm for any public transportation commute.

#5
Buy the Best Muffin at Grand Central Terminal
Once you arrive at Grand Central Terminal, I say it’s time to reward yourself! The best breakfast muffin you’ll find is the ‘apple cranberry walnut muffin’ at Magnolia Bakery on the plaza level. It’s simply amazing.

The bakers seem to only cook up one batch of these muffins on any given morning… so you’ve got to show up early to get one. Any time after 9am is a gamble.

Bonus Tip: Maintain a Flexible Mindset
So, after many years as a ‘train warrior,’ I’m not currently commuting into New York City. (Instead, I brave the unpredictable parking lot known as I-95 to Stamford, CT.)
But as much as everyone I know loves to complain about I-95, it’s not really half bad if you expect the hideous traffic and always have a good podcast to listen to while driving.
(I highly recommend Malcolm Gladwell’s “Revisionist History.”)

I also suggest that you apply the same flexible attitude towards commuting on Metro North to New York City on any given day. Combined with my commuting tips, you could even ‘enjoy’ your train experience!

Good luck!

Which Bulb Should You Buy for a Porch Light?

If you’re not sure which light bulb you should be using in your outside porch light, you’re not alone. Here’s the story of my journey to a solution…

My house has an porch-light fixture above my front door. The long, cylindrical fixture’s bottom is technically open to the outside elements, but the bulb is protected.

You can spot the bulb if you look deep into the fixture after you ring my doorbell. If I take my time getting to the door, and if you’re a tech geek like me, you might wonder what kind of light bulb I use. Funny you should ask…

Every six months or so for the past ten years, the bulb has burnt out, and I have to replace it. Each time, I’ve found myself faced with the dread of not exactly knowing which one I should be using. And that has usually led me to a moment of self-reflection and uncertainty about my place in the universe.

Because I’ve come this far in life, and I can’t quite figure out what it takes to screw in the proper light bulb. It blew out again last week. So I decided it was finally time to figure this out…

How Many Words Does it Take to Screw In a Light Bulb?
First off, it’s not like I’ve been entirely oblivious in my past attempts to choose the correct bulb. Previously, I’ve used GE outdoor incandescent postlights with bent tips. I’ve assumed that because they’ve carried the name ‘postlight’ they’re designed to weather the outside elements as long as they’re protected from rain. They’ve operated just fine, even though they must get a little damp now and again.
(I hope I’ve not been tempting fate.)

Unfortunately, I can’t find these GE bulbs anymore on Amazon. Plus, they’ve always been difficult to unscrew, because my fixture is so long and I can barely get my fingers in far enough to get a grip on the bulb. So, I’ve always wanted to find a bulb that’s a little taller.

And did I really mention the word ‘incandescent” earlier? What an embarrassment.
Yes, you’re right… I should have found an LED replacement by now.

Amazon Stumbles
So I went back to Amazon and began searching for ‘LED Postlight’ and ‘Porch Light’ bulbs.

Strangely, nothing popped up that talked about outside use or all weather construction.

Frustrated with my inability to use Amazon for immediate gratification on a Saturday morning, I invited my fourth grader to go with me on a light-bulb adventure to our local The Home Depot. And we drove off…

The Value of One-to-One Human Interaction
You can easily find hundreds of conflicting product opinions online for just about anything you’re looking for. Call me old-fashioned, but I still value the opportunity to walk into The Home Depot, find someone wearing an orange smock and ask my question. Over the years, I’ve usually received great advice at The Home Depot. And this time was no different…

I found my expert hovering in the lighting section and told him my story. I held up my burnt-out incandescent bulb and waited for his response.

He stared into space for just a moment and then directed me to a ‘Philips F15 Postlight dimmable LED’ that costs $4.47.

Illuminating
The packaging displayed a picture of a glowing outside lamp post. The fine print said “Do not use where directly exposed to water. Only install in operating environments between -4 degrees and +113 degrees Fahrenheit.”

I figured I was covered…

So, I bought the 7-watt LED, and my son and I drove home. When I installed it, the bulb was much easier to grip, and it powered up just fine. So, what more is there to talk about…?

Well, I wondered why I couldn’t find this Philips LED on Amazon. So jumped back online and typed in “Philips F15 Postlight.”

And there it was…
Philips LED Dimmable F15 Soft White Light Bulb

But the description didn’t promote it as a ’Postlight.’
And the technical details listed “Indoor use only.”

Still, there was that same photo on the packaging with the outdoor light post.

And in the user reviews, several talked about successfully using this bulb as their porch light.

The Fine Print
So what should we make of all of this?

I’m detecting a certain industry ‘hedge’ when it comes to screwing in light bulbs outdoors. No, my Philips LED doesn’t have a “use at your own risk outside” warning label. In fact, on the base of the bulb, the fine print said, “suitable for damp locations.”

So what’s the problem?

Well, Philips still seemingly prefers that you use its ‘postlight’ indoors.

But lamp posts live outside. And so does my porch light.

This Philips LED model number is #9290011822.
I’ll let you know how it goes…