At Home with Tech

Unlock the power of all your technology and learn how to master your photography, computers and smartphone.

Category: Tech Diary

Here’s Why Attaching a Bumper to Protect your Apple Watch is a Smart Idea

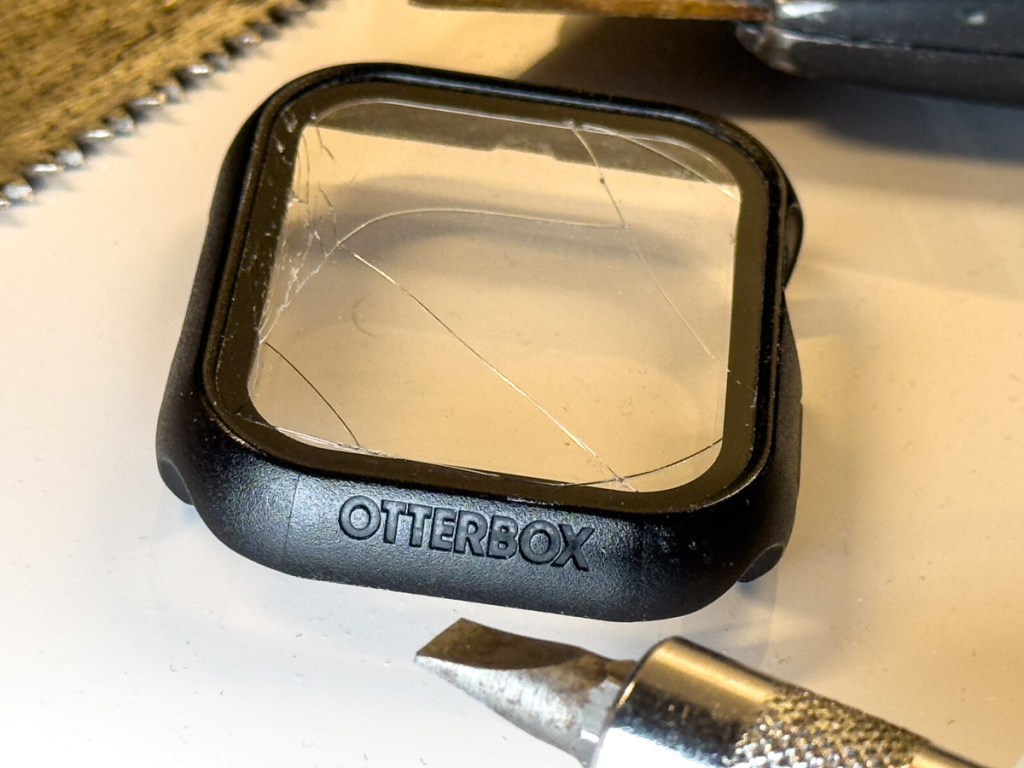
A long, diagonal crack mysteriously appeared on my Apple Watch screen. No, there wasn’t an ‘incident’ or moment of impact that I could recall. Yes, it was shielded by its OtterBox integrated bumper and screen protector. 

I could feel that the crack went deep. But I didn’t know how far down it went and whether it reached the surface of my Apple Watch Series 9.

Yes, I was concerned.

Apple Store ER Visit
So, I visited my neighborhood Apple Store and booked an ‘instant’ appointment with an Apple Genius. (Do they call them that anymore?)

My Genius walked over to me like a doctor entering an examination room. He asked me to take off my OtterBox’s bumper. I quickly realized I couldn’t. It was stuck on. Really stuck (like an alien face-hugging Xenomorph). I asked if he could help. He had trouble too.

It took the Apple Genius a couple minutes, and he needed to use a special Genius ‘tool.’ But eventually, he pried the bumper off. The integrated screen cracked further along the way, but it eventually revealed my Apple Watch’s screen… in perfect condition.

Phew!

But a fair amount of ‘particulate matter’ had accumulated in all the nooks and crannies. My Apple Genius happily polished it up for me and then handed over my Apple Watch. 

Time for Another Bumper?
My naked Apple Watch rested in my palm, gleaming. So now what?

No, Apple doesn’t sell bumpers or screen protectors for Apple Watch.

However, my Apple Genius mentioned how much he liked the OtterBox brand and that I could probably buy a replacement bumper online.

I strapped on my Apple Watch as it was meant to be worn… without any third-party protection. But I must admit… I do occasionally hit my wrist against doors and walls. So, my experience may fall outside of Apple’s definition of ‘normal.’

I walked out of the Apple Store with my next mission: Buy a replacement bumper. 

In Search of a Better Bumper/Screen Protector
I jumped back online and searched OtterBox’s website. I didn’t want to buy the exact same OtterBox ‘Eclipse’ bumper/screen combo. Not because it only lasted for barely more than a year. I didn’t appreciate how difficult it was to remove.

OtterBox didn’t offer another choice. So, I expanded my search.

There aren’t many manufactures in this market, and even fewer from brands I recognized. The options on Amazon mostly fell in the sub $10 price point. Sometimes, you’d get two bumpers for ten bucks… even with the built-in screen protector.

How good could any of these really be? 

And I couldn’t find consensus with reviews… the few that I could find. It’s like this was a forgotten/abandoned product category.

Perhaps Apple is right… Apple Watch doesn’t need protection.

Still, I knew that mine did. 

OtterBox EXO EDGE
After my exhaustive search through uncertainly, I eventually ended up back where I started with the one brand I knew.

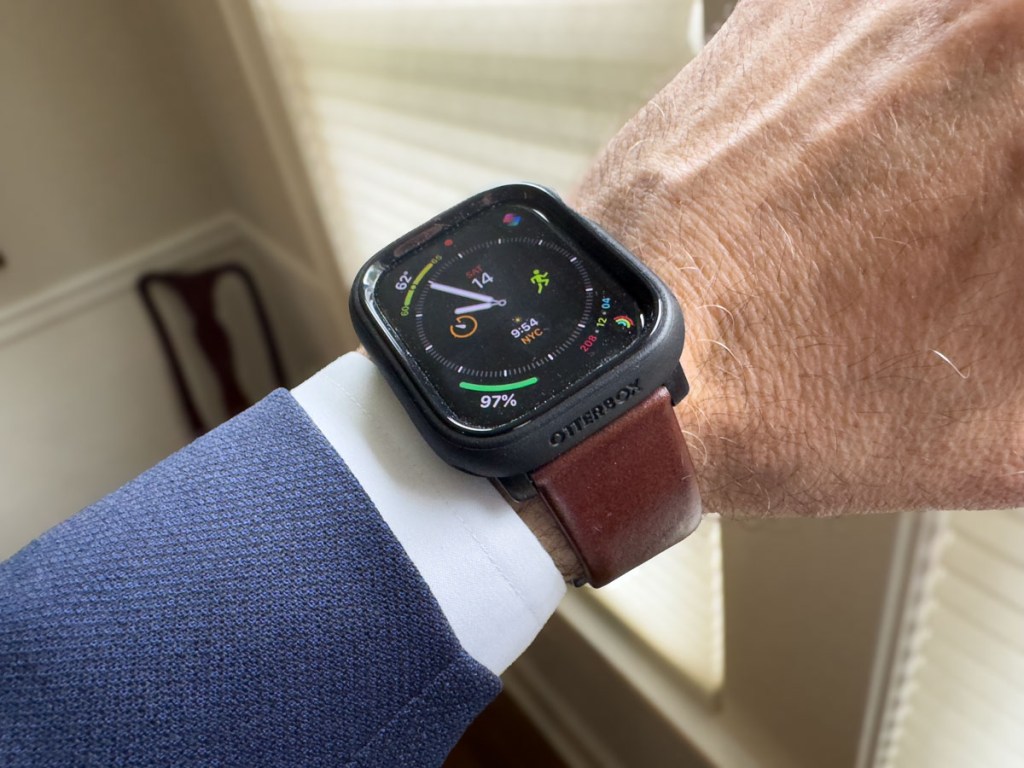
OtterBox also makes the EXO EDGE bumper without a screen protector. I figured the simple bumper by itself would be more structurally flexible without a rigid screen protector on its top.

So, I gave it a shot… Click.

And in fact, the EXO EDGE bumper does have a bit more give and take. It popped easily onto my Apple Watch. More importantly, I expect it will be simpler to remove when the time comes.

And here’s my Apple Watch with its new EXO EDGE bumper
(and Nomad leather band).

No More Screen Protection?
Case closed, right?

Well, what about the screen? It’s now exposed to any number of dangers with no net. 

Yes, I’d prefer to also have a screen protector on my Apple Watch, but I don’t want to use an integrated solution that can cause damage when removed.

My EXO EDGE bumper should offer sufficient protection from most scenarios. But no, it won’t protect against a sharp object at 90 degrees moving directly towards the screen.

You Can’t Protect Against Every Situation
I could seal my Apple Watch in bubble wrap and duct tape. Or perhaps I should just keep my Apple Watch in my pocket all the time. But, of course, that’s all absurd.

I’ve taken reasonable precaution to protect my Apple Watch’s body and screen with a simple OtterBox bumper. We’ll see how far this sensible approach takes me this time.

This topic falls under a larger question I sometimes have regarding the practicality of manufacturing expensive, shiny surfaces that require constant protection. (Wouldn’t it be great to drive a car with a tough, rubberized exterior?)

Alas, I know you’ve just got to travel your life’s path without worrying about every possible stumble.

But it’s okay to be smart and apply certain protections.

And just try not to trip.

From Dark Path to Smart Glow: My Quest for Backyard Solar Lights

We’ve set up a small fire pit area in our backyard, complete with a new Solo Stove and Adirondack-style chairs. After trying out our newly created outdoor space at dusk, I discovered a problem. It was too dark while walking out on the gravel path that leads to the back of our property and our Solo Stove. The path, which traverses a small slope in our yard needed a bit of lighting.

This requirement became clear while we were hosting dinner for a few friends on our deck. When we walked down the deck stairs in the near-dark onto the path to fire up the Solo Stove, my friend commented that it was hard to see the path’s surface for that final step down. 

That’s code for, “Someone’s going to break a leg!”

A leap of faith to my fire pit? Maybe tripping and falling down my little hill? No, that’s not what I was going for. So, it was time to illuminate the situation.

Solar Power to the Rescue
The obvious solution was to buy a few solar pathway lights. They charge up during the day in the sun, and then they shine throughout the night. There’s about a trillion of them on the market. They’re relatively inexpensive… some are under ten bucks.

I’m no stranger to this outdoor lighting strategy. I bought eight solar path lights years ago for the front of our house. But I damaged a couple with my lawnmower, and the rest broke or wore down over time. Ultimately, I didn’t replace them, as our landscaping focus moved to other priorities.

While that was a nice-to-have lighting solution, now I had a specific need. So, I began my research anew…

Shopping for Smart Solar Pathway Lighting
Solar landscape lighting tech hasn’t seemingly advanced that much. Some lights make it through the night. Others… not so much.

But that important variable really didn’t address my total need. I wanted more control of my solar lights, beyond set-it-and-forget it. I might choose to turn them on during specific nights or just when we’re hosting a party.

So, yes.. I’m talking about smart solar lighting. And yes, I wanted to control them with an app on my iPhone.

(Cue the tumbleweeds.)

Astonishingly, no company makes that for the consumer market. Well, none that I could find.

Nobody… except for Ring.

Ring Solar Pathlights
Ring appears to be the only manufacturer that’s in the smart outdoor solar lighting market. 

Ring’s Solar Pathlights integrate into Ring’s larger home security ecosystem… doorbells…cameras… alarms. Beyond the pathlights, the one extra piece of Ring gear you need is a Ring Bridge. That’s the Wi-Fi hub that connects these smart pathlights to Ring’s smartphone app.

App-tastic
And the app works great. You can manually turn all your pathlights on and off via the app. You can schedule them. You can let them go all night long.

You can also activate the built-in motion sensor on each Ring Pathlight (which aligns back to Ring’s home security focus).

Pricing
Yes, Ring’s smart solution costs more.

  • Each Solar Pathlight: $34.99 (There’s a 4-pack discounted bundle for $29.99 each.)
  • Ring Bridge: $49.99

So, all in… my 4-Solar Pathlight kit cost $169.91… plus tax.
(Compare that to a fifty buck price point for 4 old-school solar lights.)

But again, as best as I can tell, Ring is the only player in this market. So, I signed up and joined their team!

Set Up
Setting up my four smart pathway lights took a bit of time, but the process was straight forward.

  • Download the app onto my iPhone
  • Set up the Ring Bridge near a window facing my backyard
  • Add each Ring Solar Pathlight into the app (using the QR codes included in each box)

When that was done, I had total control of my new pathway lights, planted in our bed of pachysandra on the edge of the gravel path.

My Experience Using Ring’s Solar Pathlights
My current plan runs these lights from dusk till midnight. Since their positioning doesn’t give them a ton of direct sunlight during the day, I was originally concerned my solar pathlights wouldn’t have enough juice at night. Happily, that hasn’t been a problem. They’ve been operating just fine.

The pathlights’ overnight glow is moderate… not exactly ‘bright.’ But they do have more oomph. You can manually activate brighter settings (up to 80 lumens) for shorter periods or when their motion sensors turn them on. Clearly, their solar batteries can’t handle a 100% brightness load all night long.

That’s okay. Their illumination is sufficient, and I can kick it into a higher gear whenever I want.

What Comes Next
It’s odd this market isn’t more fully built out. But I’m happy with my Ring Solar Pathlight purchase.

No, I don’t own other Ring products. But now that I’m a part of its ecosystem, who knows what might come next… 

The Lester smart home is an always an evolving story.

Four Ways to Showcase your Best Family Photos on your Phone

Are you able to call up any family photo you want on your smartphone? If not, it may be time to update your photo-archiving plan. Here’s what I did.

Our teenage son asked me a question during dinner last week that I had a difficult time answering. He asked if I could show him some pictures from when he was younger. Pictures of when he was younger?! 

I had thousands of photos… tens of thousands from the past fifteen years! But where were they? Could I immediately call up any of these pictures that best represented his earlier years? 

Could I Meet the Moment?
Sure, I could flip though endless photos living in my iPhone. But that would take too long. I started sweating. 

For years, I’d been dutifully curating my family’s photos on my Mac using Adobe Lightroom Classic, but when I received this simple photo request, I wasn’t ready for it.

I took a breath. He kept eating. The opportunity was about to pass. Then, I pulled out my iPhone, opened Apple’s Photos app and quickly went… to my shared albums.

A Shared Photo Album Saves the Day
And yes, there it was… the photo album I had created years ago and shared with my wife that collected some of our Lester adventures. I opened it up, pulled up my chair next to my son and began displaying a few fun pictures from his elementary school years. He smiled, and after a few minutes, we agreed to look at more another time.

After he left, I exhaled. 

Whoa! That was a definite dad moment. And I almost blew it.

Set Up Cloud-Based Photo Albums with Easy Mobile Access
Afterwards, I thought about our exchange and wondered why I had been caught so off guard with this simple request. I’ve spent hundreds of hours working on our family photos over the years. My challenge was more about my phone having easy access to my curated photos from my multiple cameras. 

So, I decided it was time for a little review of my existing photo archiving process and how to give myself better mobile access.   

The obvious way to handle this need is to create cloud-based photos folders/galleries that you can easily view with phone apps. There are plenty of way to do this. But you’ve just got to maintain your plan and keep your albums up to date.

#1
Apple’s Photos App
For an iPhone user, Apple’s Photos app is the built-in solution. The only limitation to shared albums is the pictures are organized in the order you load them in, not in the chronological order of the photos’ time stamp.

A regular (non-shared) album that you set up just for yourself to sync with your iPhone will order the photos in the correct time sequence.

#2
Amazon Photos

Back in 2019, I started using Amazon Photos for my cloud photo archive. The big draw was it was free with unlimited storage of full-res photos… included in the cost of my Amazon Prime membership.

It has an app for my iPhone, and yes, I use it (though I didn’t have a photo album set up with my son’s pics).

The one problem with Amazon Photos is I do worry that one day, Amazon will abandon its interest in photos. And then… poof?

#3
SmugMug

So, I looked for a company with a more photo-centric raison d’être. And I decided to go with SmugMug. I’ve been curating my best photos with this platform across the past few years. 

Also with unlimited, full-res photo uploads, SmugMug has become the platform for my official family archive. But I’m being very ‘precious’ about which photos live there. I think about my SmugMug galleries as an archive that will be handed to the next generation. And I do pay $200+/year to maintain this current strategy.

Yes, of course, I have photos of my son in my SmugMug account, and yes, I have the SmugMug app on my iPhone for immediate access. But I’ve intentionally restricted the photos of my son to ones that more reflect his life’s milestones for future generations to see. (I’m still fine tuning this theoretical goal.)

So, SmugMug is missing a bunch of the fun photos that I’d otherwise want to share with my son today.

#4
Lightroom’s Mobile App
And then it hit me… All the above solutions require me to export selected, edited photos out of Adobe Lightroom Classic’s ecosystem. 

What I had missed was never setting up a syncing solution directly to Lightroom’s Mobile app. I suddenly realized that was the obvious hole in my photo-archiving plan. 

Oops. 

Of course, I already have a great photo collection of our son in Lightroom Classic. So, I loaded the Lightroom app onto my iPhone. Then, with one click, I synced the collection to my iPhone. 

Well, that was an easy fix.

I’m now prepared for my next dinner with my son.

Don’t Fall Behind
It’s important to never let up on any photo archiving strategy. You can see I’ve worked with several solutions over the years. (Part of that is intentional to help protect against unexpected digital-file loss.)

Good photo organization takes a life-long commitment.

If you can’t immediately access the photo you want on your phone, it’s a clue there’s more work to do.

Is your phone ready for your next dinner?