At Home with Tech

Unlock the power of all your technology and learn how to master your photography, computers and smartphone.

Category: Tech Fixes

How 3 Computer Screens can Enhance your Work at Home

If you’re struggling to manage multiple windows on your computer screen while working from home, then it’s time to get yourself more screen real estate. It’s okay to admit it. Six monitors might be too many, but here’s what I did to get to three.

How many programs or apps do you juggle on your computer screen during your work day? Several Microsoft Word docs? Perhaps a Google Slides deck? Emails? Multiple web pages? Texting program? If you’re a creative, maybe you’ve also got Adobe Premiere or After Effects running. Where can you possibly put all that? Sure, you can minimize and hide windows, but you know… out of sight… out of mind.

It’s a constant struggle to keep your desktop organized and quickly find what you need. And you can never see everything simultaneously. You’d need a massive screen for that.

Well, of course they make larger screens for your computer. And if paired with a laptop, you also get the extra benefit of having a second screen. But some people keep their laptop closed and just use their external monitor. I think that’s a missed opportunity.

Stop Looking through a Pinhole
I know. Lots of folks do just fine using their tiny 13” laptop screen. Heck, 15” laptop screens are considered massive by comparison. But I know I’m not alone in feeling even that’s not enough room to do your work if you spend most of your day on a computer.

An office environment can often accommodate for this need with multi-screen stations you can easily plug into. But if you’re working from home, you’re usually on your own to figure it out.

Well, I’ve got a bold message to share: It’s really time to stop struggling.

Stop ‘making do’ with your tiny laptop uncomfortably crammed in the corner of your home. Why not reprioritize your existence and acknowledge your reality? It’s not temporary anymore.

So go ahead and redesign your space to set up a larger monitor for your laptop. If you’ve already got one monitor, consider buying a second one!

Yes, you really need it! It’s okay to admit that you do.

And let me tell you, when you allow your field of computer-screen vision to spread out more, it’s like putting on glasses for the first time…. Simply glorious.

Adding a 24” Screen to a 27” Monitor on my Standing Desk
I’ve been using a 27” LG monitor for the past few years with my laptop. They sit on my 42” wide standing desk in my home office. But I finally decided it just wasn’t enough. I really wanted a three-screen setup.

My standing desk is positioned in front of a window across from a separate V-shaped desk that houses my personal Mac Studio and a 32” HP ‘Z’ monitor.

Years ago, I chose to separate my work and play spaces in my home office. Perhaps that’s unnecessary, but it feels right for me. So, on the days when I work from home, my commute is a simple 150° swivel of my chair, and I’ve arrived.

No, I didn’t have a ton of extra room on my standing desk, certainly not enough for another 27” monitor. But I believed I could squeeze in a 24” monitor to help me gain additional screen real estate.

I knew it wouldn’t look pretty. I wouldn’t win any home-office feng shui awards. It would be a “Matrix”- like clutter vs. an airy starship design. And that’s okay. You go with what you’ve got.

So, with holiday sales swirling about, I finally allowed myself the freedom to buy a second additional screen for my laptop.

My New 24” Dell Monitor
I went with a 24” Dell UltraSharp USB-C Hub Monitor (U2424HE). The ‘hub’ functionality made it easier to tether to my existing set up without having to buy a separate hub device.

The USB-C connection to my laptop also feeds power to my laptop, which is a nice bonus, reducing cable clutter.

The IT Guy Finds a Challenge
The setup mostly was plug and play, but you really must know where to plug everything in. There were no directions in the box. (The quick setup sheet didn’t talk about multi-screens.)

I eventually found the 116-page manual online. The PDF was crammed with every possible detail. It described 14 connection options, each pin designation for the RJ45 plug and the emergency steps to take if you have to quickly dump the warp core (Trekkie joke). I scoured though this manual nobody ever wants to read and finally found page 55.

MST on Page 55
It’s titled, “Connecting the Monitor for USB Type-C Multi-Stream Transport (MST) Function.” (MST? Are we supposed to know that acronym?)

In short, page 55 told me to connect the Dell to my laptop with the USB-C cable and then tether the two monitors with the DisplayPort (DP) cable. (easy)

And then it simply worked. All my screens began to glow, and so did I. But please take note that you really do need to bring your inner IT Guy for this.

The Power of 3 Monitors
I think the irony and the truth behind this story is my secret desire to ultimately surround myself with 360° screens. Well, I’m on my way…

For now, I’ve got my laptop screen, my 27” LG and my adorably mismatched 24” Dell. Everything fits. And the extra monitor really makes a big difference. (Barrett is happy.)
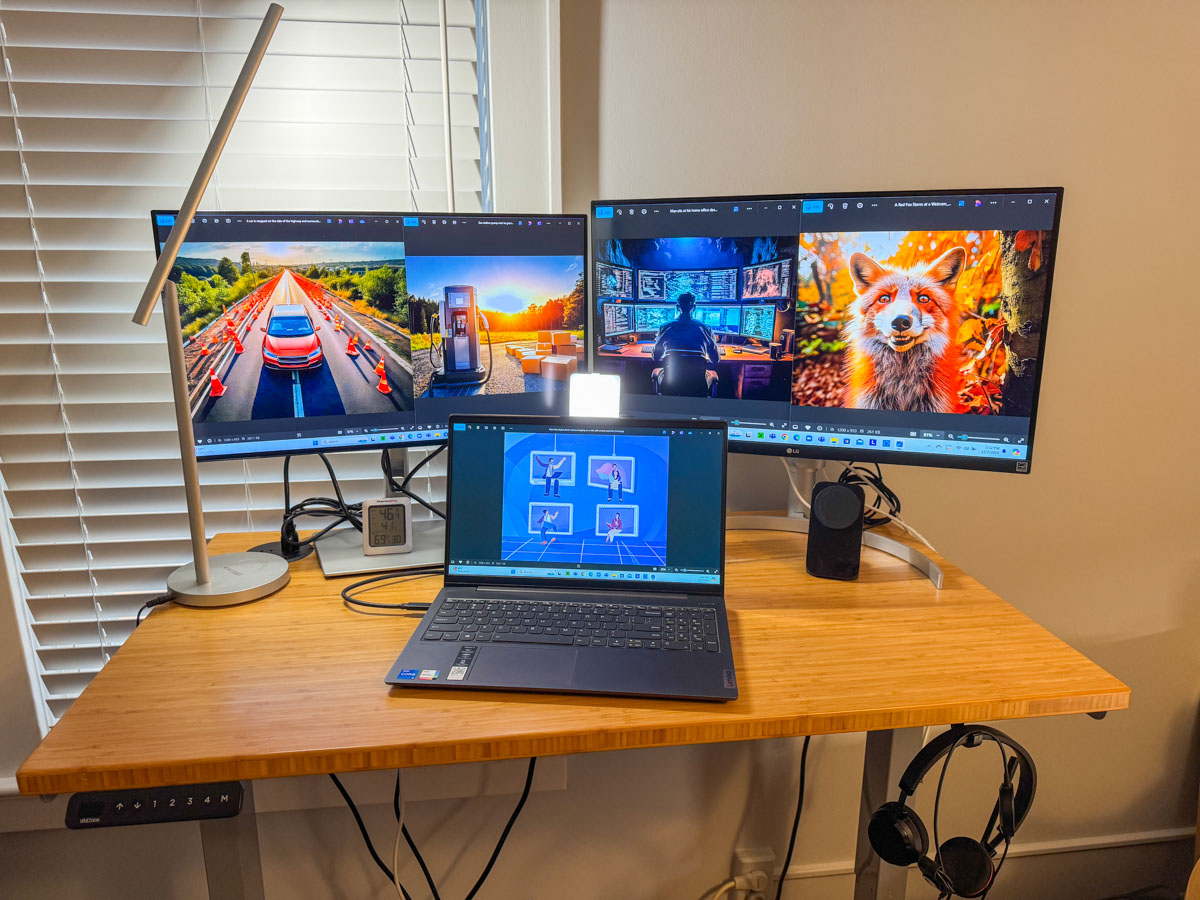
Here’s my upgraded standing desk setup with my personal laptop displaying Adobe Firefly images I’ve created for my blog.

Maybe one day, a less expensive next-generation Apple Vision Pro will transport me into a more evolved virtual workspace environment and better serve my needs.

For now, all that matters is I’ve successfully expanded my access and visual connection to the many details constantly flowing through my computer.

More clarity through working smarter. I highly recommend it.

Our Computers aren’t Built to Handle so Many Videos and Photos

It’s really simple to create media with our smartphones, and we’ve all become home filmmakers. But it’s becoming increasingly hard to store all the media files. If you’re not worried that you’ll eventually run out of SSD storage space in your Mac, think again. Here’s what you can do about it. (And it won’t take up a lot of desk space.)

A year back, I upgraded from my older 4TB iMac to my new 2TB Mac Studio. My decision to go with only 50% of the internal storage was based on Apple’s more expensive internal SSD drive pricing. (My old iMac had a larger, but slower, spinning hard drive, which is no longer part of the line up.)

I always thought that Apple would forever offer increased internal storage without charging more. (Aren’t we all needing more storage as we document our lives with photos and videos?)

But once Apple moved from HDD spinning drives to next-generation SSD drives, that equation imploded.

  • An Apple Studio with a 4TB SSD costs $1,200 more!
  • You can’t even buy an iMac today with more than 2TB of storage. And that will set you back $600-$800.

Something’s very wrong. We’ve got less to work with and paying more for it.

Still, pricing aside, I successfully deluded myself that didn’t actually need 4TB. (Ha!)

Better Digital Housekeeping?
Sure, I had filled up my old iMac’s 4TB drive, but I told myself that maintaining and transferring all that content from computer to computer was unreasonable. I didn’t need all of it within my internal drive. instead, I would offload much of it to external drives and my G-Technology RAID for long-term storage.

I brainwashed myself that the new 2TB SSD in my Mac Studio should be more than enough once I performed some long-overdue digital housekeeping.

That was just wishful thinking.

Face the Inevitable
Sure, I’ve done some media management, but my goal of a 50% reduction was unobtainable. Within a year, my 2TB internal drive was bursting at the seams. (And we all know that Macs aren’t built to allow you to later upgrade internal storage.)

And Apple hasn’t helped any by continuing to improve its iPhone’s capabilities to generate RAW photos and advanced video codecs (including ProRes files). All this means larger media files.

We’re all filmmakers now with the critical need to house our content libraries somewhere. What did they think was going to happen when we moved these huge files over to our Macs?

iCloud Storage?
Sure, I could export terabytes of my media into Apple’s iCloud ecosystem. But come on… that’s not really a good value proposition.

  • 2TB costs $9.99/month
  • 6TB is $29.99/month

Let’s do the math:
I would have to go with the 6TB plan, which comes out to $360/year. While that is surprisingly competitive with external hard drive pricing, across multiple years… it gets too expensive.

Certainly, $360 x multiple years is more than the one-time cost of buying a companion external drive. I know physical drives won’t last forever, and you’re supposed to upgrade them every few years. So perhaps a future iCloud storage plan could be a reasonable solution… if the pricing comes down.

SSD Drives
But what is today’s answer when your internal drive gets filled up?

Well, that’s simple: You’ve got to buy an external drive and plug it in. (I know I didn’t have to tell you that.)

The real question is what kind of drive?

To match the speed of your internal drive, you’ll want to buy a similar technology. If you’ve got an internal SSD, you should look at getting an external SSD.

So, that’s what I did.

Video Editing
Another question is what you want to do with the drive.

My most demanding task is editing my family videos and personal creative projects, which are all shot in 4K. Many of my video files are generated by my iPhone 15 Pro Max.

Plus, I’ve got:

So, perhaps my video editing needs are more advanced than the average user.

4TB OWC Express 1M2 SSD
All this said, I decided to go with a fast NVMe M.2 SSD. And I wanted to take advantage of the Thunderbolt 4 interface my Mac Studio offers. While there are many Thunderbolt 3 drives on the market, only OWC appears to offer a USB4 drive (same as Thunderbolt 4).

Now, some of you will immediately question my need for such a fast drive, and others will point out that thunderbolt 3 drives are fast enough for my media workflow. I know.

But this is a dizzying choice. So, I figured it’s best to go with a little more oomph than not enough.

So, I landed on the bus-powered 4TB OWC Express 1M2 SSD. (It’s an enclosure with the 4TB NVMe prepopulated.)
This Express 1M2 is blazing-fast, boasting 3200MB/s. It gets positive reviews, it’s compact and so far… it’s working great for me.

The Price for Performance and Peace of Mind
No, it’s not exactly cheap. (Remember, SSD technology is pricy.)

Yes, I could have saved more and bought a less expensive NVMe separately and popped it in an empty OWC 1M2 enclosure. But… I’m a baby.

Really, I just want this thing to work out of the box. Sure, plenty of you may chide me for being so ‘tech-timid.’ But hey… I’m not ‘Mr. At Home with IT.’ I know my limits. I’m not building my drives. I’ll buy them pre-built, thank you very much.

I just want some peace of mind. (Sure, I back up my files, but that’s also a complex equation.)

So, yes, I’m willing to pay a little more.

Build a Big Enough Home for your Files
Let’s review:

  • I bought a new Mac that had 50% of the internal storage of my old Mac
  • I inevitably ran out of space
  • A year later, I spent more money to buy a companion OWC drive for my Mac
  • I plugged it into my Mac Studio via a Thunderbolt 4 port, and I’m back in business

Yes, my story has a happy ending, but I’m not that happy.

Sure, maybe I have more media storage needs than the average bear, but not by that much.

I think today’s new computers simply need more internal storage. The fact that Apple sells its base-level computers with only a 256GB SSD is absolutely silly. (I could choose a stronger word.)

The lesson here is over the years, you’re going to need a bigger hard drive for your computer. And you’re going to pay for it one way or another.

So, plan for the future.

How to Slow Down the Inevitable End for your Beautiful Tech

Yes, I immediately ruined the sleek beauty of my new Apple Watch by strapping a protective bumper over it. Was that necessary? Here’s what happened the very next day…

Design is a key element for the look of your personal tech. Sure, how your gear works is important, but it sometimes feels like style supersedes function.

So, if a piece of technology is designed to look beautiful, covering it up can be viewed as something of an insult. Or at the very least, you’re certainly not cool.

But the reality we move through every day doesn’t usually contain smooth edges and gleaming surfaces, unmarred by the brutality of existence. Wearing expensive and beautiful personal tech in an unpredictable and messy world creates inevitable danger for your devices.

Let me count the ways I’ve put my tech in harm’s way.

Projectile AirPod
During the latter part of the pandemic, I was walking to work from Grand Central Terminal wearing my Apple AirPods. When I stepped into the crowded office elevator ten minutes later, I temporarily popped on a face mask.

As I exited the elevator onto my floor, I quickly pulled off my mask. That was a mistake.

One of the mask’s ear loops caught the left AirPod, and a rubber-band effect propelled it forward into the elevator-bank hallway.

My AirPod flew towards the wall and hit it hard (with a horrible ‘ping’ impact). It ricocheted onto the floor and then skidded about like a glass marble. I chased after it in horror.

Somehow, my tiny AirPod seemed undamaged.

Apple Watch Scarface
Five years ago, I bought my first Apple Watch. Of course, I immediately bought a plastic bumper for it, which provided a protective raised edge.

I had to ruin my Apple Watch’s sleek beauty in the name of common sense. I often whack my wrist on objects. I felt the watch would simply never survive.

And for years, the bumper worked just fine. Then one day, I looked at my watch to check the time, and I saw a diagonal scratch on its face. There had been no impact that I could recall. The silent attack obviously came head on and avoided the bumper.

It would have been a more crushing moment had it occurred earlier in my Apple Watch’s life, but it was still annoying.

That said, I often spot people living with mutilated smartphones, the spider-cracks spanning entire screens. And these people act oblivious to the damage, since the screens somehow continue to function. (But I know they must be crying inside.)

My Apple Watch’s singular scratch was a laughable inconvenience by comparison.

OtterBox Bumper
I finally said goodbye to that scratch when I recently upgraded to my new Apple Watch Series 9.

And this time, I not only bought a bumper to protect my new Apple Watch’s edges, I found a model with a built-in screen protector. Yes, please!

While not exactly inexpensive, I think the OtterBox Eclipse is well worth its cost for the added screen protection.
So, I popped on the Eclipse. A warm feeling of invincibility washed over me (silly human).

A Danger at Every Corner
The very next day, I walked up to my closet to pull out my sneakers. I used my left hand, which was sporting my new Apple Watch. My hand almost imperceptibly brushed against the door frame’s edge as it moved in for my sneaks, which were jammed in the left corner.

An hour later, my heart skipped a beat when I realized there was a long horizontal scratch by the OtterBox’s lower edge.

What?! This is day 2 for my new Apple Watch! And I’ve ruined it already?!

I looked closer…

Phew. The scratch was actually on the OtterBox case… not the Apple Watch. (Yay OtterBox!)

And it wasn’t a scratch. It was a whisper-thin line of paint that had rubbed onto the case from my painted door frame as my wrist brushed by.

Was my brand-new OtterBox case now permanently scarred? Not necessarily.

Scrub Up
I quickly set up a mobile tech repair station on my dining room table with a bottle of rubbing alcohol and a folded strip of paper towel. I dabbed an edge of the paper towel into the rubbing alcohol and then very gently ran it over the line of paint on my OtterBox case.

It was critical not to overexpose the OtterBox case to the rubbing alcohol as it could ruin the case’s finish. And of course, I knew not to touch the screen protector with the rubbing alcohol. (I’m not a chemist, but I didn’t want to discover how quickly I could do even more damage.)

My light-touch strategy worked. The paint disappeared, and my OtterBox case looked like new. Life was good again.

Have a Repair Plan
One more word: AppleCare.

You can cover up your tech all you like. Sometimes that’s not going to be enough to protect it. You might say that damage is inevitable. It’s just a matter of when and how.

You can’t control everything, and that’s okay.

No, it’s not a good idea to catapult your AirPod onto a marble wall. Try not to drop your smartphone on a cement sidewalk or whack your Apple Watch onto what feels like a diamond-edged wall corner.

But when you do, having paid a little more for a repair plan certainly helps.

Bumpers for Bumps
After AI takes over the world, I expect personal tech design will no longer focus on physical beauty. I imagine the iPhone 45 may be a gruesome-looking device with sharp wires fused to our skin like a Star Trek Borg interface.

Until then, we must endure the limits of sleek and delicate design for our personal tech and do our best to protect against the bumps of daily existence.

Otherwise, your gear’s ‘End of Life’ may come sooner than you’d prefer.