At Home with Tech

Unlock the power of all your technology and learn how to master your photography, computers and smartphone.

Category: Tech How To

How to Organize Vacation Photos to Tell a Complete Story

This is the start of our recent trip to Alaska. Here’s why this type of ‘reference photo’ is so important when you want to curate a complete visual story of your vacation.

After a family vacation, I always like to go through my photos and pick out the very best ones. Actually… the best few. (And that’s usually harder to do than you might think.) They’re the ones that really tell the story. And I’m talking under 40-50 pictures.

If you’ve tried a similar exercise, you know what a challenge this can be. Sure, creating a photo book with hundreds of your vacation photos doesn’t require you to choose from all your darlings. But if you’re going to simply show off your photos from your phone to family and friends, their eyes will quickly glaze over after only a dozen of your finger flips.

You’ve got to keep your presentation short. And you should choose the pics that go well together and represent the total arc your trip.

Ideally, they should also visually represent the key information about your travels. Sure, you can audibly fill in the details through a little voice-over support as you share your pictures in the moment. But I think the best collections of family travel photography don’t require that. The photos should stand on their own.

The 3 Categories of Vacation Photos

To create the best collection of vacation photos, you’ll need to take and include three types of shots.

#1 – The Money Shots
It’s obvious that you’ll want to show off your ‘money shots.’ These are your best photos of the ‘place’ you’ve visited. Whether it’s the natural beauty of the wild or a famous urban landscape, those are the photos that anchor your entire trip.

#2 – Your Selfies
And then we all know to snap some selfies along the way (or ask a friendly tourist to take a posed shot of you and your family). You’ve got to include a few of those shots in your collection, right? That’s what makes it your trip.

#3 – Reference Shots
This third category isn’t intuitive, and you’re not going to realize you really need them until you try to put your collection together. I call them reference shots. Think of them as the thread that stitches your whole photo story together. In many ways they’re like an establishing shot in a movie.

These shots provide the context you’ll want for your other photos.

The Boat
For example, on my family’s recent vacation to Alaska, we went on an amazing day cruise on Prince William Sound to get up close and personal with a few glaciers. It was incredible. So sure, I got tons of shots of the glaciers and some shots of my family posing in front of the glaciers. But I almost forgot to get a shot of the boat we were on.
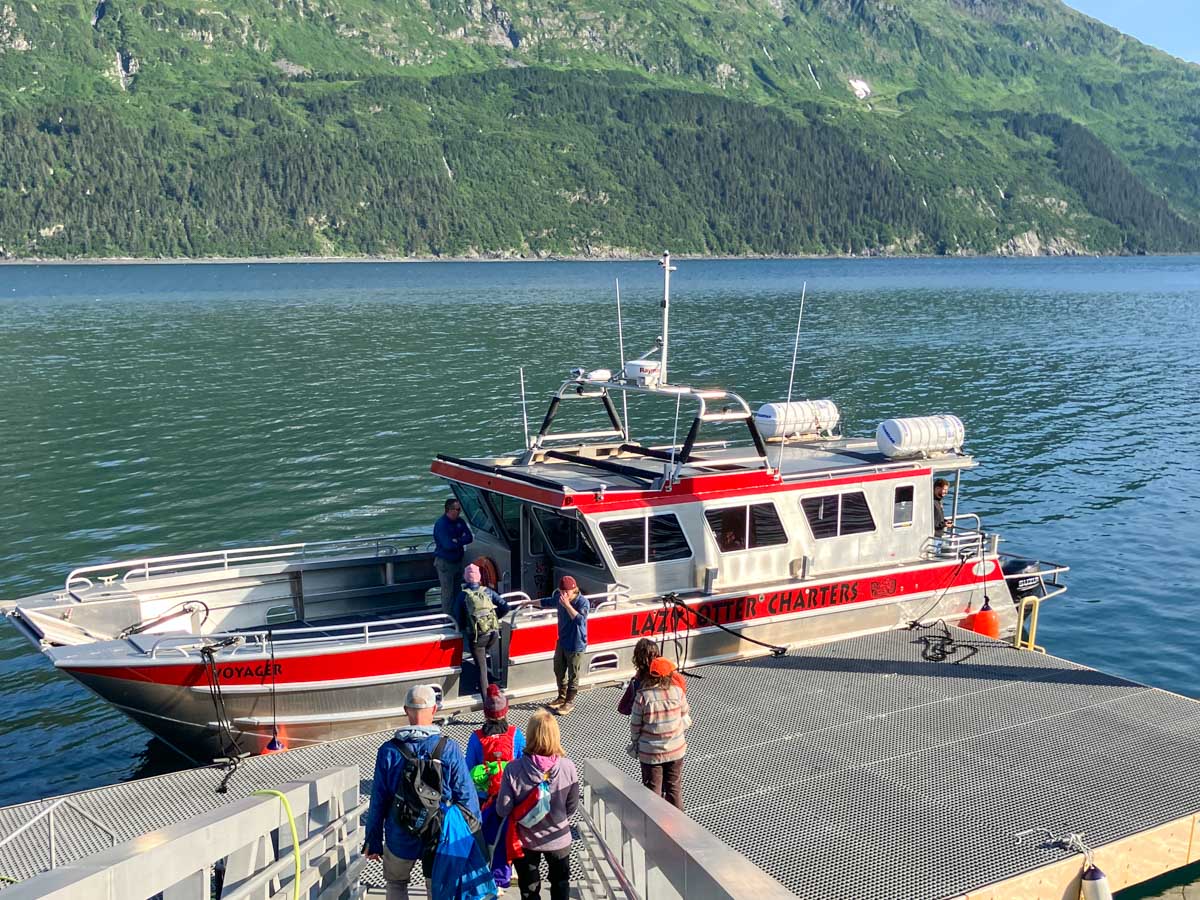
The boat was really a big part of the story… We were on Prince William Sound… and cruised right up to a glacier… and there we are… on this boat. It’s so important to complete the visual sentence.

The Trailhead Marker
Another example: We took the hike of a lifetime right next to Exit Glacier in Kenai Fjords National Park up the Harding Icefield Trail.
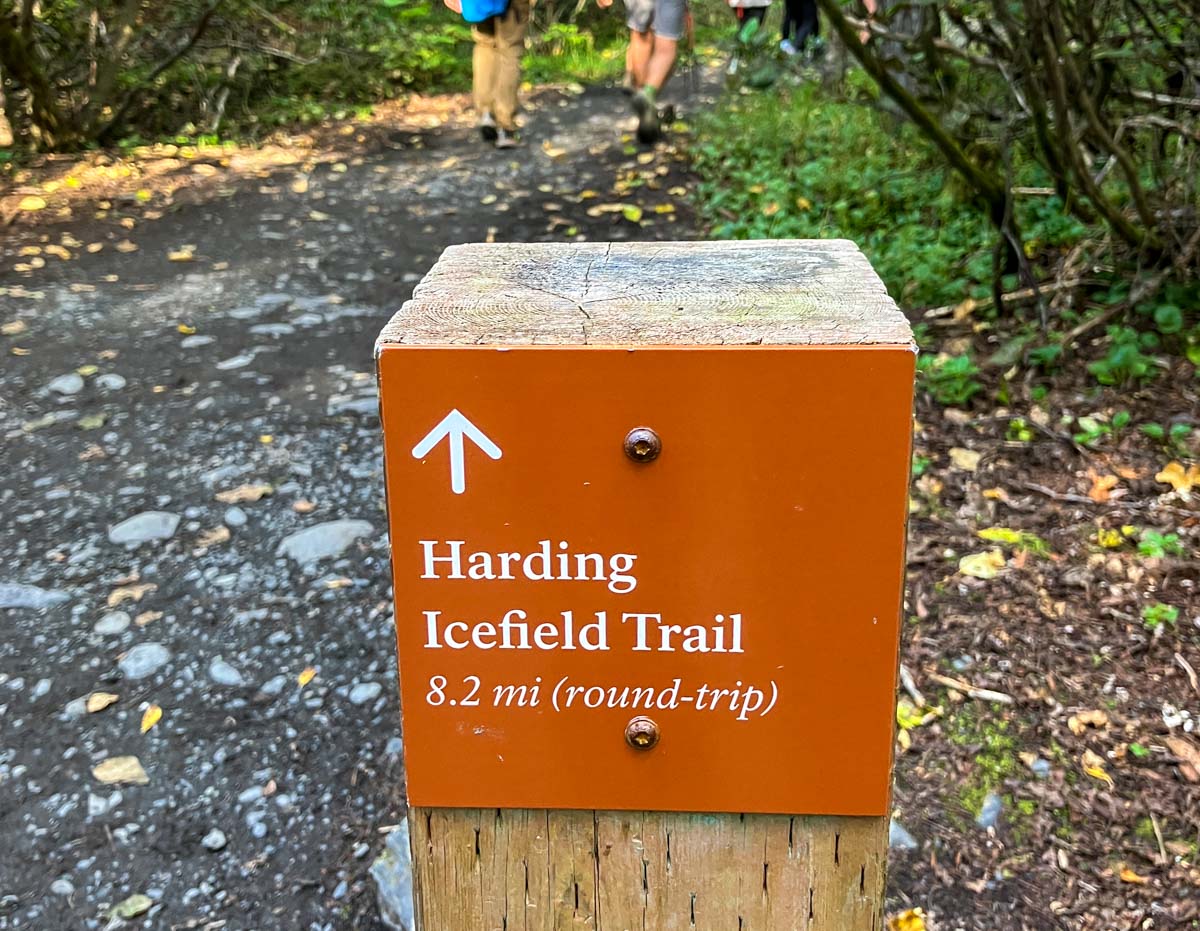
The money shots were a couple hours away up the trail, but I intentionally dragged my feet at the beginning of our hike to let everyone in our Backroads group walk ahead of me as I shot the trailhead marker that contained the key details.

The Name of the Place
Ideally, it’s great to find a shot that includes the actual name of your location. That’s so helpful, especially as an opening shot for your visual story.
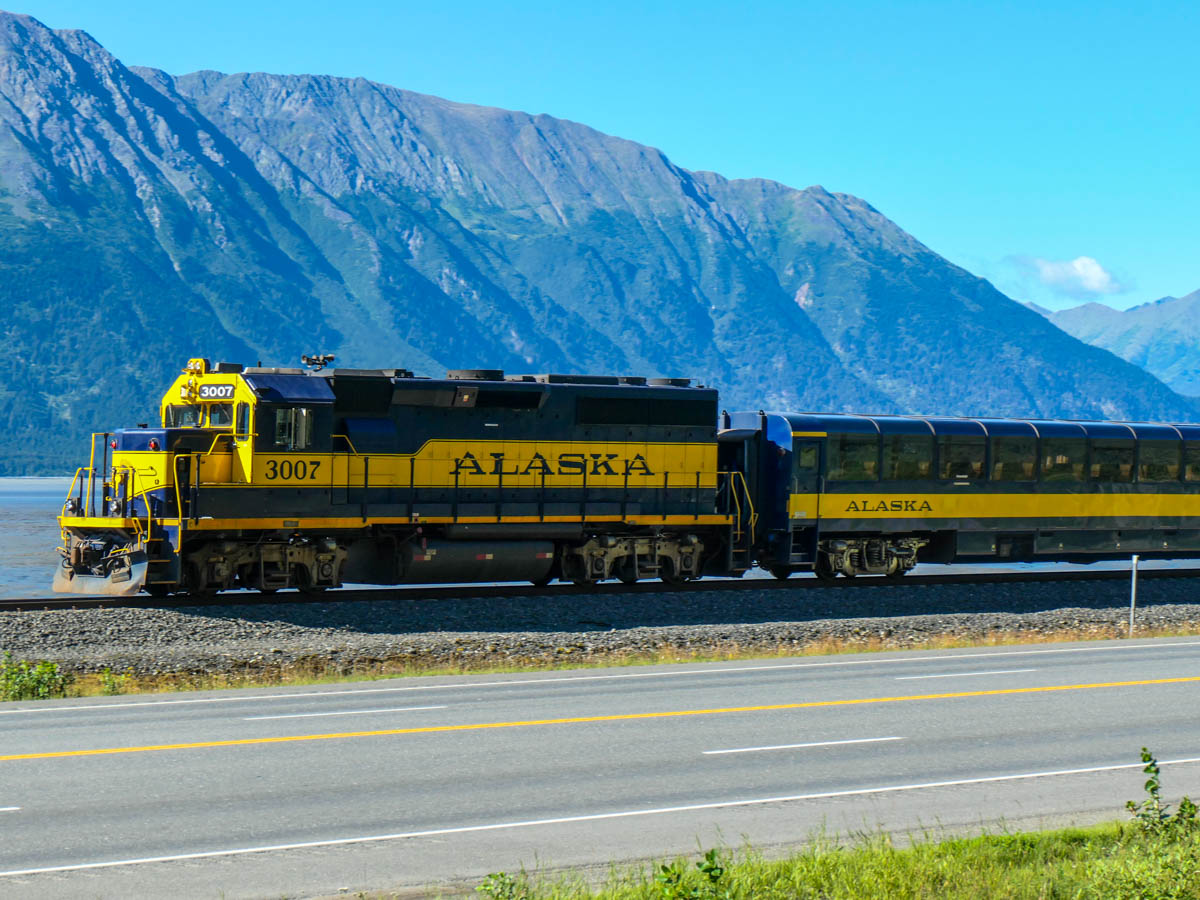
I found my ‘Alaska’ shot spontaneously as we were biking the Bird to Gird path along the Turnagain Arm. Suddenly an Alaska Railroad train roared by. I braked, grabbed my camera from my belly bag and snapped my photo!

Set Up your Visual Story
These reference shots are easy to forget. But they’re the glue to help group together all your other photos and represent a complete story.

In the same way that any written story has a beginning, middle and end, so should your collection of vacation photos.

Whether you think of them as ‘reference’ or ‘set up’ or ‘establishing’ shots, just a few of them can serve this need exceptionally well. You just have to be mindful to find them along the way.

Don’t Dilly Dally
And if your traveling companions glance at you quizzically the next time you take an extra few beats to snap one of these shots, just remember the value they represent.

Even through you might then have to hoof it to catch up to the rest of your group (guilty), it’s worth it.

Just don’t take too long. Otherwise you’ll risk falling too far behind your own story!

How to Protect the Camera Lenses on the Back of your iPhone

If you worry about destroying your iPhone’s three camera lenses, you might want to consider buying a case with a lens cover.

In many ways, the most prominent feature of an iPhone is its camera system. Being able to make a phone call these days is almost an afterthought. And those three camera lenses on recent iPhones are fairly large. Long gone are the little lens dots on the back of smartphones.

As I began to consider my daily life with my brand-new iPhone 15 Pro Max, I thought about how to best protect its three lenses from damage. Of course, I know I’ll be constantly placing my new iPhone on various surfaces facing up to maximize its ‘always on’ trick. (Love that!) And in practicing this technique, my iPhone will always rest on its camera lenses.

That doesn’t feel quite right.

A Standard Case Won’t Cover Every Danger
Sure, many iPhone cases have a lip surrounding the lenses that prevent direct contact. Other cases can even out the back side of an iPhone, so it becomes one flat surface without the lens bump. Then, they won’t protrude at all.

But those three lenses are still unprotected and exposed to the grimy elements.

You wouldn’t mistreat any other camera lens that way. You’d have a lens cap for it, right?

What happens to those three iPhone lenses after daily contact with any number of surfaces? Wouldn’t that eventually smudge and scratch them, affecting the optics of all your photos and videos?

Sure, the little camera lenses are natively constructed with sapphire crystal lens covers. Does that make them impervious?

A Genius Perspective
So, I brought my concern to a couple Apple Genius’s when I picked up my iPhone 15 Pro Max at the Apple Store.

One mostly brushed off my question as irrelevant. He said that he simply wipes off his iPhone’s lenses for smudges and they’re ready to go. He said otherwise, he “doesn’t think much about it.”

Whenever I visit an Apple Store looking for answers, I often quiz multiple Geniuses. So, I kept going…

I found another Apple Genius who appeared more analytical. (Maybe it was the glasses.) He told me that all flat clean surfaces were safe to rest an iPhone on. I should just be mindful of avoiding gritty surfaces. Those “might” scratch the camera lenses.

I felt a bit better with that answer. But life isn’t flat and clen. Life is gritty, especially when you least expect it.

An iPhone Case with a Lens Cover
The standard solution of simply wiping off my three little lenses with a microfiber cloth (or my sleeve) just wasn’t going to cut it. I knew I wanted a more comprehensive plan.

Question: Had any iPhone case manufacturers yet designed their cases with a dedicated lens protection solution? After a little quick Googling, I realized that in fact, yes… some of them had.

Though I may be in the minority for wanting this extra protection, I decided to buy an iPhone case that offered a protective lens cover.

Cases for new iPhone models take time to enter the market. So, I looked for a quick and dirty solution to help my iPhone’s lenses avoid the grit.

I found two types of cases built with little plastic covers that shielded the camera lenses. They moved one of two ways:

  • Sliding over and away (left to right)
  • Folding over and back (like a little door)

SUPCASE Closed-Door Solution
I ended up trying out the tiny door concept with the SUPCASE UBMag XT Case.
Amazon has it for $26.99.
The little lens door locks in place when it’s closed and is appropriately stiff as you move it. (The plastic flap doesn’t swing around when it’s open.) The door can also double as a kickstand for your iPhone.

The SUPCASE allows for MagSafe charging and magnetic grip, and functionally works just fine.

Most importantly, the “closed door” gives me peace of mind as I move my iPhone and its three camera lenses around.
All this said, the lens cover does require the extra step of opening it before taking a photo. So, in those spontaneous moments, you’ll inevitably lose a second or two before getting off your first shot.

Cautious Optimism
I wanted immediate protection for my new iPhone, and for a case in the sub $30 category, this was a solid choice. It’s a good way to begin ahead of other iPhone 15 Pro Max case options entering the market.

Does that mean I’ll eventually upgrade to another case? Perhaps. No case will last through your iPhone’s expected lifetime. My iPhone cases have all shown wear and tear long before that. But isn’t that the whole point?

The case takes the licking, and your iPhone keeps on ticking.
(Wait…that’s another brand.)

Bottom line: My three new camera lenses now have their extra layer of protection. Do they actually need a cover? Who really knows for sure…

But the idea of it certainly makes sense to me.

Case closed.

8 Ways to Quickly Get your New iPhone Up to Speed

I’m the proud owner of my new iPhone 15 Pro Max. Beyond the basic set up, here are the next steps I took and extra purchases I made to quickly unlock my iPhone’s full potential.

Buying a new iPhone and setting it up is easy. But integrating it into the daily routines of your old device is not as simple as you might expect. Sure, migrating apps and data over is straight forward, but’s that’s not everything you need to think about. There are other steps to take and more decisions to make surrounding your core purchase.

It’s been five years since I bought my recently departed, beloved iPhone XS Max, and I found myself a bit rusty on remembering everything I needed to take care of surrounding my iPhone 15 Pro Max purchase.

Here’s my guide with eight tips to help speed the entire process and get you quickly up and running with your next iPhone.

#1
Be Sure to Join the Virtual Line Early on Launch Day
If it’s time to upgrade to your next iPhone, then it makes sense to buy one the day it’s released to maximize its twelve months of being the ‘latest and greatest.’ I bought my iPhone 15 Pro Max online at 8:20am the day of its launch. It arrived a week later, and I picked it up at the Apple Store. Sweet.

But that happy story first required 25 minutes of frustration, persistence and I think a dash of luck.

I sat down at 7:55am EDT in front of my Mac Studio on launch day and promptly waited for the Apple Store to open for business. (Yes, it’s usually down during the hours ahead of a new iPhone going on sale.) The Apple Store didn’t open (for me) until 8:05am. And then it took another fifteen minutes of multiple failed purchasing attempts (as I fought others around the world to be among the first new iPhone owners) before the transaction finally went through. (I’ve had the same challenge over the years when buying an iPhone on day 1.)

Apparently, I just squeaked through before the delivery times began to slip into October and November.

So, it clearly pays to be prompt and close to the front of your virtual line.

#2
Buy More Storage than You Think You’ll Need
Five years ago, I wrote my blog post, “Why Do You Need an iPhone with 512GB of Storage?” And while I recommended the idea of having what was at the time a ridiculous amount of storage, I ended up sticking to 256GB. This time, 512GB was a no brainer for the extra $200.

The choice was whether to spend another $200 on top of that for 1TB.

While I’m enamored with the idea of recording Pro Res video clips, I no longer feel the need to permanently house every piece of media I generate locally on my iPhone. With that strategy, even 1TB storage would eventually not be enough.

The truth is you can’t carry around every digital media file you’ve ever created. And I would also argue why would you? That would be a crippling number of videos and photos to manage.

Sure, I’m always impressed when a parent can pull out their iPhone and quickly flip through tens of thousands of photos to find that one cute photo of their kid from a decade ago. That’s a superpower I don’t have. And I’m willing to bet that no one will be able to retain that capability forever. You can only flip though so many files before your finger falls off.

#3
Buy the 20W USB-C Power Adapter
Apple’s 20W USB-C power adapter is the new norm. Goodbye tiny 5W adapter (though it will still work slowly in a pinch). Unfortunately, you don’t get a 20W adapter in your iPhone’s box (just a USB-C cable). So, you’ll need to buy one separately if you don’t already have one.

#4
Replace your Lighting Cables
I’m sure you know by now that the Lightning connector is out, and USB-C is in for the iPhone 15 line. Yes, you do get one USB-C cable in your iPhone’s box, but that’s not going to be enough, right?

You’ll have to replace your existing arsenal of Lightning cables to maintain your new iPhone’s power/charging stations.

And if you intend to continue using your old USB-A chargers, you’ll need to buy some USB-A to USB-C cables.

#5
Buy a Case with a Camera Cover
Choosing a protective case for a new iPhone can easily become a complex decision. Unless you take the path of least resistance and go with an Apple case, it could be weeks of research before you come to a decision (guilty).

I wanted a case ready to go for my iPhone 15 Pro Max (essentially as a temporary solution, if need be). So, I took a chance and ordered one on Amazon before my iPhone arrived. That’s way early, because case manufactures are still guessing a new iPhone’s physical specs at that point. But I did okay.

The case fits really nicely, and its distinguishing feature is its little folding door cover for my iPhone’s three camera lenses.
Protecting those little lenses was on my mind, and this quickly took care of that concern!

#6
Unpair and Pair your Apple Watch
Your Apple Watch is an intensely faithful device. It sticks to only one iPhone at a time. If you think that by simply cloning your old iPhone’s identify into your new iPhone, your Apple Watch will gleefully follow along, you’d be wrong.

Your Apple Watch needs to literally break up with your old iPhone and then marry your new iPhone. So that means first unpairing it. And then pairing it again.

It’s not an especially quick process. So, set aside a half hour or so for this.

#7
Sign Back into your non-Apple Apps
Yes, your iCloud apps will be ready to go. But for everything else… nope.

You’ll need a chunk of time to sign back into the rest of your apps.

#8
Add a MagSafe-Compatible Charger for your Car
And then there’s your iPhone’s car interface. No matter how you connect your iPhone in, you’ll want to consider how it’s positioned in your car (perhaps mounted to your dash). A MagSafe-compatible solution is a good idea for both positioning and charging.

I picked up Belkin’s Magnetic Wireless Car Charger that’s MagSafe-compatible and mounted it to one of the air vents on my dash.
The magnetic grip is plenty strong. The vent mount slides in fine, though it does feel a bit ‘MacGyvery,’ (which in fact it is).

Technically, it’s not an official MagSafe mount and thus doesn’t charge as fast. (Belkin’s upgraded MagSafe model is the real deal, but it’s quite pricy at a hundred bucks!)

This one works just fine.
Click.

For the record, I also saved some money on my Belkin charging mount by buying a used one. I clicked on Amazon’s “Saved with Used – Like New” icon for $41 bucks (same model). It really was like new, and I saved almost twenty bucks. So, if you see that purchasing option, I think it’s a good idea for this type of support tech.

One other note… Some magnetic mounts are just that… magnetic. They don’t offer charging. So, check the fine print when reviewing your choices.

Doing the Work Pays Off
Getting your new iPhone back into the groove of your old device takes some planning and additional spend. Sure, you may have the latest and greatest in your pocket, but no smartphone is an island. It will also need its own accessories to be able to keep up in your orbit.

You’ve taken years to curate the experience you want from your iPhones. Only when everything is literally back in place and properly supported will your next iPhone really feel like… yours.

I recommend making this a weekend project. That’s what I did.

It’s time well spent, and let me tell you, there’s no better feeling than starting a Monday morning with your gleaming piece of new Apple tech operating at its full potential.