At Home with Tech

Unlock the power of all your technology and learn how to master your photography, computers and smartphone.

Category: Tech How To

This Visual Upgrade will Instantly Improve your Experience Working from Home

It may be finally time to build out a multiscreen home office work space. Here’s what I did.

Ironically, working from home during the pandemic has contained some silver linings. But not having access to a fully decked-out office computer station with multiple monitors can be limiting.

So, I bought myself a new second monitor for my home office. It paired up with my work PC laptop’s screen to provide more room for all of the open windows that collect throughout the work day.

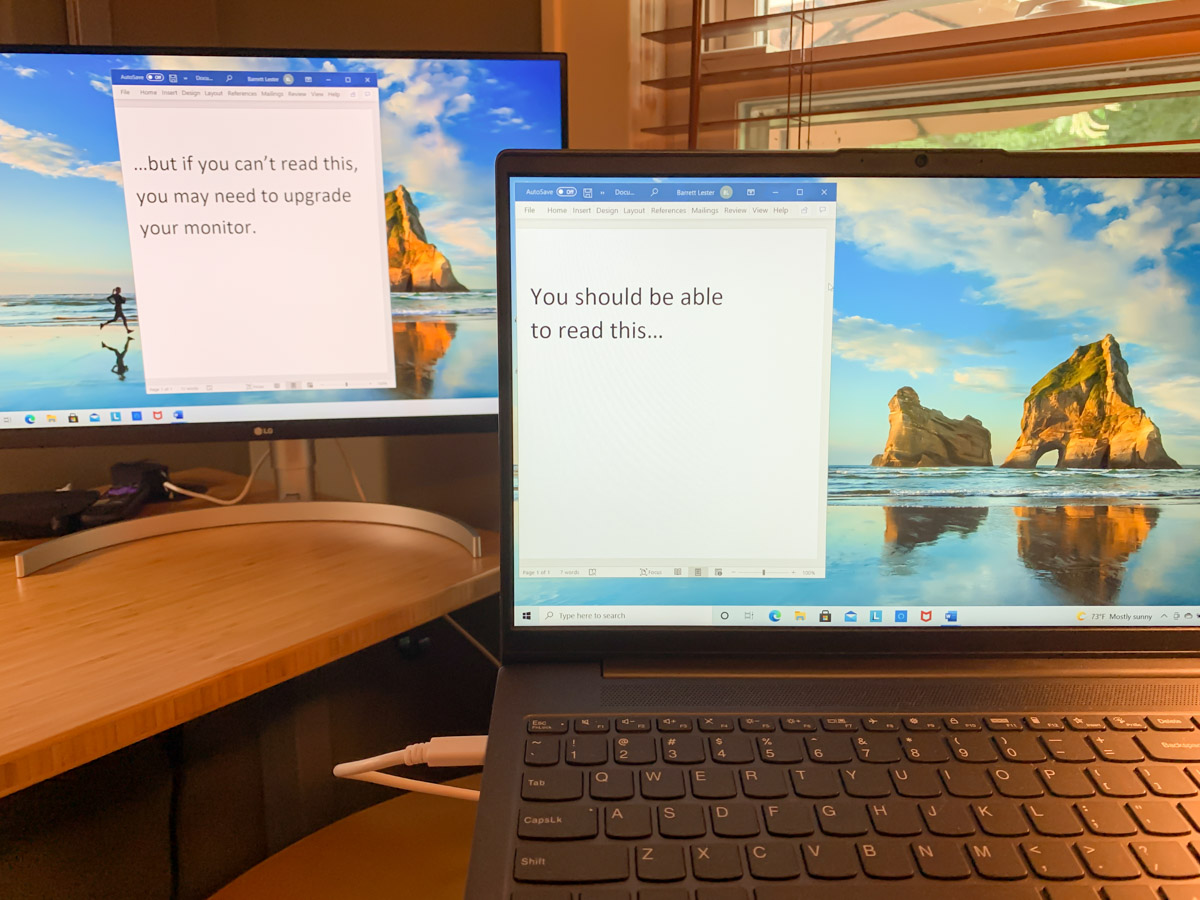
During the early months of the pandemic, I repurposed my old Sony 21” LCD TV and connected it to my laptop via an HDMI cable. I thought I was so clever MacGyvering it, but its non-HD resolution wasn’t doing me any favors. Sure, I could extend my laptop’s screen, but the clarity on the Sony wasn’t there. If I came across small text, I often had to move it over to my laptop screen to be able to read it.

Favoring one screen over another adds unnecessary complexity.

Though I did eventually have another monitor solution temporarily in place, it was clearly time to upgrade my own gear. Not to mention a long-overdue reset surrounding my mindset over these many months.

Post Pandemic Mindset
The pandemic forced me and so many others to instantly adapt to a 100% work-from-home lifestyle. There were inevitable compromises where functionality trumped form.

  • Were you connected?
  • Did you have a comfortable location to do your home video conferencing?
  • Could you simply get your work done?

It wasn’t perfect, but it didn’t matter. My laptop’s second screen wasn’t great, but I didn’t feel it was an important enough limitation. (So I needed to squint a little.)

But thankfully, we’re moving away from that bunker mentality as life begins to return to normal in the US. Coming back to the office is on the horizon for many. But it’s going to be different.

Band-Aid Solutions No Longer Needed
Hybrid work will include working from home as a new norm as opposed to an occasional convenience. Even though remote work existed long before the pandemic, I think many of us viewed it as an infrequent arrangement that didn’t require fully-built-out technical solutions. Again, function over form.

But the pandemic forcibly evolved the very concept of working from home as a new standard. New hybrid work schedules are on the horizon. So, if you haven’t already done so, it’s probably time to finally focus on form over function when working from home.

For me, that meant upgrading my second screen for today and into the future.

The Power of a USB-C Connection
My first thought was to simply purchase a computer monitor with 1080 HD resolution and connect it via HDMI. That’s a cost-effective strategy to get the job done. But it’s based on older tech.

Newer computer monitors include a USB-C connection. Sure, that makes the screen more expensive, but it opens up a huge opportunity for your computer.

Laptops are notorious for not having enough outputs for peripherals. But if there’s a UBB-C port, that connection can do much more than simply connect to a monitor.

You can multipurpose one USB-C connection:

  • Feed your second computer screen
  • Power your laptop through that same USB-C feed
  • Connect an external keyboard and mouse via the monitor’s USB-A ports

It’s a no-brainer.

After I came to that conclusion, my next challenge was figuring out which monitor to buy.

Billions of Choices
I’d like to say that I combed through every option on the market. I didn’t. That’s an overwhelming exercise. Instead, I called B&H and asked for some help. And I got it. The affable sales consultant and I agreed on these specs:

-27” screen size (based on my own workspace)
-4K (Future-proofing choice)
-USB-C input (the golden connection)

Then, he offered me a few options, and we quickly landed on this LG 27” 4K screen:

The LG had everything I needed, and I liked it because it has built-in speakers. (The B&H consultant also mentioned he was partial to LG monitors.)

I said, “Let’s do it!”

And my new LG screen arrived two days later.

You’ve Got to Have Some Trust
Now, I know what you’re thinking. Barrett blindly took a salesman’s recommendation. Ha!

Well, not entirely. The LG does get good reviews. But yes, I followed the salesman’s lead.

You can’t be an expert on everything. There’s simply not enough time. Instead you’ve got to find some trusted support systems to help you along with certain decisions.

B&H has always offered me great advice and customer service. I’ve been buying my tech there for years. I trust their recommendations.

Multi-screen Home Office for your Hybrid Future
Adding the right monitor for a multiple-screen setup instantly creates a more effective home office workstation.

After I plugged in my new 27” LG computer monitor and connected it via the USB-C port, I felt like I had just bought a new pair of glasses.

Perhaps it’s also time for you to have a larger and clearer digital canvas to work on at home, even if your new hybrid work schedule means it won’t be used every day.

Not to repeat the term, but consider all of this as part of the new normal.

It May be Time to Say Goodbye to your Nest Protect

No tech lasts forever. Here’s what I did when my Nest Protect let me know that its ‘life’ was ending.

My Nest Protect Smoke and Carbon Monoxide Alarm recently informed me that it was about to reach the end of its life and cease all operations. I received the sad message via the Nest smartphone app that communicates with it. My Nest Protect has been stationed on the ceiling outside our bedroom for the past six years.

It has glowed reassuringly green as I passed by it every night on the way to bed. (A yellow color ring would suggest that all was not well.)

Feeling like You’re in a Movie
When I got the news, I felt like I was in a slick sci-fi flick, and my trusted AI bot had informed me that it was time to say goodbye. Its makers had programmed its end, and there was nothing I could do.

Wait. Scratch that.

The year is 2048. It’s my grandson’s bot. They’ve been inseparable over the years, while my son was away for long stretches conducting critical science experiments on Moonbase Alpha. The bot walks up to the eight year old and presents the bad news. There are tears and a huge hug. But my grandson can’t accept it. There must be a way to save his life-long friend!

Cue the opening credits…

My Next Protect Experience
Costing $99, my battery-powered Nest Protect was an expensive investment as far as smoke detectors go, but it has provided peace of mind over the years. And the fact I could check its status on my iPhone was pretty cool.

It would also talk to me in a friendly voice as opposed to projecting angry chirps like most smoke and carbon monoxide detectors. Of course, it did possess the important capability to project a mind-melting alarm if needed. (Thankfully, I’ve only been exposed to that dimension-ending sound during tests.)

One of its big selling points, that it wouldn’t chirp when it was time to replace its batteries, didn’t quite work out for me. My Nest Protect was simply supposed to tell me that. Maybe I wasn’t paying attention, but over the years, I still got that blasted chirp… more than once.

And you should know that the Nest Protect is picky regarding what kind of batteries you feed it. It requires six Energizer Ultimate Lithium AA batteries, which are super powerful and can keep the Nest Protect happy for long stretches.

So the Nest Protect does need a little extra love. You can’t just treat it like a cheap, throwaway detector. And yes, eventually it will be time to say goodbye.

But not for long.
I’ve decided to re-up my commitment to this tech relationship.

Time for a New Google Nest Protect
I just bought the second generation model. And it’s now part of the Google product line.
So, it’s the Google Nest Protect.
$119 on Amazon

  • It has a split-spectrum sensor. (I think that’s like a warp drive upgrade for smoke detectors.)
  • You can turn off a false alarm from the smartphone app.
  • Its ‘pathlight’ is brighter.
  • This model is supposed to last for up to a decade.

Return to the Happy Green Glow
I’ve got my new Google Nest Protect in place, and tech balance has been restored in the Lester home (for now).

If all goes well, our home’s new guardian will be around past 2030.

That said, something tells me a newer model will show up before the decade is out to attract my attention. We’ll talk more then!

How to Use Apple’s Photos App to Quickly Create a Memory Movie

If you need a way to display a group of photos in a movie-like presentation, Apple’s Photos app can do this trick for you. Here’s how.

Apple’s Photos app on a Mac contains the powerful functionality to organize your pictures into collections and then display them as “Memory Movies,” complete with photo zooms and transitions. The app does this on its own to generate unexpected and often delightful photo-montage movies from your photo archive.

But you can also put the Photos app to work to create a Memory Movie using your own (human-directed) collection of pictures.

It’s simple to do, and with a couple of clicks, you can also add music and a title graphic.

How to Make a Memory Movie
The trick to quickly creating a Memory Movie is choosing one of your existing albums of photos. But it’s also not hard to create a new album for this use. The bottom line is the album feeds your movie structure.

Once you’re in your album, you’ll see the option on top to click on “Show as Memory” or “Slideshow.” (The difference is Slideshow doesn’t contain the photo moves and zooms.)

On the next page that appears, you’ll see your Movie Memory ready to start.
Click the play icon.

That’s it!

To adjust your music choices, click on the tools icon on the right side of the playback controls.

Fast and Good Enough
Once you understand the easy steps to creating a Memory Movie, you can pull one together in minutes by using one of your existing albums.

It’s a much faster process than importing your photos into a video editing program and then manually setting up all of the photo transitions before exporting your video file.

Sure, a manually-edited version would be more creatively precise. (AI-directed photo moves and transitions can sometimes be a bit off balance.) But I’d say for most uses, letting your computer do the work is just fine.

A Memory Movie is also an especially simple way to quickly pull together and share a collection of photos for a Zoom meeting.

A couple caveats: You can’t create a Memory Movie using a shared album. It needs to be one that lives locally on your Mac. And you can’t actually export your Memory Movie into a separate file. The movie experience is generated and remains within the Photos app.

Display your Memories
There are any number of ways to display digital photos these days. But if you’re already using the Photos app for your photo management, this quick and easy presentation trick is a no-brainer.