At Home with Tech

Unlock the power of all your technology and learn how to master your photography, computers and smartphone.

Category: travel

Why I Woke Up Early on Vacation to Spot the Sunrise Instead of Sleeping In

I used the early mornings from my summer vacation to capture timelapses of the sun rising over the mud flats in Cape Porpoise, Maine. Here’s how I set up my photo gear.

Creating a timelapse video of the sunrise is like looking at a snowflake. One is never exactly the same as the next. The sun may arrive on schedule, but the surrounding weather is always the wild card.

Specifically, it’s all about the clouds. They will make or break your sunrise timelapse photography every time. Yes, you don’t want a cloud to be blocking the sun as it makes its grand entrance on the horizon, but that’s only one piece.

Wonderful Clouds
Properly positioned in your shot, clouds are the secret ingredient that can create a spectacular sunrise in a timelapse. They’re always on the move, and a timelapse will speed up their motion. Plus, clouds augment the visual drama by reflecting the orange hues on the horizon and adding stunning contrasts to what can otherwise be a boring blue sky.

But it all must organically come together for your camera at the right time. Every morning doesn’t offer the perfect sunrise. So, repetition is key.

The Magical Mud Flats
Over the past three summers, my family and I have been driving up the Maine coast to the same beach house for a little R&R.

The house overlooks the mud flats of Cape Porpoise near Kennebunkport. And if you walk for 15 seconds to the edge of the ‘flats’ at the crack of dawn, you’re offered a magnificent environmental canvas for the sunrise. (Whether the flats are dry or filled with tidal ocean water, it’s always a stunning view.)

We’ve been sharing this Maine vacation experience with two other families, and each morning while everyone was still asleep, I got up at 4:35am to get my gear in place ahead of the sunrise. (And if you’re concerned that I haven’t been giving myself the opportunity to sleep in and rest up, don’t worry. I caught up on my Z’s during luxurious afternoon vacation naps.)
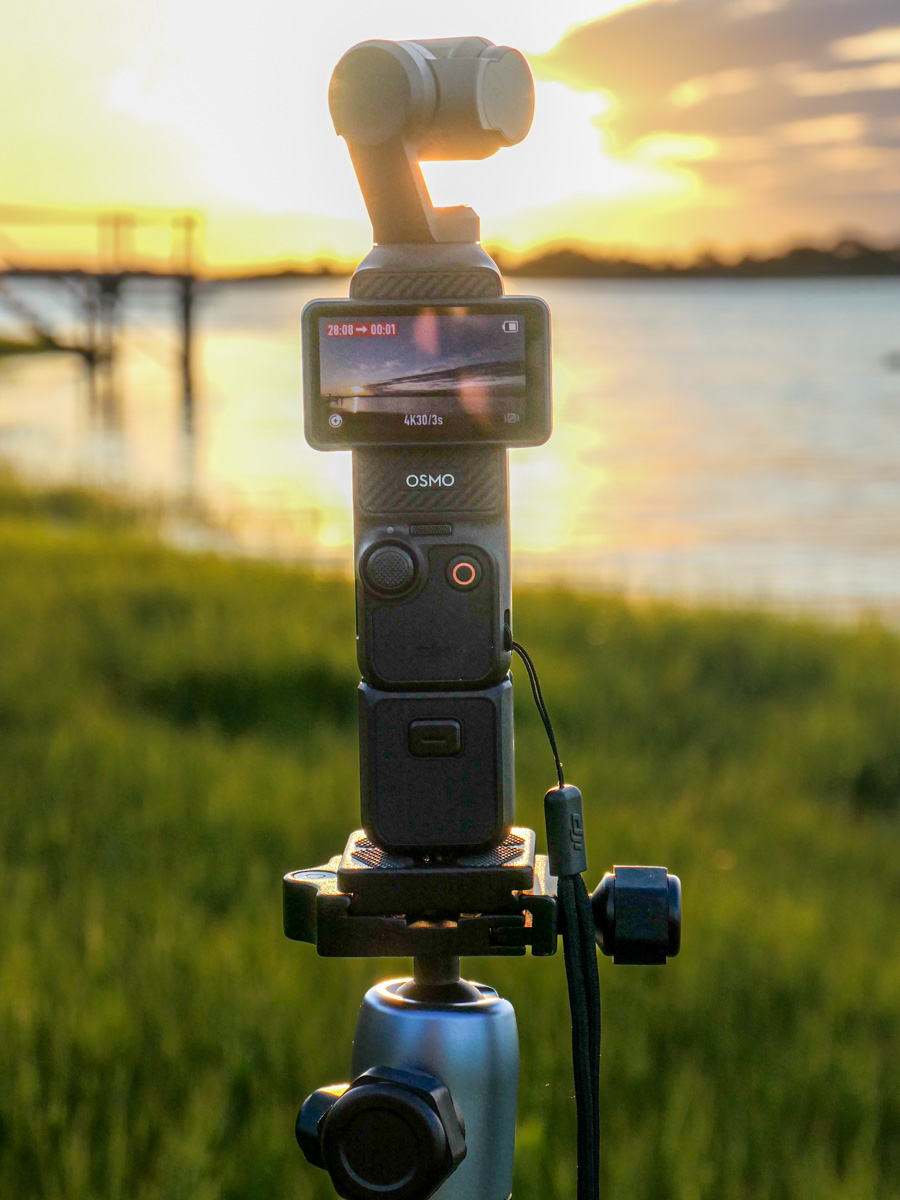
DJI Osmo Pocket 3
My camera of choice for my ongoing sunrise timelapse project is currently the DJI Osmo Pocket 3. Its superpower is its tiny gimbal design. The lens can be programmed to pan left or right throughout the timelapse sequence. (DJI calls that a ‘motionlapse.’)

I bought the original Osmo Pocket back in 2019, and I’ve just upgraded to the third-generation model (Pocket 3), which among other improvements boasts a larger 1” sensor size for better image quality.
I usually set my timelapses to run for 30 minutes, with each frame set at 3-second intervals. That creates a 20 second timelapse. (Sometimes I double it and go a full hour for a 40-second timelapse.)

I try to start at least 10-15 minutes before the first edge of the sun peeks out, and then I let my Osmo Pocket track the sun during those wonderful early minutes before it becomes too intense for the camera. (I also use a DJI ND16 magnetic filter which acts like sunglasses for the lens.)

Holiday Parade
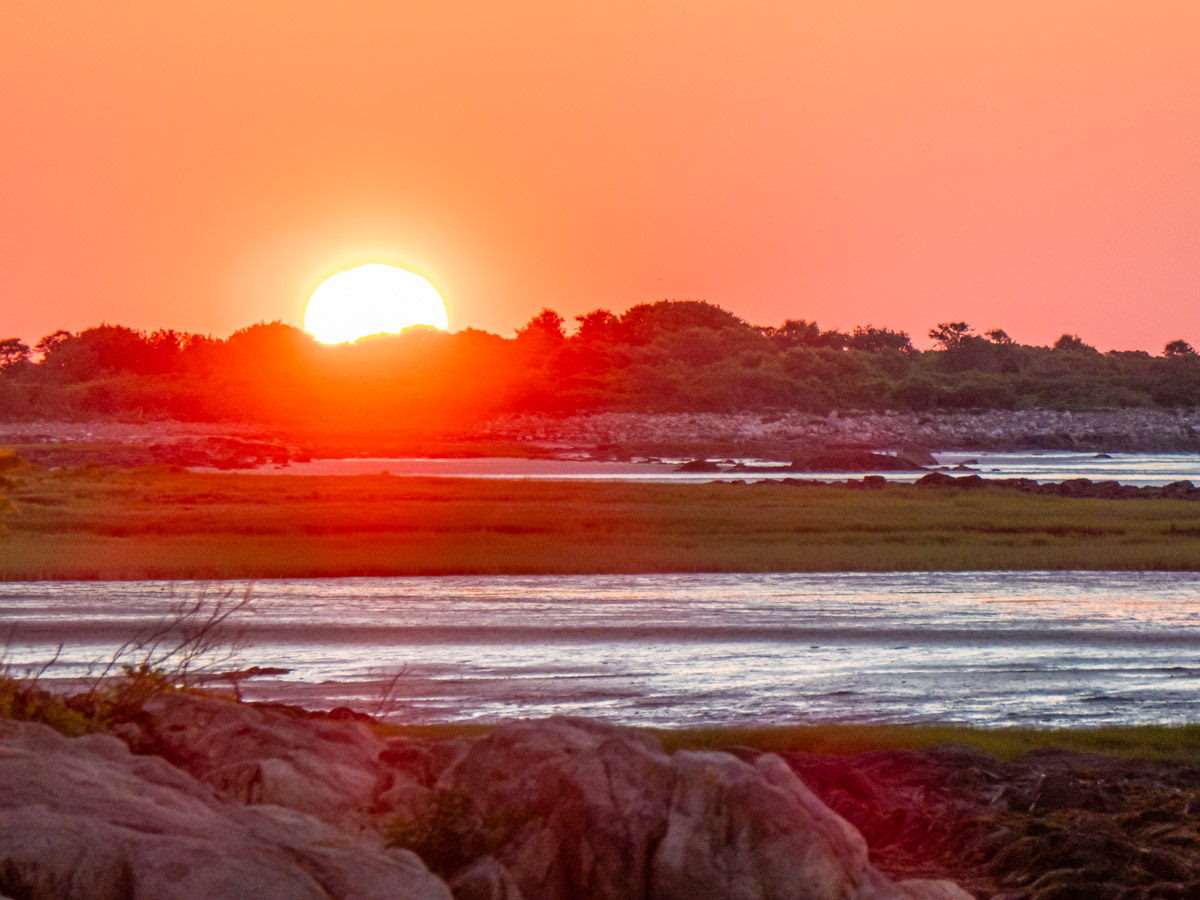
This year, the best sunrise presented itself to my Osmo Pocket 3 on July 4th.

When I stumbled out of bed with my Pocket 3 and tripod, I spotted a few clouds already in good position. I set up my gear at the edge of the flats for the full hour, crossed my fingers and walked away to get a cup of Joe. When I returned, I was so pleased with what I got. The clouds offered up a perfect parade.
My Magic Hour
Waking up early to document sunrises may seem like a counterintuitive vacation activity. But when the opportunity is literally right in front of you, it’s hard to pass up.

Plus, I usually rise on the early side throughout the year for what I call my ‘magic hour’ from 5:30-6:30am. I use this time for my blog writing and photography editing. My mind is fresh, and I find that the creativity flows.

So, waking up 40 minutes earlier for my vacation sunrise timelapse project isn’t such a big change from my usual routine.

Another benefit of greeting the sunrise is the massive sense of accomplishment you get before most people are even awake. I’m a huge believer of ‘doing’ in the morning hours. The rest of the day then feels much fuller.

Tend to your Flame
There’s nothing wrong with waking up late when you’re taking some time off.

But for me, I find happiness practicing my personal photography. Capturing a glorious sunrise always juices my joy factor.

Even capturing the energy of a blustery, cloudy morning brings me great satisfaction.
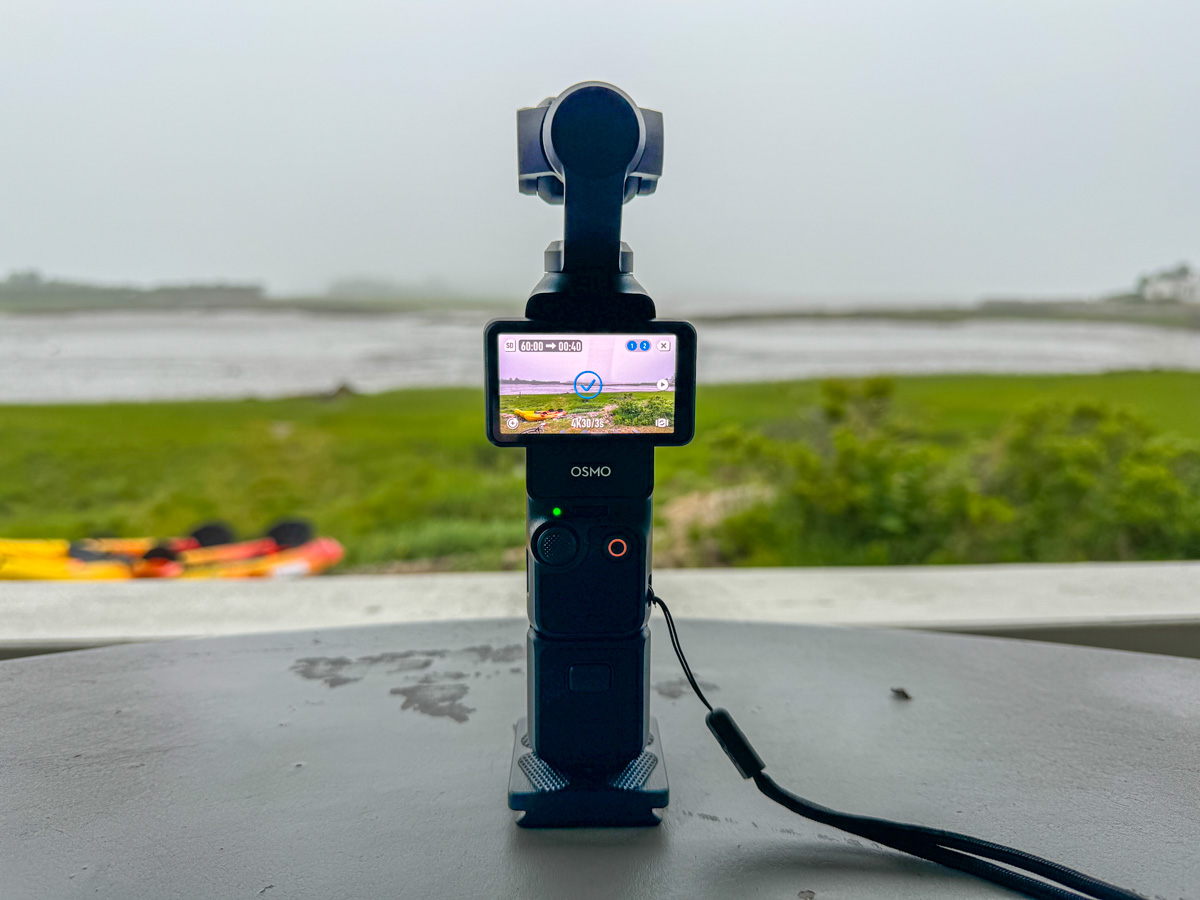
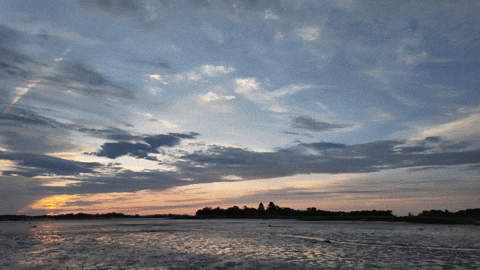
This cloudy morning on day 2 of our Maine vacation obscured the sunrise, but my resulting timelapse still did not disappoint.

It’s about exploring the art of the unexpected. Results will inevitably vary.

Practicing your craft, whatever that may be, will always revitalize your spark.

4 Helpful Tech Packing Hacks for Vacation

Here are a few ways to help ensure your tech stays safe, organized and fully functional throughout your trip for a more seamless travel experience.

Taking all your tech with you on vacation comes with inevitable risk. But if you’re committed to your decision, you should take these few extra steps while packing to help ensure both your gear’s safety and maximize its functionality during your trip.

Set up a Charging Station
Many hotel rooms don’t have enough convenient outlets or USB ports to charge all your gear. Instead of spreading your tech around the room to tether to the few available outlets, it’s much better to centralize and create an organized charging station of your own.

The trick is to bring your own mini power strip. Make sure it has a long cord so you can snake it from a wall plug to a table or dresser where you can construct your charging station for your hungry tech.

Yes, it may seem counterintuitive to weigh down your luggage with a power strip, but there are a variety of travel-worthy models out there that are relatively light.

Believe me… It’s a game changer.

Bring a Dedicated Camera Bag
If you’re a photographer with a larger-profile camera and lenses, you don’t want to throw all that delicate gear randomly into a piece of luggage. You need a dedicated bag to properly protect it.

A few years back, my family and I took a vacation to New Orleans, and I purchased a Peak Design Everyday Backpack 30L for my camera gear. I carried it onboard the plane with me. Its dimensions are right on the edge of being too big, but I did successfully squeeze it under the seat in front of mine. That said, it would have easily fit in the overhead bin, but I already had my suitcase there. (My family and I had challenged ourselves to not check any luggage on that trip.)

My Peak Design backpack performed absolutely great during our time in The Big Easy. It even housed my little Manfrotto travel tripod.

Pack your Apple TV
If you‘d like your hotel room television to have the same streaming options as your home TV, packing your little Apple TV puck could be your solution. Just connect it to the hotel’s Wi-Fi and the TV’s HDMI cable. (You may need to bring your own HDMI cable.)

This type of MacGyvering works best with less advanced hotel Wi-Fi systems that don’t require signing in with anything more than a password. If you need to first navigate through a hotel’s web portal to sign in, your Apple TV won’t activate.

If it all works, it’s a nifty trick.

Stash a Portable Bluetooth Speaker
Sure, you can play your tunes from your smartphone’s speaker, but it you want to really bathe yourself in the goodness of your playlists, you’ll need to bring along a dedicated portable Bluetooth speaker.

They’re so small these days. Why not throw one in your bag?

Travel Ready
By incorporating these simple packing hacks into your vacation-planning routine, you can ensure that your tech remains safer, organized, and fully functional throughout your trip. From setting up an efficient charging station to protecting your camera gear and enjoying your favorite media, these strategies can enhance your vacation experience and keep your tech running smoothly.

Happy travels!

How to Solve the Jigsaw Puzzle of your Parents’ Family Photos

What are you supposed to do with all your parents’ photos after they’re gone? Before trying to integrate any picture into your own digital family photo archive, here are the three most important details to consider.

My mother curated two massive family photo albums while I was growing up. These visual time machines that held the official Lester record from my formative years always lived in the back of my mom’s linen closet. In hindsight, her process was imperfect, but she kept it up, and she effectively completed it.

Now, I’m finally trying to integrate many of these pictures into my own digital family photo archive. And guess what?

It hasn’t gone exactly as planned.

After I scanned the old originals from the ‘60’s, ‘70s and ‘80s, I found they didn’t immediately fit neatly into one cohesive story, even when viewed in the organizing structure from their original photo album.

So, what’s wrong?

Old Photo Albums are Often Jigsaw Puzzles
Sure, my parents’ vacation photos have been relatively easy to track (though one bathing suit shot by a pool or beach often looks the same as others from different trips).
This happens to be a shot of my father vacationing in Hawaii. But how would you know?

Then there are others that don’t contain any identifying information beyond their relative position in their photo album.
These two friends of my mom (in the center) show up multiple times in her photos during the years before she married my dad. They remain a mystery to me, but you can tell they had a strong connection.

Many photos become a jigsaw puzzle to figure out. And I’ve delayed tackling it for far too long.

Now that both my parents are gone, I’ve lost access to their knowledge. I do know where some of the jigsaw pieces go, but I’m guessing with so many others.

It’s not like I didn’t pay any attention to some of the details in these photos across the decades, but only now have I realized how many gaps exist.

What’s Written on the Back of the Photo?
The biggest problem with archiving physical photos from the pre-digital era is identifying when they were taken. Some film-developing labs my parents used stamped the date on the back of the photos, but not usually.

So, it was up to my parents (actually, only my mom did this) to write down the date and topic either on the back of a photo, in the photo album, or on the front of the envelope the photos came in.

That’s a lot of work. My mother did an admirable job, but it was hardly complete.

The Unknowable Moments can be the Best Ones
So, I’ve been really trying to pull together all these photos and complete the ‘story.’ I’m sure you’re wondering why I just don’t follow the story that’s evident in the original photo albums. Well, that’s because beyond the typical birthday, holiday and vacation photos, the rest of them reflect moments that are often unclear to me.

And these unlabeled photos tend to display more spontaneous and authentic moments than the staged ones. So, I really want to know more about them, though I expect I never will.

This Cobbler Needs New Shoes
Along this frustrating process of being only partially able to unlock and restore the memories from these analog photos, I’ve stumbled across an unexpected and disturbing reality much closer to home.

I’ve been blogging for the past twelve years about the importance of good digital photo organization. But if you can believe this cobbler, I actually haven’t done a great job documenting my own story in photos.

There’s irony in this truth as I’ve regularly invested countless hours in digital photo organization since 2000. Yes, many thousands of photos are properly organized chronologically with their native digital time stamps and in good folder structures, but that’s only the start of any storytelling process.

Plus, there are my own pre-digital photos. Some made it into albums. Others didn’t. Some were labeled. Others weren’t. (Sensing a pattern?)

That Linen Closet Photo Collection wasn’t All I Neglected
And of course, there’s my mom’s linen closet photo library that remained hidden after she passed away back in 2006. The photos stayed in their New York City apartment for the next sixteen years. When my father died in 2022, I, finally took over all his photos from his travels as well as those linen closet albums.

When I began reviewing all of it for digital conversion, I thought I would focus on my mother and father. But I realized how many of these photos were also key to my own story (not surprising).
Here’s baby Barrett in Central Park with my mom and grandfather.

And when I turned to my existing digital photo archive that I thought I’ve meticulously maintained in Adobe Lightroom and looked back a few decades, it was only then that I saw major gaps in my own photo history from those years.

I think I always knew the missing chapters lived in that linen closet, and I had just kept kicking the can down the road.

The Importance of Tending to your Own Timeline
So, I’ve temporarily paused my broader family photo history project to fill in the gaps on my own visual timeline.

Here are the three key insights I’ve learned along the way that you should first consider before embarking on this type of photo-archiving work.

#1
Get the Time Stamp Right
The ‘when’ doesn’t tell the whole story, but without it, an old paper photo is effectively unbound in time. Sure, you can probably estimate it within a couple years based on visual cues. However, locking it into the correct year or even month will better fit it into that jigsaw puzzle. Maybe a perfectly accurate date is not so critical to that individual picture, but it could help clarify other photos.

Plus, without this important marker, you won’t be able to sort your digital versions chronologically.

So, when you digitize or scan a photo, you do really need to take that extra step (I know it’s a nuisance) and immediately modify the ‘creation’ date away from when you scanned it to your best guess on when it was actually snapped.

Taking that critical step will instantly place that photo into its correct position on your sacred timeline. (Yes, that’s a “Loki” reference.)

#2
Your Best Photos Should Independently Tell their Own Stories
Then comes the ‘what.’ The who may be obvious (hopefully), but what’s going on is usually the whole point of any photo.

Of course, you can write a caption into a photo’s metadata field to explain the image, but ideally, a great photo that can stand up against the future will speak for itself.

I’ve come to realize that pictures that can’t tell their own story simply aren’t as valuable as archival tethers to your past.

This may be common sense, but as I’ve gone through many of my own 20th century photos, I’m shocked by how many have effectively lost their archival value, because I can’t tell what’s going on.
Look at me. I’m a kid swimming somewhere in a pool. Does anyone care?

Here’s another photo from the same family trip to Puerto Rico. It’s certainly more interesting, right?

It’s all about the details in a photo. That’s what really matters. Sure, how you look as a younger person may be interesting, but that’s not truly the point of a great archival family photo.

#3
Assume a Stranger is Holding your Photo
Yes, this is similar to #2, but #2 applies to you. #3 is for everyone else!

I think the biggest mistake when building out a collection of photos that represents your family history is to think that the viewer knows what you know. Always assume that nobody will have any knowledge about you or your family. (I know that’s harsh, but that’s the real key to future-proofing your collection.)

You may intuitively understand a grouping of photos, and they may make sense to you, but the truth is nobody else will.

Who is this All for?
Which begs the question… Do you even care if your photo collection makes little sense when viewed by the future? Perhaps all you care about is enjoying your photos in the now. (I think that’s how my father experienced his own photos.)

But I’m talking about your kids… and their kids. Or maybe distant relatives… or even strangers (back to #3).

Do you want your photos to have some level of enduring impact as opposed to dissolving into an anonymous digital oblivion?

Yes, now this is all about legacy. That you were here. And you lived.
This is one of just three photos I have of my great grandfather and the oldest picture of any family relative. I’m so glad it somehow survived.

Legacy
I didn’t used to think about any of this. And now I’m beginning to. (Yes, I know this is connected to Father Time.)

And who knows if there’s really any way to preserve your digital photos into the future any better than a precious photo album in the back of a mother’s linen closet that’s ‘forgotten’ for decades.

But I’m determined to complete my multi-generational family photo archiving work started by my mother. (I’m just currently focusing on the ‘me’ part.)
Here’s a cool photo of me visiting the Museum of Contemporary Art in Los Angeles during college.

It’s Not too Late
For those of you who will eventually face a similar archiving project, I can offer this piece of advice:

Don’t wait to get started. It’s much easier if you truly tackle this immense task years earlier, finish it and then simply add to your family photo collection throughout the journey of your life.

Doesn’t that sound so much less stressful?

Good luck.