At Home with Tech

Unlock the power of all your technology and learn how to master your photography, computers and smartphone.

Tag: Apple Photos

How to Quickly Turn a Scanned Negative into a Positive Image on a Mac

If you think a 90-year-old negative is a lost cause, think again. Here’s how to bring it back to life.

Sure, photo negatives aren’t cool anymore. They represent 19th century technology. Most of us aren’t housing a roll of Kodachrome in our camera bags these days. I get it.

But there’s well over a century of family history locked away in millions of shoe boxes in the back of closets… all in those negative strips. There should be a way to rescue them.

Correction:
There should be an easy way to rescue them and quickly bring the negative images back to life into positive form.

I’ve been traveling that complex journey for the past months since I’ve taken ownership of all of my family’s photo archives (shoe boxes) after my father passed away.

Digital Conversion
So, I bought a slide and negative converter to handle the bulk of the work.

It’s fast. It’s a one-click solution. The results are mostly solid.

But the Wolverine couldn’t capture the full real estate of the larger negatives dating back to the 1930s (2 ½” x 3 ¾”).

I turned to my old flatbed scanner to handle the large negatives. But then I needed a way (an easy way!) to transform each negative into its positive doppelganger.

Adobe Solutions
There are any number of tutorials on YouTube that demonstrate how to do that in Adobe Lightroom or Photoshop, and they all promote the concept of how easy and fun it is.

‘Fun’ is code for it’s not really that quick. Sure, it may be relatively easy, but it still requires about five minutes of fiddling to bring the image to life in the positive universe.

A few minutes may not seem like a lot of time, but fiddling is not a precise exercise, and five minutes can easily turn into fifteen.

Apple Photos (OS X):
As a Mac user, I wanted to see if I could find a native solution without having to rely on the muscle of Adobe. The good news is I found a couple good options.

If you already use the Apple Photos app on your Mac, you can do the conversion right there. It’s not quite one click. But it’s straight forward. Let’s give it a shot using a negative of my grandmother Rae from 1935 with my father and uncle. (My dad is the tiny one!)

  • Upload your negative into Apple Photos.
  • Select it.
  • Click on ‘Edit.’

Select the ‘Curves’ drop down.
You’ll see a histogram of the photo with a straight white line positioned diagonally from bottom left to top right.

To invert the negative image to its positive version:
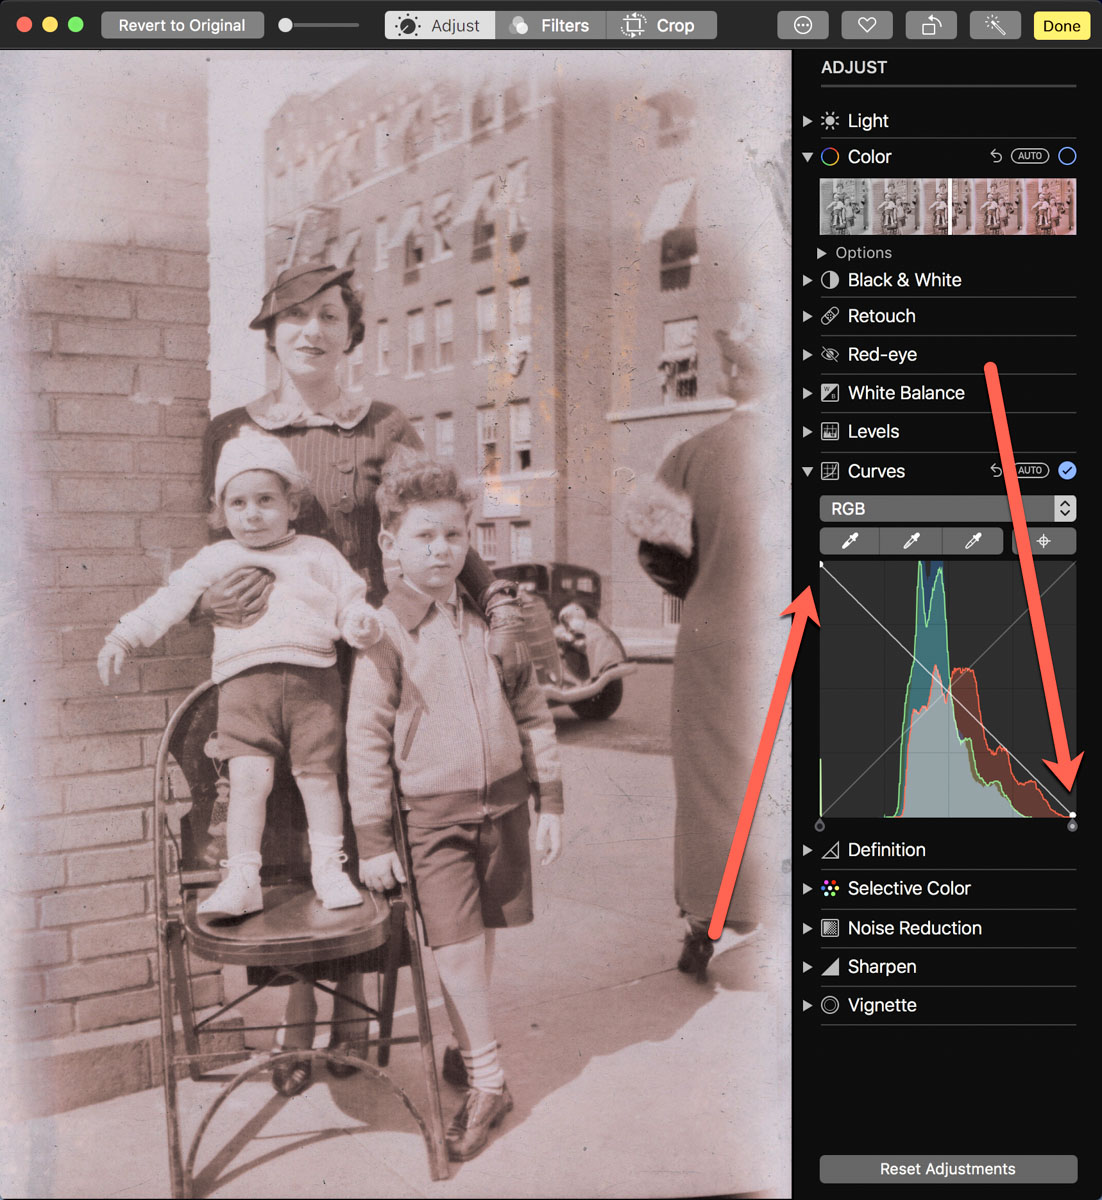
Click on the bottom left of the line and drag it all the way to the top left. Then click on the top right of the line and drag it to the bottom right.

Voilà! Your negative image is now inverted and displays in positive form.

Then, you can continue to tweak the image from there as you choose. (And that’s where you can go down the rabbit hole of tweaking.)

Using Apple Photos to perform this trick is actually quite similar to Adobe Lightroom’s interface.

Preview App
You can also use Apple’s ‘Preview’ app to bring your negatives back to the positive universe.

It’s a near-identical exercise:

  • Select ‘Tools.’
  • Then ‘Adjust Color.’

Can You Invert a Negative Image in One Click?
Okay. None of these options are one-click solutions. So, Is there one? I figured any number of online photo management websites must have a negative-reversal filter built in.

I checked out Shutterfly, Google Photos, Amazon Photos and Canva.

Nope.

Yes, there are apps out there that promote the ability to reverse a negative in one click. But after giving it some more thought, I just didn’t want to add yet another piece of software into my workflow.

So, I canceled my adventure down this particular rabbit hole. Enduring a few clicks to turn a negative into a positive image will suffice.

Diagonal-Line Maneuver
The truth is I already do most of my photo management work in Adobe Lightroom. The diagonal-line maneuver in the Tone Curve section works just fine (just like with Apple’s ‘Photos’ and ‘Preview’ apps).

The good news is there’s a choice on the software to use if you don’t want to take the Adobe path.

And now I need to get back to work on my time machine. There’s still almost a century of negatives to go through.

I’m bringing the past back to life, one image at a time.

I’d say maybe that’s worth the five minutes.

How to Use Apple’s Photos App to Quickly Create a Memory Movie

If you need a way to display a group of photos in a movie-like presentation, Apple’s Photos app can do this trick for you. Here’s how.

Apple’s Photos app on a Mac contains the powerful functionality to organize your pictures into collections and then display them as “Memory Movies,” complete with photo zooms and transitions. The app does this on its own to generate unexpected and often delightful photo-montage movies from your photo archive.

But you can also put the Photos app to work to create a Memory Movie using your own (human-directed) collection of pictures.

It’s simple to do, and with a couple of clicks, you can also add music and a title graphic.

How to Make a Memory Movie
The trick to quickly creating a Memory Movie is choosing one of your existing albums of photos. But it’s also not hard to create a new album for this use. The bottom line is the album feeds your movie structure.

Once you’re in your album, you’ll see the option on top to click on “Show as Memory” or “Slideshow.” (The difference is Slideshow doesn’t contain the photo moves and zooms.)

On the next page that appears, you’ll see your Movie Memory ready to start.
Click the play icon.

That’s it!

To adjust your music choices, click on the tools icon on the right side of the playback controls.

Fast and Good Enough
Once you understand the easy steps to creating a Memory Movie, you can pull one together in minutes by using one of your existing albums.

It’s a much faster process than importing your photos into a video editing program and then manually setting up all of the photo transitions before exporting your video file.

Sure, a manually-edited version would be more creatively precise. (AI-directed photo moves and transitions can sometimes be a bit off balance.) But I’d say for most uses, letting your computer do the work is just fine.

A Memory Movie is also an especially simple way to quickly pull together and share a collection of photos for a Zoom meeting.

A couple caveats: You can’t create a Memory Movie using a shared album. It needs to be one that lives locally on your Mac. And you can’t actually export your Memory Movie into a separate file. The movie experience is generated and remains within the Photos app.

Display your Memories
There are any number of ways to display digital photos these days. But if you’re already using the Photos app for your photo management, this quick and easy presentation trick is a no-brainer.

How to Build a Cloud Family Photo Archive for your Smartphone

It’s time to release the power of your best family photos! Here are four steps to help you create a family photo archive that you can carry around in your pocket.

Remember how your parents and grandparents liked to carry around wallet-sized photos of you when you were a kid? I think some folks still do that. How quaint… how silly…how unnecessary!

With smartphone tech that can house thousands of photos, why would anyone want to carry around a tattered physical family photo in a wallet?

Well, for one reason… you know exactly where that photo is. And when someone asks you about your family, you can pull it out on demand and show it off.

Can you boast that same super power?
…Right now?

Stop Looking for a Needle in your Visual Haystack
Yes, this topic may fall under the category of ‘super obvious,’ but you can’t simply hope to swipe through a mess of photos in your smartphone representing years of moments and successfully pull the desired image out of a hat whenever you need to.

You’ve got to tuck away a few of the really important ones in a place where you can easily access them (beyond your wallet).

And I’d say the best way to do that is to create a family archive photo album in the cloud that you can access from anywhere, including your smartphone.

Here are four easy steps to help get you going…

Step 1:  Create a Shared Cloud Photo Album
In the Apple ecosystem, of course that’s really simple to do…

You can create a ‘Shared Album’ either on your iPhone or in ‘Photos’ on your Mac and then simply pop in your top 50-100 pics that represent the entirety of your family and your life to date.
(Keeping the number down is much easier said than done, because you’ll find so many choices that you’ll want to include!)

The trick here is to only choose a small number of pics among the thousands you’ve got. Remember, you’re trying to essentially simulate the tattered wallet photo experience… with some obvious improvements. Simplicity and easy access are paramount.

Then after the heavy lifting of curating your little photo collection, simply share the album with your partner and whoever else you’d like…
How considerate of you!

Step 2:  Choose only a Few Photos
So which photos are you going to include?
Well, think about which pics best represent your family’s ‘story.’

Yes, that may take you some time to figure out…
(Our ancestors had it easy with only having to manage through a shoebox of disorganized photos.)

But once you go through your digital collection and pull together this new group of archive-worthy gems, you’ll realize the awesomeness of your accomplishment.

Step 3:  Include the Major Moments
I don’t think there’s one particular recipe to follow… you just need to take a little time to decide what those exact photos are…

For me, I wanted to include some of the obvious milestone family moments…

  • Our wedding
  • Our son’s birth and first days


Then show off a little of the ‘where…’


And then I realized, beyond the several landmark moments in life and fun places that anyone might want to display a picture from, there’s a blur of countless other experiences over the years that you really don’t need to consider.
(That’s sobering, right?)

So, what’s left…?

Step 4:  Focus Mostly on the ‘Who’
Well, it’s the people in your life… your family and friends.

The “who.”

Yes, we’re back to essence of the wallet photo phenomenon.

You’re going to want to carry around the pictures of the people in your life who have mattered most.

Those images are what I immediately felt the need to collect into my own cloud family photo archive…

And so I put those photos in a cloud folder titled ‘Family Portraits.’

Some were candid pics, but most were posed group shots taken at family events. The organic organization of the people in these photos nicely framed much of my family’s history.

Carry Your Family History in Your Pocket
Remember when I said that your photos have expiration dates and that your family and friends only care to see the most recent pics from your life?

While that’s certainly true at one level, some of your pics will defy that phenomenon and retain their long-term value as foundational explainers for your family’s history.

Just make sure you don’t lose them in the endless mass of digital freeze frames from your life.

Sure, they might be properly archived in a portable hard drive somewhere, but if you can’t immediately access them when you want to on your smartphone, you’re going to miss most of the opportunities to share them throughout your life!

A cloud family photo archive that lives on your smartphone is a strategy lightyears ahead of using those tiny wallet photos.

You’ve just got to build it!