At Home with Tech

Unlock the power of all your technology and learn how to master your photography, computers and smartphone.

Tag: apple

Strengthen Your Computer with a New Year’s RAM Boost

As you consider your New Year’s resolutions, don’t forget about the health of your computer. It might need a little more memory and a lot less dust!

As you consider your New Year’s resolutions, don’t forget about the health of your computer. It might need a little more memory and a lot less dust!

My iMac has been acting somewhat sluggish lately… lots of spinning beach ball action. I first thought it was simply because I had so many family photos jamming up my Aperture photo management software. But I eventually realized there might be more afoot than a memory-hogging program.

I can’t believe it, but my iMac is already kind of old. It’s a mid-2010 vintage with 4GB of RAM. (random access memory)

My iMac hadn’t been to the Genius Bar at the Apple Store for a long while.
(ever?)
So I figured it was time to take it in for a check up…
Why not start off the New Year right on solid digital footing?

My Trip to the Genius Bar
Fast forward to my Genius Bar appointment, which I had easily booked online.
My designated Genius ran a few diagnostics on my iMac, and within twenty minutes she gave it a clean bill of health. I asked her if installing more RAM might help my digital companion reclaim some of its original pep.

My Genius looked a bit skeptical and said that 4GB should be enough to run memory-intensive programs like Aperture, but she decided to bring in a second opinion to confirm her perspective.

Enter Genius #2…
This Genius looked at me knowingly and without missing a beat said, “Oh yes. You definitely need more RAM.”

My iMac has 4 RAM slots. Two of them contain 2GB RAM chips, and the other two of the slots are empty. Genius #2 suggested putting in four 4GB chips for a total of 16GB.

I said, “Great! Let’s do it.”
It’s common knowledge you can buy RAM memory elsewhere for less and install it yourself, but I wasn’t feeling especially adventurous. I was willing to pay a premium for a little official Apple love.

But the gesture wasn’t returned… this Apple store didn’t stock this older RAM.
(D’oh!)

I think I may have started to hyperventilate, because Genius #2 took me aside and quickly began typing into one of the many humming iMacs surrounding us…
www.macsales.com.

The name of this website he called up is actually Other World Computing, or ‘OWC,’ for those in the know.
Genius #2 told me it was a reputable site to purchase extra memory, and
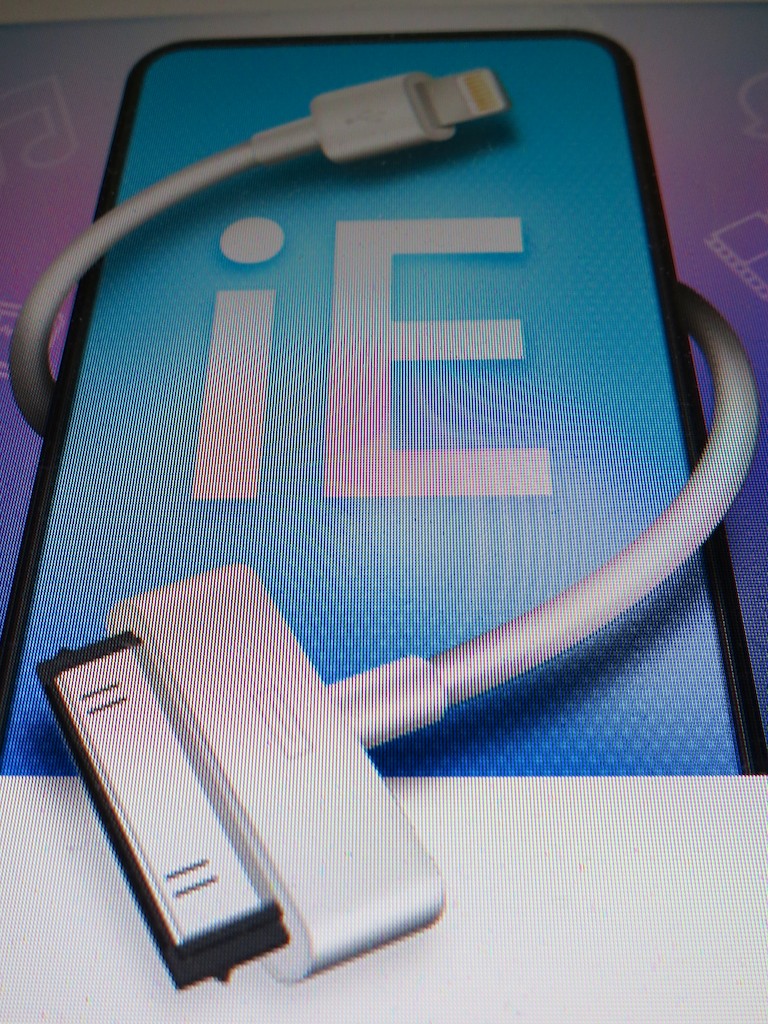
I could pick up the 16GB of RAM I needed for a great price…$77.99

Impatient Human
So I boxed up my massive iMac and schlepped it back to my car.
(Yes, this is the one time in four years you get to use the original box and packing Styrofoam. How else are you supposed to safely transport this
30-pound monster?)

As I was driving home, feeling mildly dissatisfied without immediate resolution, I scanned my brain for something swifter. Then, I remembered there was an Apple-authorized reseller just down the street from my house. Maybe that store had the RAM I needed…

And in fact it did. But the pricing wasn’t quite as competitive as OWC….
Still, I picked up two chips of 4GB RAM there.
(You always want to buy memory in matching pairs.)

That would bring my computer up to 12GB of RAM. Not quite the recommendation of 16GB, but I figured I could always upgrade the other two slots later if I really needed to.

The Dusty Install
Everyone I talked with… from Genius #2 to the helpful sales lady at the third-party store assured me it was super simple to install the RAM chips on my own. I’ve actually done this kind of operation a couple times before on non-Mac machines, and it always made me feel a little queasy jamming a delicate memory chip into a computer slot without breaking something.
(Plus you’ve got to worry about ‘grounding’ yourself so you don’t zap your computer with a little static electricity discharge.)

But I was committed… and I had come this far. So I began the operation…

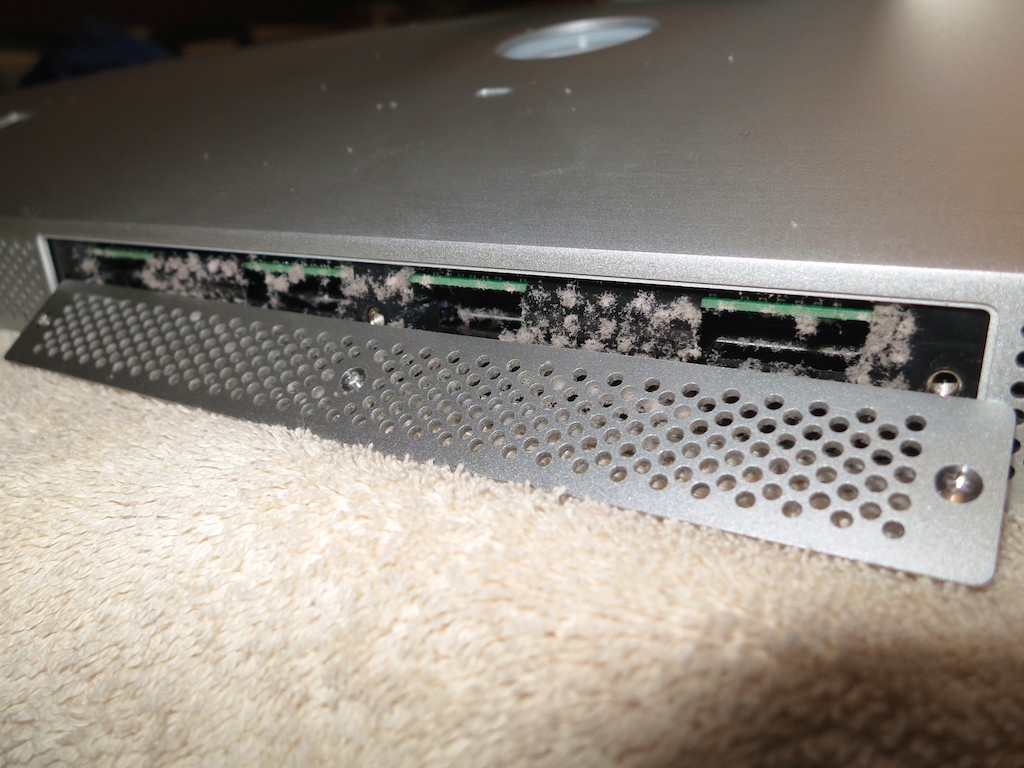
I place my heavy iMac face down onto a towel on my dining room table. Under the bottom edge of the screen were three tiny Philips head screws, which housed a metal cover protecting the four RAM slots.

Unscrewing them was straight forward, but I wasn’t prepared for what I saw when I removed the cover…

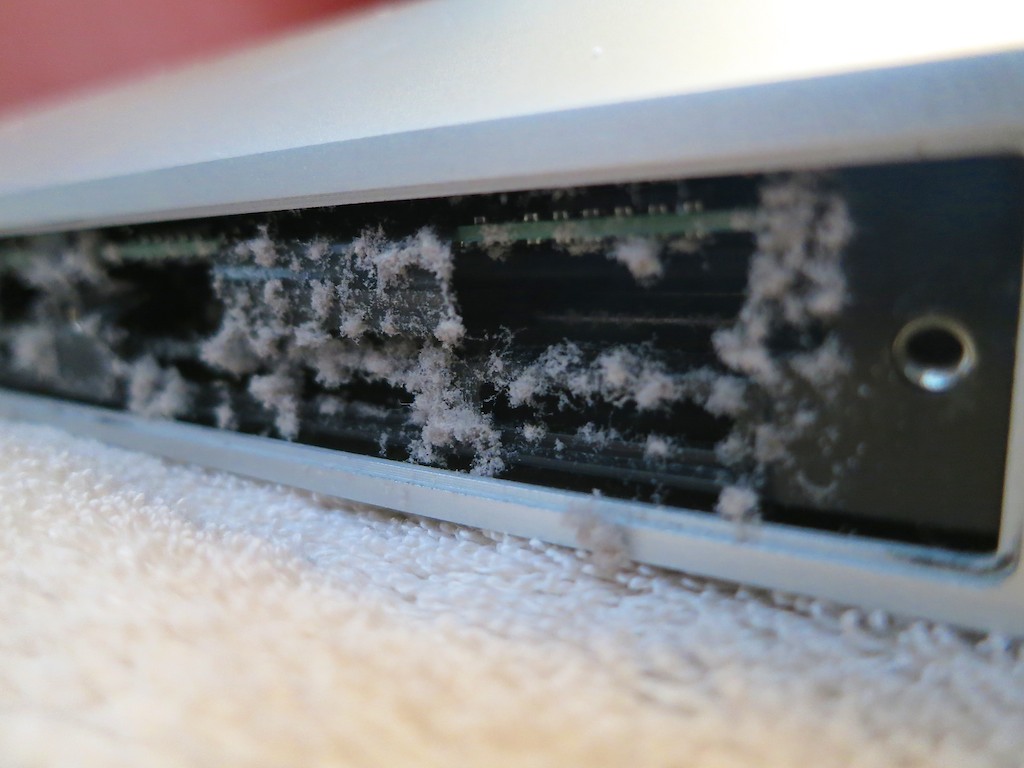
There were these ‘mini-mountains’ of upside-down dust piles on the bottom edges of the two existing RAM chips.

These linty stalactites can’t be good…

Dust on RAM Chips


Now what…?!
I didn’t have a can of air to blast the dust away.
(That actually might have been a bad idea if I blew some of the dust deeper into the guts of my Mac.)

So I carefully removed the dust with a tiny, soft brush.
As a result, a few clumps of dust fell into the side of the machine, just out of finger’s reach… but I carefully removed these powdery bandits with tweezers.

I wouldn’t exactly call my cleaning an exact science or a perfect execution, but at least there was a whole lot less dust hanging around to clog up my computer’s airflow.

After Dust Cleaning


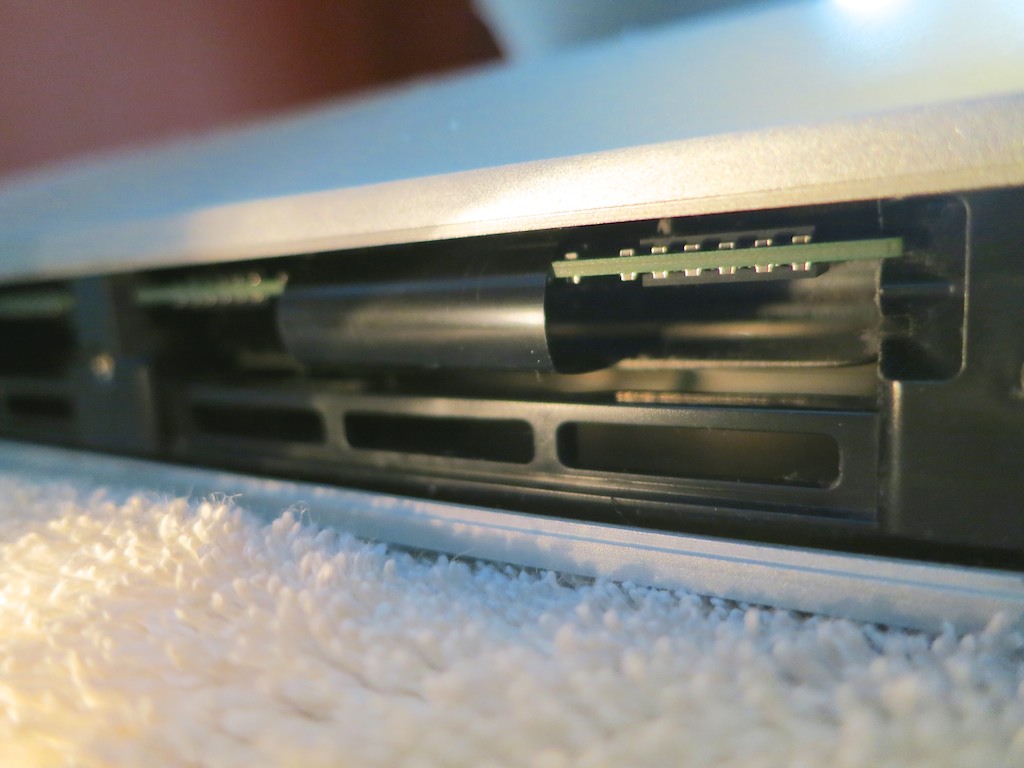
Now, it was finally time to insert my new RAM.

The Operation is a Success, but…
Yes, it was indeed a pretty straightforward process… you lift out two flexible, plastic tabs that are blocking your way… and then you insert your RAM with increasing effort until you feel that horrible scrunching sound of two plastic parts being forced to bond together.
Apple literature describes it as a ‘click.’
(But it never feels to me so clean and simple.)

And that’s it.

You hope you haven’t done any damage; you screw the bottom plate back on… and you lug your iMac back to its normal location and plug it in.

Then it’s time to turn your buddy back on…

Happy Computer…
“BONG…”

I immediately checked to see if the new RAM memory registered.
(You can click on the Apple icon on the far left and then on “About this Mac.”)

And there it was… “12GB.”

I opened up Aperture and happily saw an immediate improvement. My computer was indeed much more snappy!

Problem solved.

…Happy New Year
So as you consider your New Year’s resolutions, you might want to make sure you’re not waiting around for your computer to keep up with the “new you” this year.

Everybody and everything needs a little boost… every so often.

Those Pictures on Your Fridge

People love to look at photos and art on your refrigerator.  But if the imagery isn’t current, it’s probably time to give your family ‘monolith’ an artificial time-warp update.

People love to look at photos and art on your refrigerator. But if the imagery isn’t current, it’s probably time to give your family ‘monolith’ an artificial time-warp update.

We had a small family get-together yesterday. A little holiday brunch. Nothing crazy…

As my wife and I were doing some prep work earlier in the week, we noticed our refrigerator needed some refreshing.

No, not the food on the inside. My wife had that covered. (yum)
I’m talking about some of the items affixed with tape and magnets to the outside!

A lot of the pictures wrapping around our fridge were a tad out of date, and so my new mission was to bring the general imagery of our son’s adventures with his cousins and friends up to a more current state.

So how easy is that?

Normally, pictures, postcards, and your children’s drawings evolve onto your refrigerator. It simply takes time… just like good wine, right?
You can’t just snap your fingers and suddenly give the outside of your icebox that ‘look.’

Well, of course…you can.
Actually, tapping your fingers on your computer’s keyboard is the way to do it.

How to Refresh Your Fridge Photos
With a little thoughtful photo organization using software like iPhoto or Aperture, the pictures you need are waiting patiently for you in digital form.

And with your trusty home photo printer,
(You do have one of those?)
…it’s super simple to print up a fresh batch of refrigerator pics!

In less than half an hour, my-four-year-old son and I were busily taping a fresh batch of photos onto our refrigerator.

Problem solved.

HAL, Open the Refrigerator Door
But I find it interesting how such an old-school, analog activity centered around the family refrigerator is still alive and well in our high-tech lives these days.

There are lots of forward-thinking ideas surrounding what a ‘smart’ refrigerator should do for you, such as letting you know when you’re out of milk.

I know I’m not the first to acknowledge the fridge as the ‘bridge’ in the starship of your family’s household. It’s like the ‘memory central’ for the Borg of your little population.

It sits there, not unlike the black ‘monolith’ in “2001: A Space Odyssey.”
And people are compelled to tape important strips of paper to it.
So be it.

Bringing Your Icebox into the 21st Century
So what about a fridge that has a digital workspace or interactive whiteboard on its entire door? Then you can take all that taped clutter away and clear the space for a rotating digital photo montage managed from your computer.

Now that’s a concept I’d be interested in paying for!

How expensive could it be?
With flat-screen monitor prices crashing, popping one into a refrigerator door shouldn’t be that costly!

And of course, one that’s ‘connected.’
Okay, so that would jack the price up a bit.

But it would be so sweet…

The 2015 holiday shopping season begins in just a few more days.
(unofficially)
I’m ready to start saving up!

Saving the Sounds of Your Precious Voicemails

Are you tired of staring at your iPhone’s visual voicemails and wondering how to easily rescue them for your family history archiving needs?  You can MacGyver them out, but iExplorer has a better solution for you!

Are you tired of staring at your iPhone’s visual voicemails and wondering how to easily rescue them for your family history archiving needs? You can MacGyver them out, but iExplorer has a better solution for you!

My wife recently received her iPhone 6 Plus from UPS with great joy…
I bought it online a few hours after my 3am adventure to be among the first to preorder one.

So as a result, her Plus arrived a couple weeks after mine did.
(Actually, a few days earlier than Apple promised)

But this second Lester Plus was purchased in a much more civilized manner…
(No lengthy 3am digital dance during the first hours the new iPhone was ‘available.’)  It was just another calm 6:30am online transaction. Apple’s website was fully functioning by then, and I even had my cup of Joe within arm’s reach.

It was a snap and easily worth the extra wait for my wife’s iPhone to show up…
(I just didn’t want to chase stock availability and long lines for the next few months.)

Your Phone is a Time Machine
But before we activated my our second Plus, of course there were a few digital house-cleaning matters to attend to…

  • We eliminated the apps she wasn’t using any more on her old iPhone 4
  • Then deleted old voice mails, audio files and any mediocre photos
  • And did a full backup of her old iPhone’s data via iTunes
    (We’d use that backup to inject into her Plus.)

While going through some of the older media, we came across a few audio files that we definitely wanted to hold onto.
They were the sounds of our son my wife recorded when he was just a baby!
(carried over from her original iPhone 3GS)

Other precious moments to save were more recent voicemails from our now four-year-old ‘little man.’

And though the switchover to a new smartphone is supposed to be seamless, you really don’t want to play around with your priceless digital memories.
Especially around Halloween, you never know what horrors will appear
(or disappear)…

So I decided I’d better export those particular audio files before initiating the iPhone upgrade.

The Easy Way or The Hard Way?
Backing up the audio recordings was easy. They sync natively to iTunes.
But the voicemails were a different story. There’s no obvious way to save voicemails out of an iPhone’s visual voicemail ecosystem.

I’ve looked at this problem before and analyzed
three different ways to rescue iPhone voicemails.

During my initial research, I touched on third-party software to crack the voicemail code, but didn’t fully focus my attentions there, because I felt you shouldn’t have to pay someone else to release your own voicemails.

And the two do-it-yourself solutions suffered from the major problem of being really slow.

Now, as a father and a busy guy overall, I think I finally acknowledge that a faster solution is worth a few bucks.

iExplorer to the Rescue
So after a little more Googling, I took a closer look at iExplorer, a robust utility that allows you to easily export your files and media from your iPhone or iPad.
And yes, it also gives you easy access to those important voicemails and text messages you want to save…

So I proceeded to pony up $35 and downloaded the desktop software.

I plugged in my wife’s old iPhone…
Bam!
There were the voicemails we wanted.
Click.
Now, they’re in a new folder on my computer!
Click.
Next, I initiated a Time Machine backup.

And our precious voicemail files were speedily saved and backed up.
That was easy…

Now, to the task of activating my wife’s iPhone 6 Plus…!

Only Now, at the End, Do You Understand…
So is thirty-five bucks too much to shell out for a computer functionality you think should be free?

Yes, it’s a pretty penny, especially when you’re used to dropping only 99 cents on a new app.

But how much did you just spend on that new iPhone?
And look at all that time iExplorer just saved you.
And isn’t the price of dinner worth ensuring the safety of these priceless digital additions to your family history archive?

As my dad likes to say,
(which his father told him)
“You don’t get old for nothing!”

Thirty-five clams?
I’d pay twice as much…!