At Home with Tech

Unlock the power of all your technology and learn how to master your photography, computers and smartphone.

Category: family

Best Way to Quickly Reset your Zoom Shot after You’ve been Kicked out of your Home Office

Here’s a trick that can help you instantly relocate your laptop to another Zoom-friendly location at home when you’ve been unexpectedly banished from your usual room.

By now, we’ve all identified our preferred Zoom meeting locations at home where you can stream yourself to your world. Beyond finding a quiet space that’s not in the middle of your family’s normal traffic patterns, there are other factors that can make a particular corner Zoom/Teams/Google Meet-friendly.

For me, being close to natural light near a window is important. That’s an easy way to properly illuminate your face. That said, it’s not too hard to power up a small battery-powered LED light or a ring light.

Setting up in front of a relatively organized and clutter-free background is always a best practice to demonstrate some visual order and professional look in your shot. You probably don’t want to show off an unmade bed with unfolded towels and underwear fresh from the dryer heaped on top. (Of course, simply use a virtual background for an easy fix.)

The Most Important Detail in a Good Zoom Shot
Fundamentally, the one detail to nail when generating a flattering Zoom shot is to simply position your laptop where its webcam is at the same level as your eyes.

Your webcam should point horizontally to your eyes. It shouldn’t be focused up your nose towards the ceiling. (This unflattering angle is what you’d normally get if you’re sitting at your desk with your laptop). So, you need to somehow elevate your laptop.

One way to MacGyver that is to stack a few hard-cover books and then carefully place your laptop on top.

Always Have a Backup Plan
Angles. Books. Windows. Backgrounds. Who knew we’d be simulating TV live shots from home a few years back? But we’ve adapted.

The only problem is life invariably happens, and you may suddenly find yourself temporarily displaced from your normal Zoom set up. Then you’ve got to wing it and quickly find a flat surface somewhere else in your home to move your laptop for your next Teams meeting in three minutes.

And that can be harder to find than you may think, considering your family’s needs competing for the same spaces. (The inherent challenges of multiple concurrent remote meetings.)

Wouldn’t it be great if you could just magically plop your laptop wherever you wanted, even if there’s nowhere to put it?
A portable floor laptop stand can do exactly that for you.

Portable Laptop Stand
It’s effectively an articulating standing tray that you can grab with one hand as you escape into another room with your laptop. Think of it as a tripod for your webcam and simultaneously a portable standing desk for your laptop.

Laptop stands are usually designed for presentations on stage or video/media production work, but why can’t you have the same access to this solution for home use?

Another superpower for this kind of stand is it will bring your laptop back to eye level wherever you go, because you can easily adjust its height. No more need to stack books.

And you can fold it up when you’re done.

Time to Choose
Buying one is simple. There are numerous choices online in the $40-$50 range. Some are more expensive, but I don’t think it needs it to be built like a tank to withstand abuse. I know I’ll treat it well at home. I just want it to be steady and not fall over. (That would be bad.)

Amazon has a variety of choices. Here are three options:

I bought the Amazon Basics model, not because the Amazon Basics brand screams ‘best quality,’ but because it’s the tallest. So, when I choose to use it while standing, that would be best for my height.
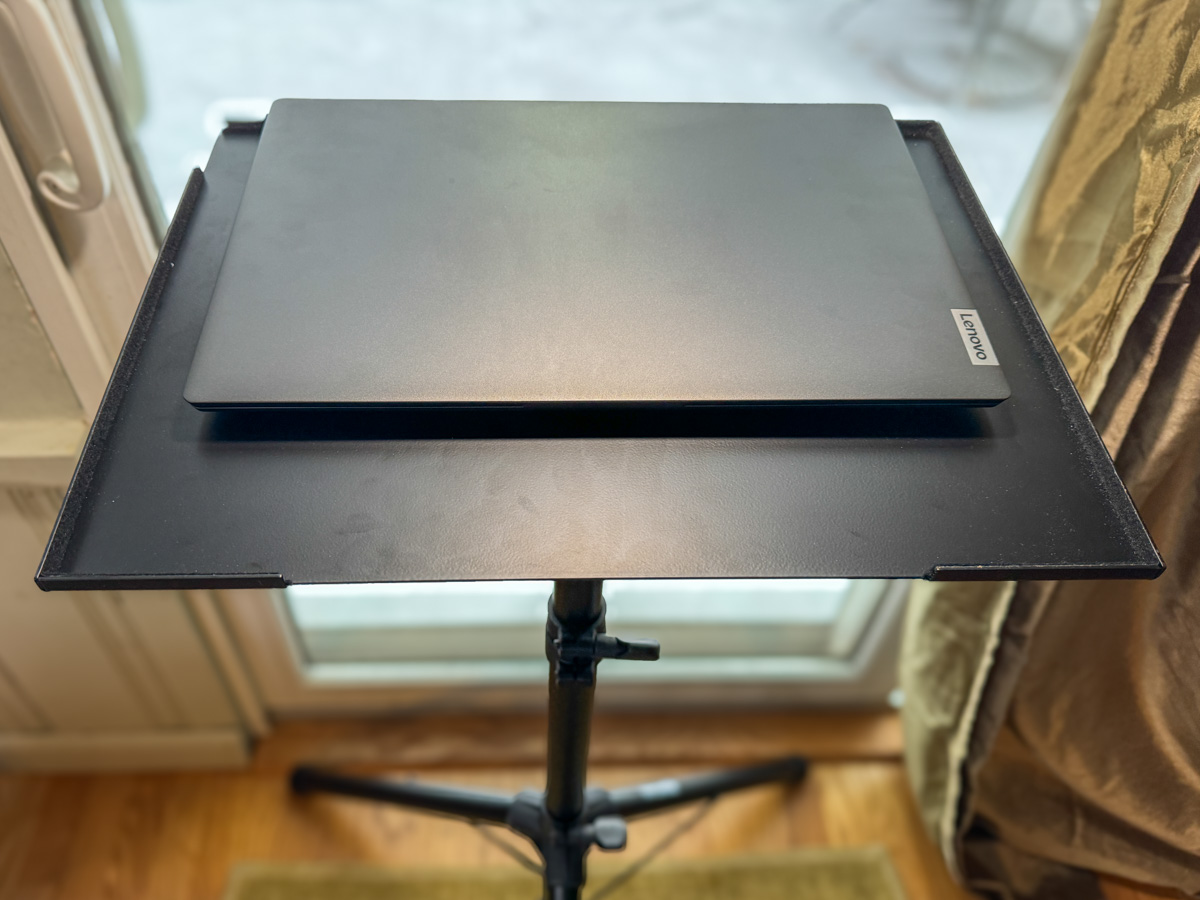
And it works just fine. In fact, it’s plenty beefy at over 10lbs. You can use it for your laptop, portable projector or any other piece of tech that needs a pop-up surface.

The Importance of Maintaining Visual Communication
Of course, you could always choose another path that sidesteps this entire challenge. Just don’t turn on your webcam. I know many folks follow this practice.

But I’ve said it before… If you want to stay connected to your world from the comfort of your home, you’ve got to show up for your close up.

Always keep your webcam on.

And a portable laptop stand can help make that all the easier no matter which room you’ve been banished to!

How to Use AI to Easily Improve your iPhone Photography

AI can effortlessly and perfectly select the people in your photos to individually brighten and edit. Here’s how to access this superpower using your iPhone and Adobe Lightroom.

I don’t travel about taking family photos with my own team of lighting professionals and a heavy bag of prime lenses (I wish). I typically just use the camera baked into my smartphone, which as you know is my trusty iPhone.

Sure, I sometimes get more ambitious and bring my GoPro, my Panasonic Lumix LX-10 or Lumix ZS200 with its bigger zoom. But my iPhone 15 Pro Max has a great camera system. And best of all, it’s always with me.

So, like the rest of us, most of my photography is generated through my phone.

When the Light is your Enemy
Even though my iPhone’s camera skills are admirable, the world usually doesn’t present perfect conditions to capture an optimal photo. Often, the lighting is not quite right.

Your subject can often look dark. Sure, my iPhone can sometimes handle this challenge. But it has problems (as does any camera) when my subject isn’t as well-lit as other parts of the frame. A similar limitation develops when the background is too bright (such as when your subject stands in front of a window with sun pouring in).

Then you’ve got yourself a silhouette shot, which is the opposite of what you probably wanted.

Yes, you can try to reframe, but that’s not always possible. The only option is to snap the photo and then try to fix it in post.

The Former Limits of Photo-Editing Solutions
There are any number of photo editing software options where you can brighten your photo to pump up how your subject appears. (Your smartphone will do this in one click.) But that can often start to overexpose the other parts of your image that are already sufficiently bright.

Professional photo editing programs can enable you to just select a portion of your photo to enhance, but there’s not been a one-click solution… until recently.

How to Brighten the People in your Photos using the AI in Adobe Lightroom
I use Adobe Lightroom Classic to organize and enhance my photos. The software now offers the ability to perfectly isolate and select people in photos with just one click. Being able to accomplish that used to take years of training and practice with complex software.

But with the power of Adobe Sensei AI, Lightroom does all that for you. Then you can easily pump up how the people in your photo look.

Here’s how:

  • In Develop mode, click on the circular Masking Tool on the top right. That’s your entry point.

On the top of your options, there are three boxes you can click to select:

  • Subject
  • Sky
  • Background

The AI-powered Masking Tool immediately isolates a perfect cut out and adds a mask that you can brighten, darken or adjust in any number of ways. If there are several people in your photo, and you want to enhance the look of just one, you can click on ‘People’ to select that individual.

It’s amazing.

Two Examples of Lightroom’s Masking Tool in Action
Here’s one example of using the Masking Tool to pump up the light and color saturation of just the two people in my shot overlooking Exit Glacier in Alaska’s Kenai Fjords National Park.

Brighten the People

And here’s another example where I used the Masking Tool to brighten this somewhat hidden young moose I spotted while biking near Anchorage.

Brighten the Moose

It’s not a perfect shot but being able to actually see the moose more clearly with the help of AI certainly improves it.

  • A warning: Clicking-in more light onto your subjects should be a subtle enhancement. Otherwise, it will look fake. So, sprinkle in your extra light sparingly.

Add Buttery Bokeh Blur Using your iPhone’s Portrait Mode
Once, you’ve got your photo subjects properly ‘re-lit,’ then you can focus on editing the backgrounds in your shots. A relatively new AI trick you can use is adding in background blur or ‘bokeh.’

This nifty visual effect used to be achievable only while taking photos with a more traditional camera in bright light using the right lens and aperture setting. Now you don’t have to be an expert photographer to get some bokeh. AI can create the same effect in post!

An iPhone camera’s Portrait Mode setting is designed to do exactly that. The iPhone’s software in the Photos app isolates the background from your subject, allowing you to dial in your background blur. You can snap away and then later choose to add bokeh (as long as the photo was originally taken in Portrait Mode).

This feature has been a game changer for me.

  • Another warning: You might want to dial back the amount of your iPhone’s auto bokeh level setting (Yes, you can do that.). Sometimes, just a subtle background blur is all you need. Too much may make the background look like it’s a complete digital replacement.

Three Levels of Bokeh
Here are three examples adding different levels of bokeh in Portrait Mode on my iPhone. I took this selfie while I was shopping for a new pair of reading glasses. You don’t need to see the optometrist office background. So, I thought it was a perfect opportunity to blur it out. But how much bokeh is the right level? You decide…

Lens Blur in Lightroom Classic
Adobe Lightroom Classic can perform the same bokeh trick with its new Lens Blur feature. In one click, you can create a depth map of your photo using Adobe Sensei. From that point, you can tinker further to adjust the scope of the blur.

Is It Cheating to Use AI to Improve your Photos?
The technology to digitally adjust your photos has been around for years. But some of the tricks were complex to pull off. The big change now is AI can do much of the same work for you with just a few clicks.

Should you feel like all of this is somehow cheating? Are you not really a good photographer, because you couldn’t originally capture your shot perfectly, and you need AI to save you?

Please.

If you’re a Luddite, maybe. Otherwise, this is simple technological progress.

Time to get on board and use some AI-oomph to make your photos shine brighter!