At Home with Tech

Unlock the power of all your technology and learn how to master your photography, computers and smartphone.

Category: video

Don’t Skip these Steps when Sharing Video Clips during a Zoom Meeting

To prevent Zoom from dooming your day, here are three ways to help you successfully share video content during your next Zoom call.

How many Zoom meetings have you been in over these months? More than a few? I hope by now, you’ve decided that you need to show up for your close up and take the necessary steps to improve your video shot. But you’re not done. Not by a long shot.

That’s because you may decide that it’s time to attempt the more advanced step of “sharing your screen” with your audience. And that’s an even trickier task to do properly, especially because it looks so easy.

If you believe that brain-busting audio feedback caused by an unmuted microphone is the most likely culprit to sabotage a Zoom meeting, then welcome to the unstable art of sharing your screen.

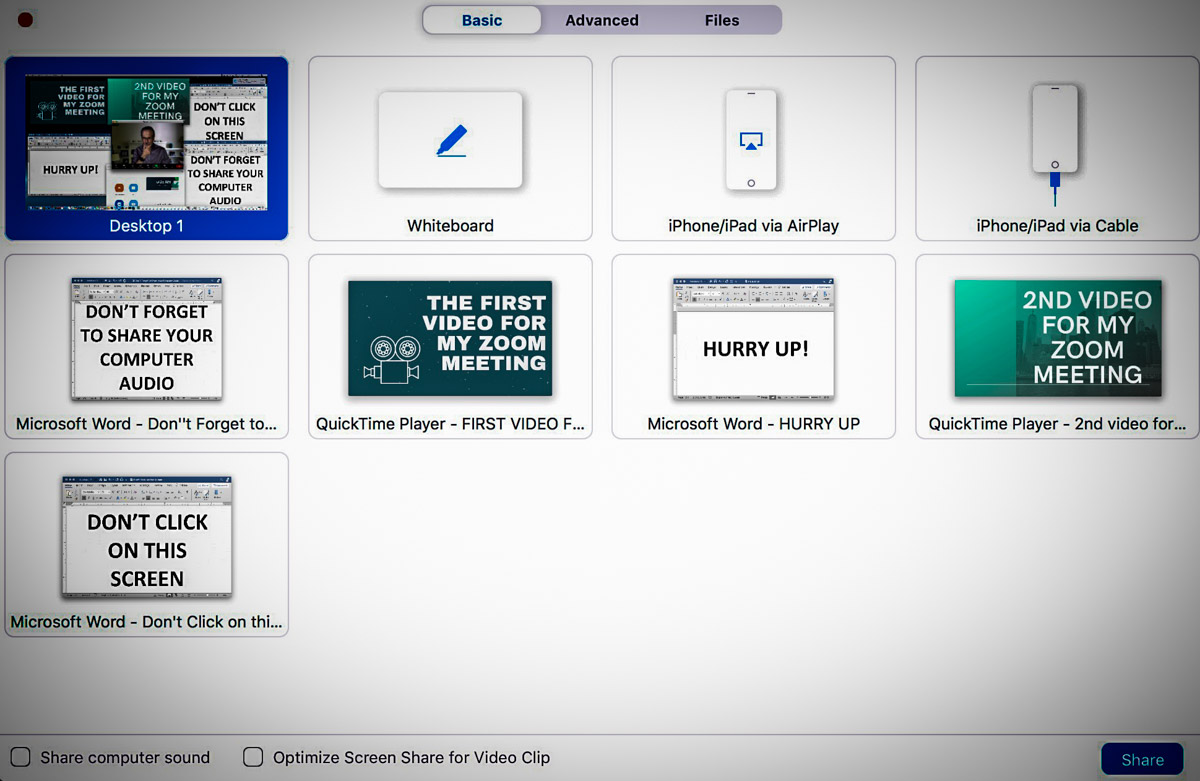
That said, the basics of sharing your screen are indeed relatively simple. You click on the ‘Share Screen’ tab and then you choose the open window on your screen to share. Simple. Right?

I have found the complexity lies in properly sharing the content. And for me, that content is often video.

Here are three easy steps to take to help ensure your success the next time you want to share video content during a Zoom meeting.

#1
Don’t Forget to Also “Share Audio”
First off, the biggest challenge in sharing a video clip on a Zoom call is making sure that your viewers can hear the clip. That’s because you always have to remember to click that bleeping little box on the bottom left that says “Share computer sound” before you select the correct window with your video to share.

That should be easy, right? But let me tell you, it’s also really easy to forget, because you’re mostly focused on finding the right open window to share. And then you’re not aware of your gaffe until someone writes in the chat section that you’re a Luddite.

It’s a maddening experience, especially when you know to look out for the problem.

Note to Zoom:
Please make your “Share computer sound” box sound more prominent. Or at least capitalize the words! Right next to “Share computer sound,” there’s a little box that says, “Optimize Screen Share for Video Clip.” Those words all begin in caps… why not offer the same level of grammatical importance to the audio box?

Isn’t it clear by now that so many have a hard enough time remembering to mute and unmute themselves when talking on Zoom. Please don’t make it even harder to activate the audio from the video clips we’re trying to share.

(User rant is now complete.)

#2
Make Sure All of Your Audio is Balanced
You should test all of your audio sources before you show up for your Zoom meeting. You might find that the output from your microphone is louder than your video clips. Or the reverse could be true.

If you set up a test Zoom session ahead of time and use a second device to hear how it all sounds, then you’ll be able to preview your viewers’ experience. And if necessary, you can adjust your audio levels.

It’s just another example where audio can be your Achilles’ heel during your Zoom presentation.

#3
House All of Your Video Clips in One Window Using Google Slides
During your Zoom meeting, if you want to share more than one open video window, you’ll likely begin to feel like you’re spinning plates on sticks.

It’s not that straightforward to switch between multiple windows. (There’s a reason why in the TV studio production world there’s a professional technical director dedicated to quickly switching between multiple video sources.)

So, the simple fix is packaging everything you want to share into one window. You can try to jam all of your visual elements into Word or PowerPoint, but that can get clunky with video.

I’ve found that Google Slides is a much more efficient way to house video. It’s easy to create a new page in Google Slides and then insert a video file.

  • Click ‘Insert’
  • Choose ‘Video’

But there are two limitations:

  • You can only upload video from Google Drive or YouTube. (You’re actually linking to the video.)
    Other ecosystems are not allowed.
  • If you’re using Google Drive, you can’t change the default video freeze frame that Google chooses as the image in your slide deck. So, when you click on your Google Slides page that houses a video, what you see is what you get before you click it to play.

Be Prepared
If there’s one common thread here, it’s that you should begin your live presentation prepared. You want to feel confident that Zoom will support you and not doom your day.

You’re effectively running your own multi-source live shot. A little practice and testing will go a long way to help you hit it out of the park!

44 Seconds from my Surreal Summer of 2020

Have you begun to see life differently too? Here’s my view from the beach…

I’m not complaining. As I write this, our state is currently not a hot spot. My family and I are healthy and safe. But of course, this summer of COVID-19 is anything but normal.

Even a walk on our local beach early in the morning feels… surreal.

Avoiding the crowds yet also craving more human interaction. Enjoying the uninterrupted patterns of nature and flow of water, though unable to avoid the constant awareness of instability and global disruption.

It sometimes seems like I’m living in someone else’s painting.

This short video I shot with my DJI Osmo Pocket provides a sense of this experience that I imagine you may also be feeling…


Again, I’m not complaining. Not really. It’s just so weird. And if I’m actually inhabiting a virtual painting in some alternate reality, I’m happy it can be at a beach on a sunny Saturday morning.

#FindingTheBrightSide

This Trick will Improve your Zoom Virtual Background

Using a virtual background with Zoom can be hard to get right. Here’s a way to upgrade your look in this digital arena.

Have you gotten a haircut yet? I haven’t. Now, after months of COVID-19 seclusion, my Zoom video shots look like a time portal back into ‘70s. Yes, I must admit I’ve started using hair gel to try to tame my mad scientist look. But I know it’s not sustainable for any long-term plan. I’m spotting lots of folks now with new haircuts. I certainly can’t wait two years until there’s a vaccine!

I think this speaks to what we’re all currently grappling with… how to traverse this new reality when the plan to continue to lock yourself up at home isn’t realistic anymore.

For now though, I’m relying on my hair gel as well as a cool video trick I’ve discovered to improve my Zoom videos when using virtual backgrounds. 

The Challenge Using Virtual Backgrounds
The holy-grail solution to generating a great virtual background is to place a green screen behind you that spans your entire background. Then, Zoom will create a beautiful chroma-keyed background using the green. 

The other option is to let Zoom figure it out without the benefit of a solid color. It works, but often with the edges of your head and body shimmering like an apparition.

Maybe some people don’t care how ‘solid’ they appear with their virtual background. But I just can’t let that sloppy look go without attempting to fix it.

The Limitations of Space Restriction
But, the challenge I face when trying to improve my own virtual background starts with the basic shot my iMac’s webcam creates. It’s a relatively wide field of view, and you will see much more of my home office than I’d prefer. 

No, there’s no dirty laundry to see. (I moved all that another foot away.)
But it’s still not pretty.

I can’t cover my entire background with a green screen, because there simply isn’t enough room based on the configuration of my home office. Even if I could somehow jam one in, I wouldn’t be able to move around anymore. So that really wouldn’t work…

But I’ve figured something else out that does…

Add a White Screen Behind your Head
My trick is to place some ‘white’ behind your head and shoulders. It can be with a white screen, curtain or even a big piece of white paper. It doesn’t have to cover your whole background. Just enough of your body.

Then, when you activate your virtual background, the white screen also disappears, and it does wonders to reduce that horrible black ‘helmet outline’ that often surrounds your head.

And if your virtual background displays lots of white or brightness behind your out-of-control hair, the overall key around your head will look much more realistic. That’s because the virtual background will appear to show through the mess of your hair. 

Otherwise, Zoom will digitally crop the edges of your hair with that black line circling your head.
(Now, if you want Zoom to give you a digital haircut, go right ahead!)

Brighter Backgrounds will Help You Light your Face 
There’s also another big benefit to adding some white behind you before activating your virtual background. It can really improve how your face looks!

This is especially true if your room is generally dark. That’s because ‘Zooming’ in a darker space generally forces your webcam to overexpose your face while trying to bring out more detail in the background of your shot.

So then, when you’re forced to lower the lighting on your face to fix the problem, you end up sitting mostly in the dark.  

And then it becomes a cascading problem, because you really want more light on your face to help your webcam display it properly. Without enough light, your whole shot starts to deteriorate.

But…

If you’ve got the white screen behind you, that will trick your webcam into thinking your background is relatively bright, and it will then automatically allow more light to hit your face and improve your look. 

Here’s my collapsible white screen.

And here’s how I look in my virtual background using my hidden white screen.

My coloring looks normal.

Here’s the same shot without using my white screen.

My skin tone is off, and I look overly pink and generally overly lit. Plus you see that unnatural black edging by my left ear.

I feel the difference is definitely worth the extra step of setting up the white screen.

Now, it’s showtime!

Give Your Face a Little Pop!
The collapsible white screen I’m using is the Studio Essentials Pop-Up Reversible Background (5’x6.5’ Black/White).

$49.99 at B&H Photo

But any home-grown solution using a roll of white art paper will work just as well.

One more tip: Don’t only focus on how your face and hair show up on your next Zoom call. Remember to also pay attention to how your shirt looks. Certain patterns will shimmer in your video (like my shirt did in the above test shots).

And hair gel.

Video chatting is here to stay. Sure, we’ll eventually get our haircuts, but getting our Zoom shots into tip-top shape will always be a best practice moving forward.