At Home with Tech

Unlock the power of all your technology and learn how to master your photography, computers and smartphone.

Tag: photo editing tips

How to Use AI to Easily Improve your iPhone Photography

AI can effortlessly and perfectly select the people in your photos to individually brighten and edit. Here’s how to access this superpower using your iPhone and Adobe Lightroom.

I don’t travel about taking family photos with my own team of lighting professionals and a heavy bag of prime lenses (I wish). I typically just use the camera baked into my smartphone, which as you know is my trusty iPhone.

Sure, I sometimes get more ambitious and bring my GoPro, my Panasonic Lumix LX-10 or Lumix ZS200 with its bigger zoom. But my iPhone 15 Pro Max has a great camera system. And best of all, it’s always with me.

So, like the rest of us, most of my photography is generated through my phone.

When the Light is your Enemy
Even though my iPhone’s camera skills are admirable, the world usually doesn’t present perfect conditions to capture an optimal photo. Often, the lighting is not quite right.

Your subject can often look dark. Sure, my iPhone can sometimes handle this challenge. But it has problems (as does any camera) when my subject isn’t as well-lit as other parts of the frame. A similar limitation develops when the background is too bright (such as when your subject stands in front of a window with sun pouring in).

Then you’ve got yourself a silhouette shot, which is the opposite of what you probably wanted.

Yes, you can try to reframe, but that’s not always possible. The only option is to snap the photo and then try to fix it in post.

The Former Limits of Photo-Editing Solutions
There are any number of photo editing software options where you can brighten your photo to pump up how your subject appears. (Your smartphone will do this in one click.) But that can often start to overexpose the other parts of your image that are already sufficiently bright.

Professional photo editing programs can enable you to just select a portion of your photo to enhance, but there’s not been a one-click solution… until recently.

How to Brighten the People in your Photos using the AI in Adobe Lightroom
I use Adobe Lightroom Classic to organize and enhance my photos. The software now offers the ability to perfectly isolate and select people in photos with just one click. Being able to accomplish that used to take years of training and practice with complex software.

But with the power of Adobe Sensei AI, Lightroom does all that for you. Then you can easily pump up how the people in your photo look.

Here’s how:

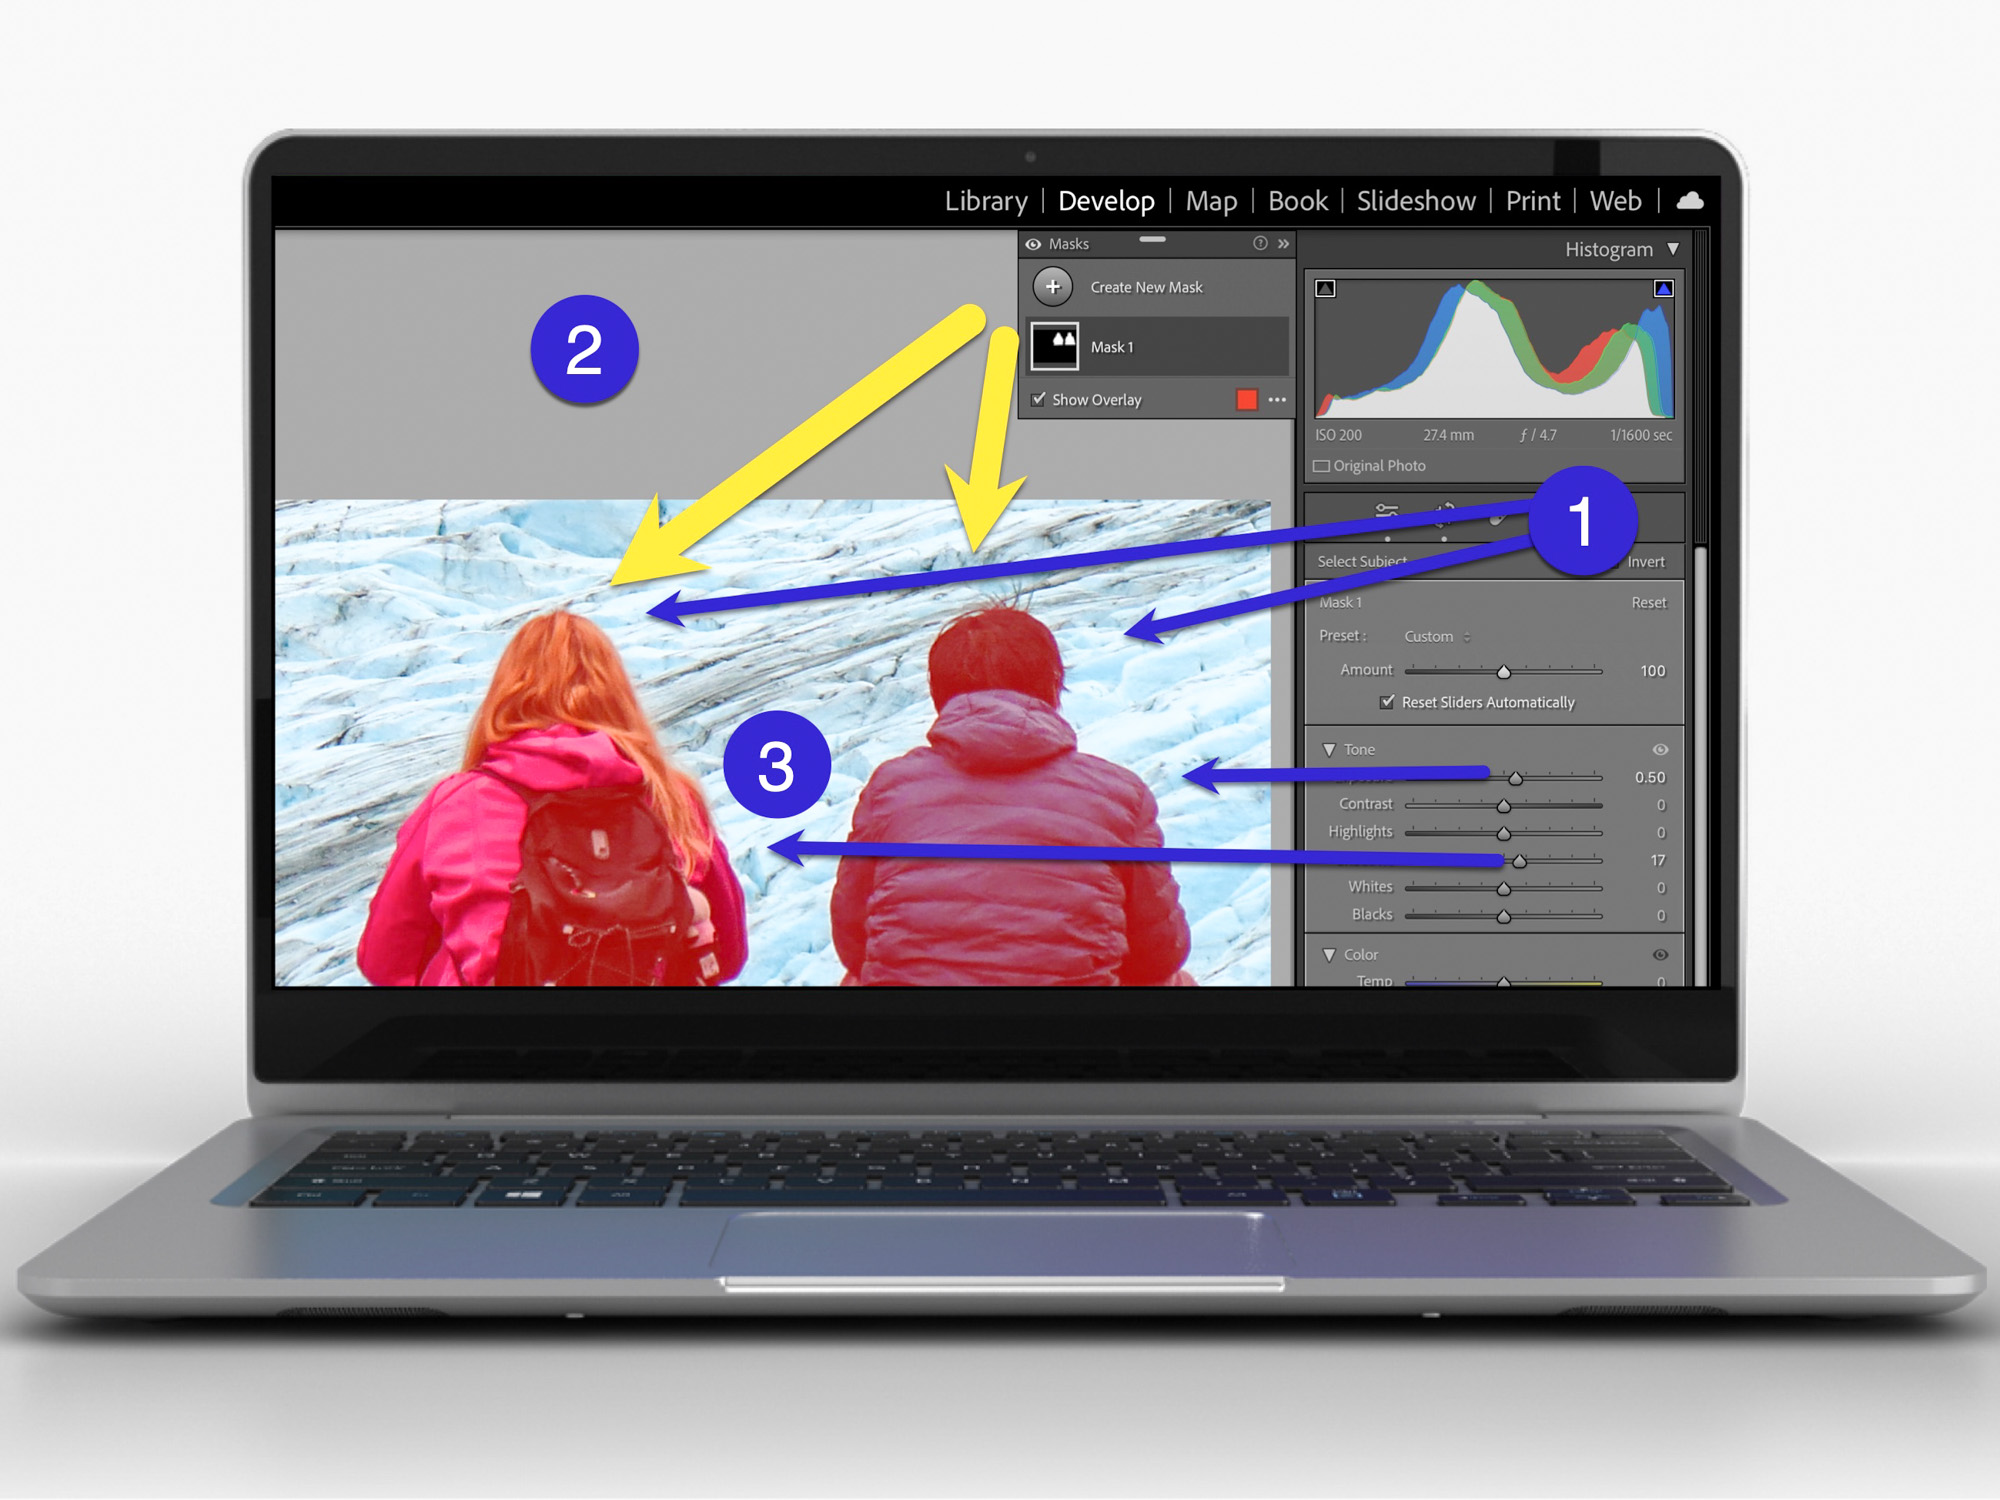
  • In Develop mode, click on the circular Masking Tool on the top right. That’s your entry point.

On the top of your options, there are three boxes you can click to select:

  • Subject
  • Sky
  • Background

The AI-powered Masking Tool immediately isolates a perfect cut out and adds a mask that you can brighten, darken or adjust in any number of ways. If there are several people in your photo, and you want to enhance the look of just one, you can click on ‘People’ to select that individual.

It’s amazing.

Two Examples of Lightroom’s Masking Tool in Action
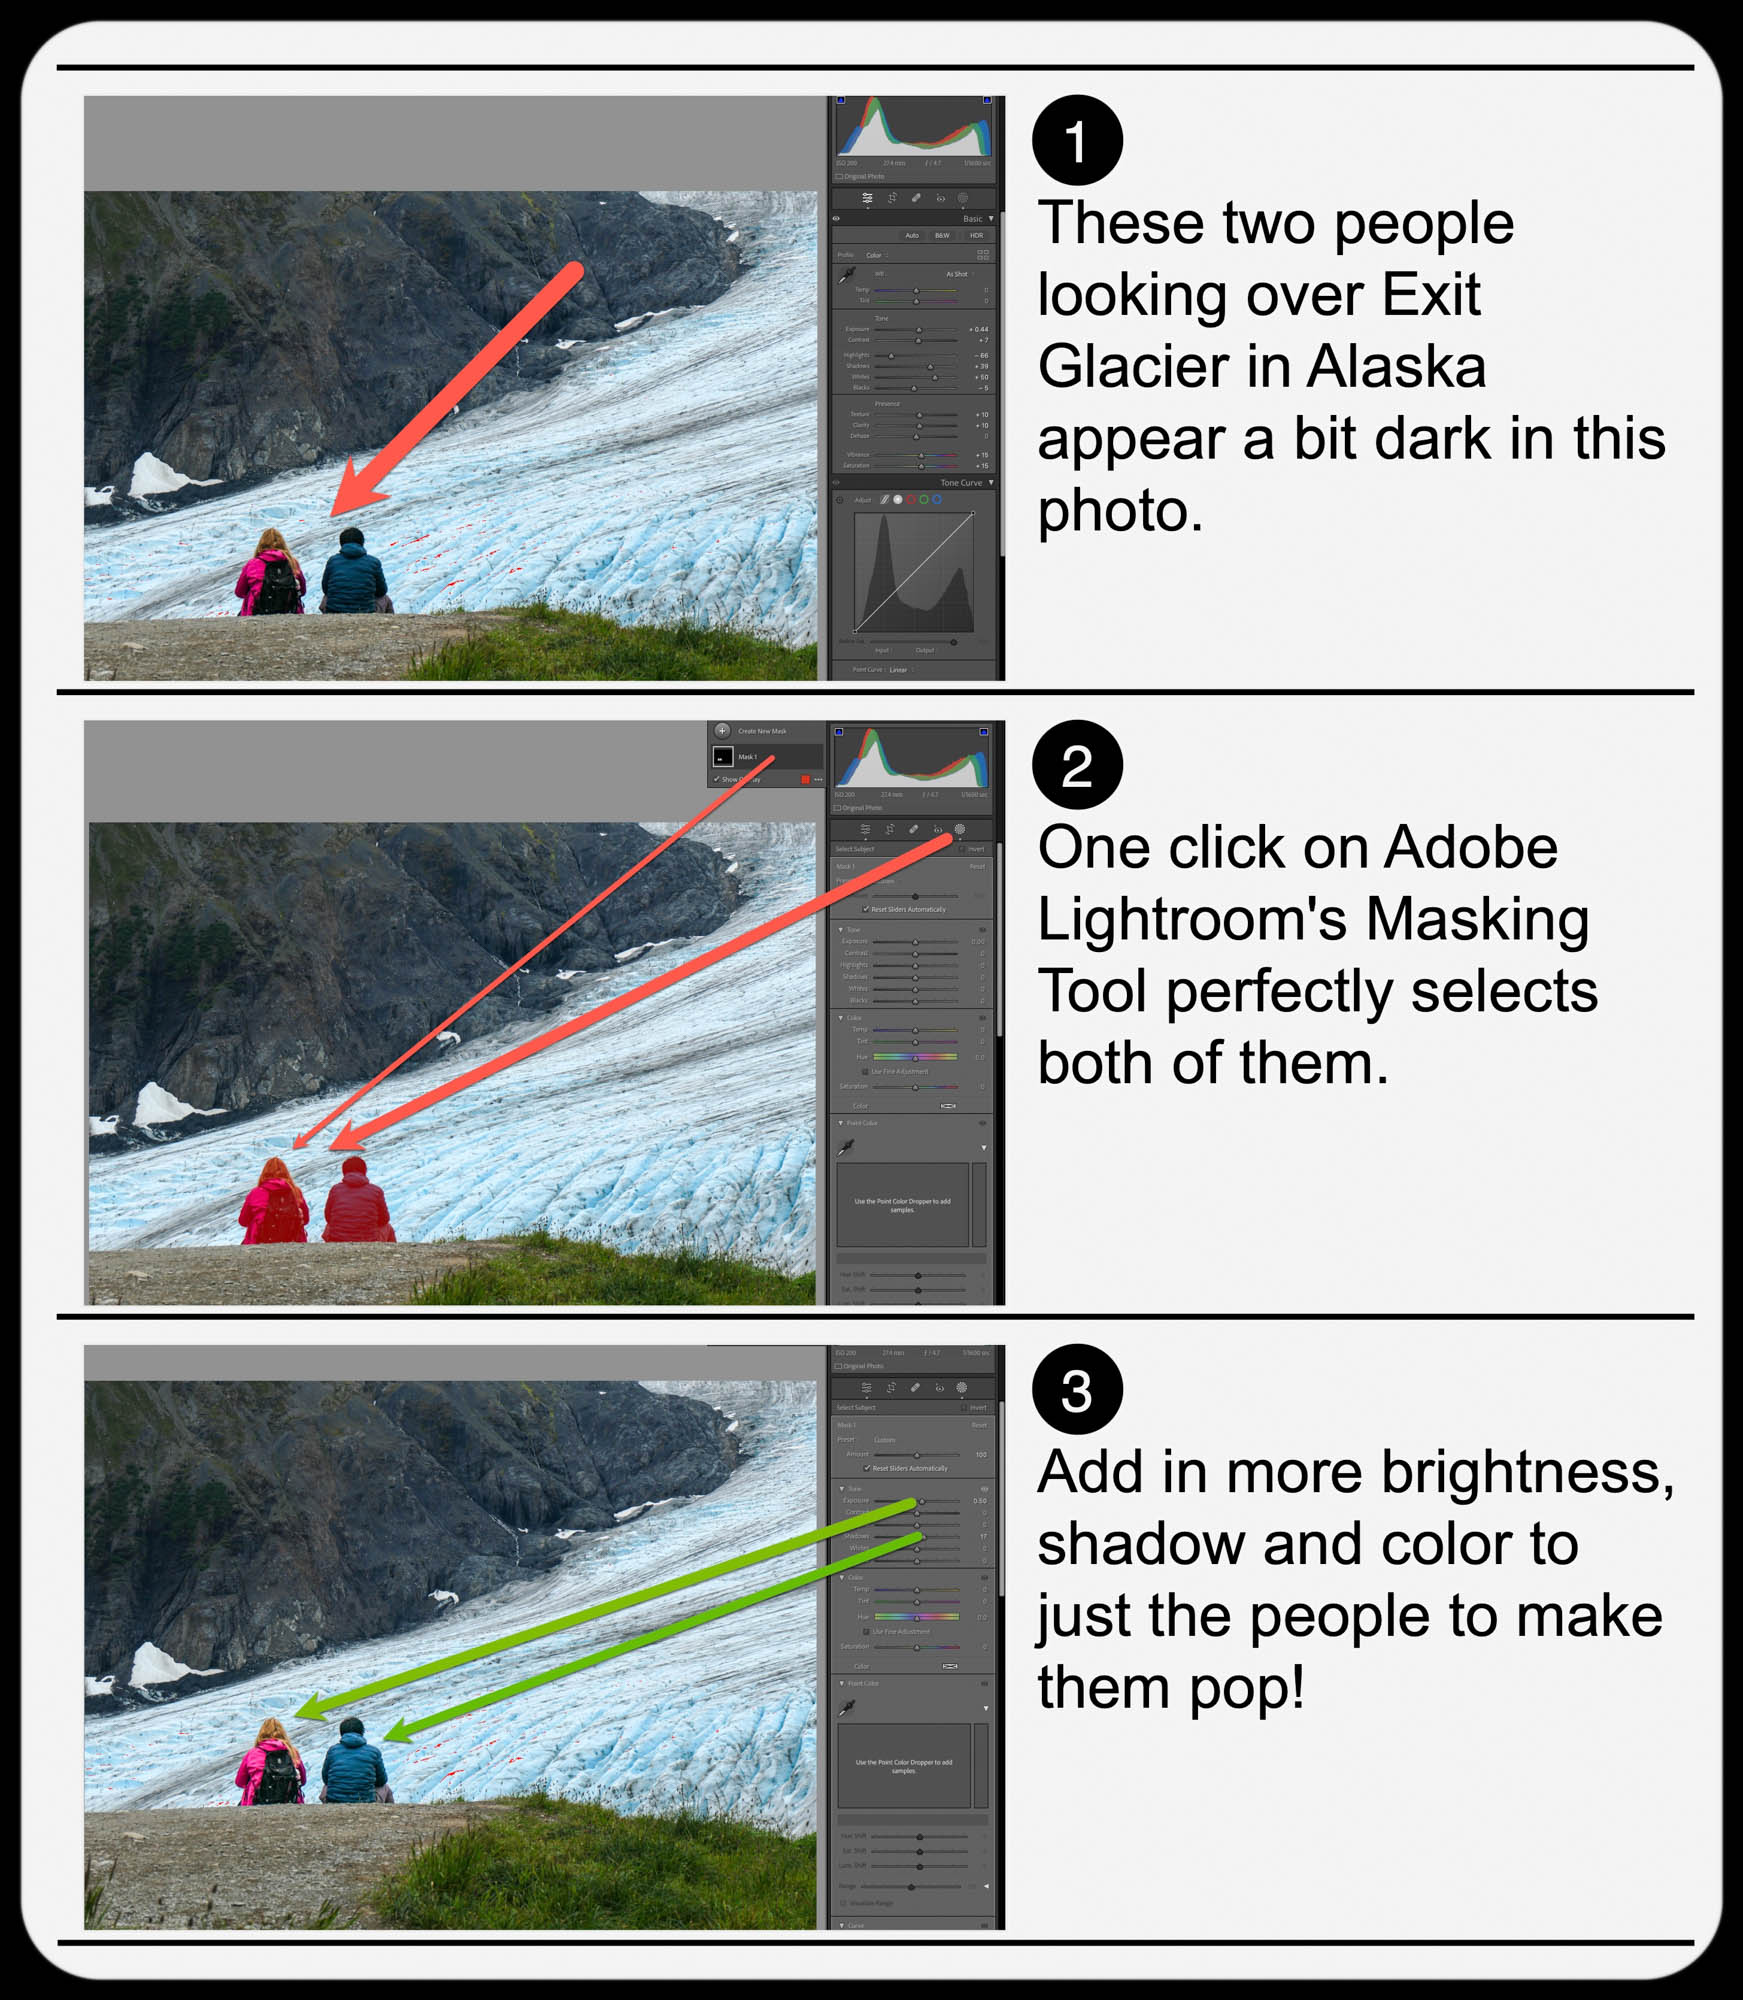
Here’s one example of using the Masking Tool to pump up the light and color saturation of just the two people in my shot overlooking Exit Glacier in Alaska’s Kenai Fjords National Park.

Brighten the People

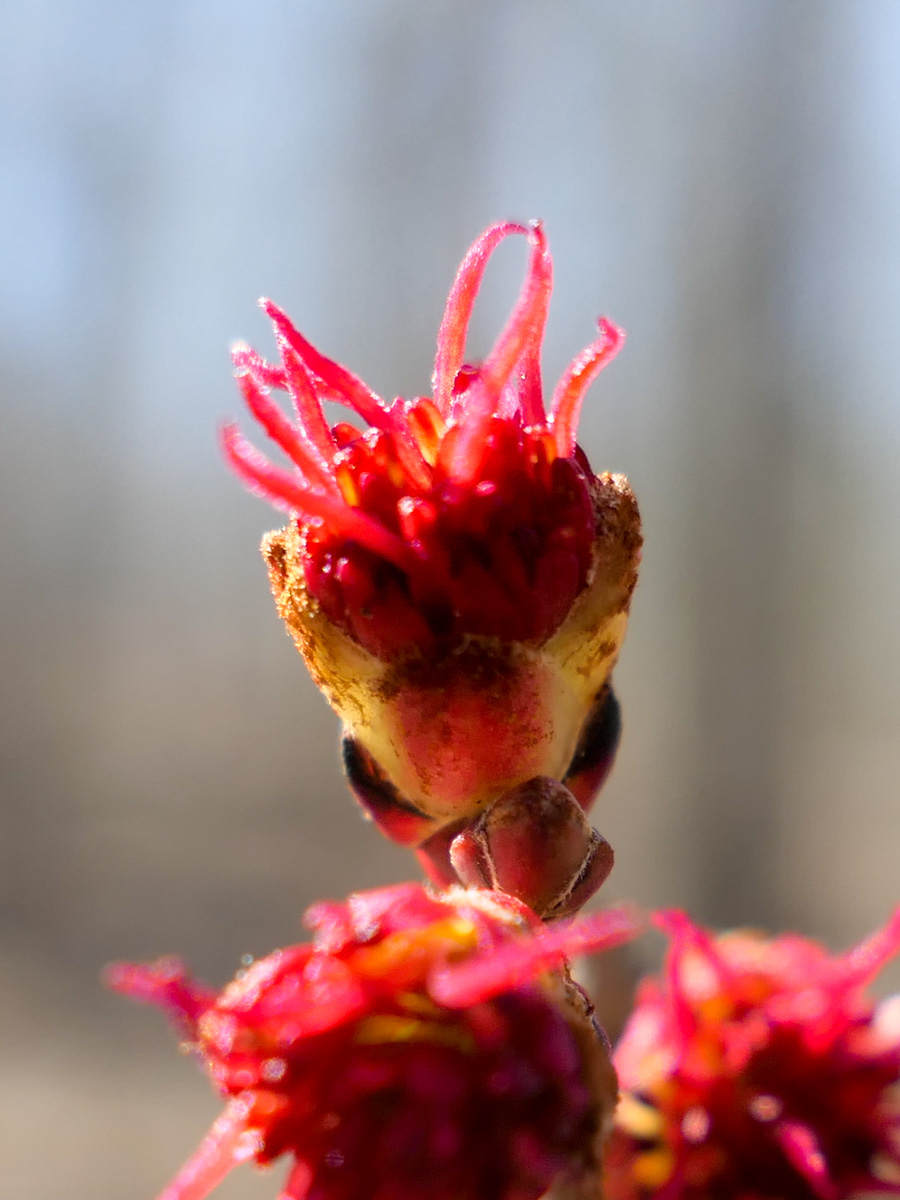
And here’s another example where I used the Masking Tool to brighten this somewhat hidden young moose I spotted while biking near Anchorage.

Brighten the Moose

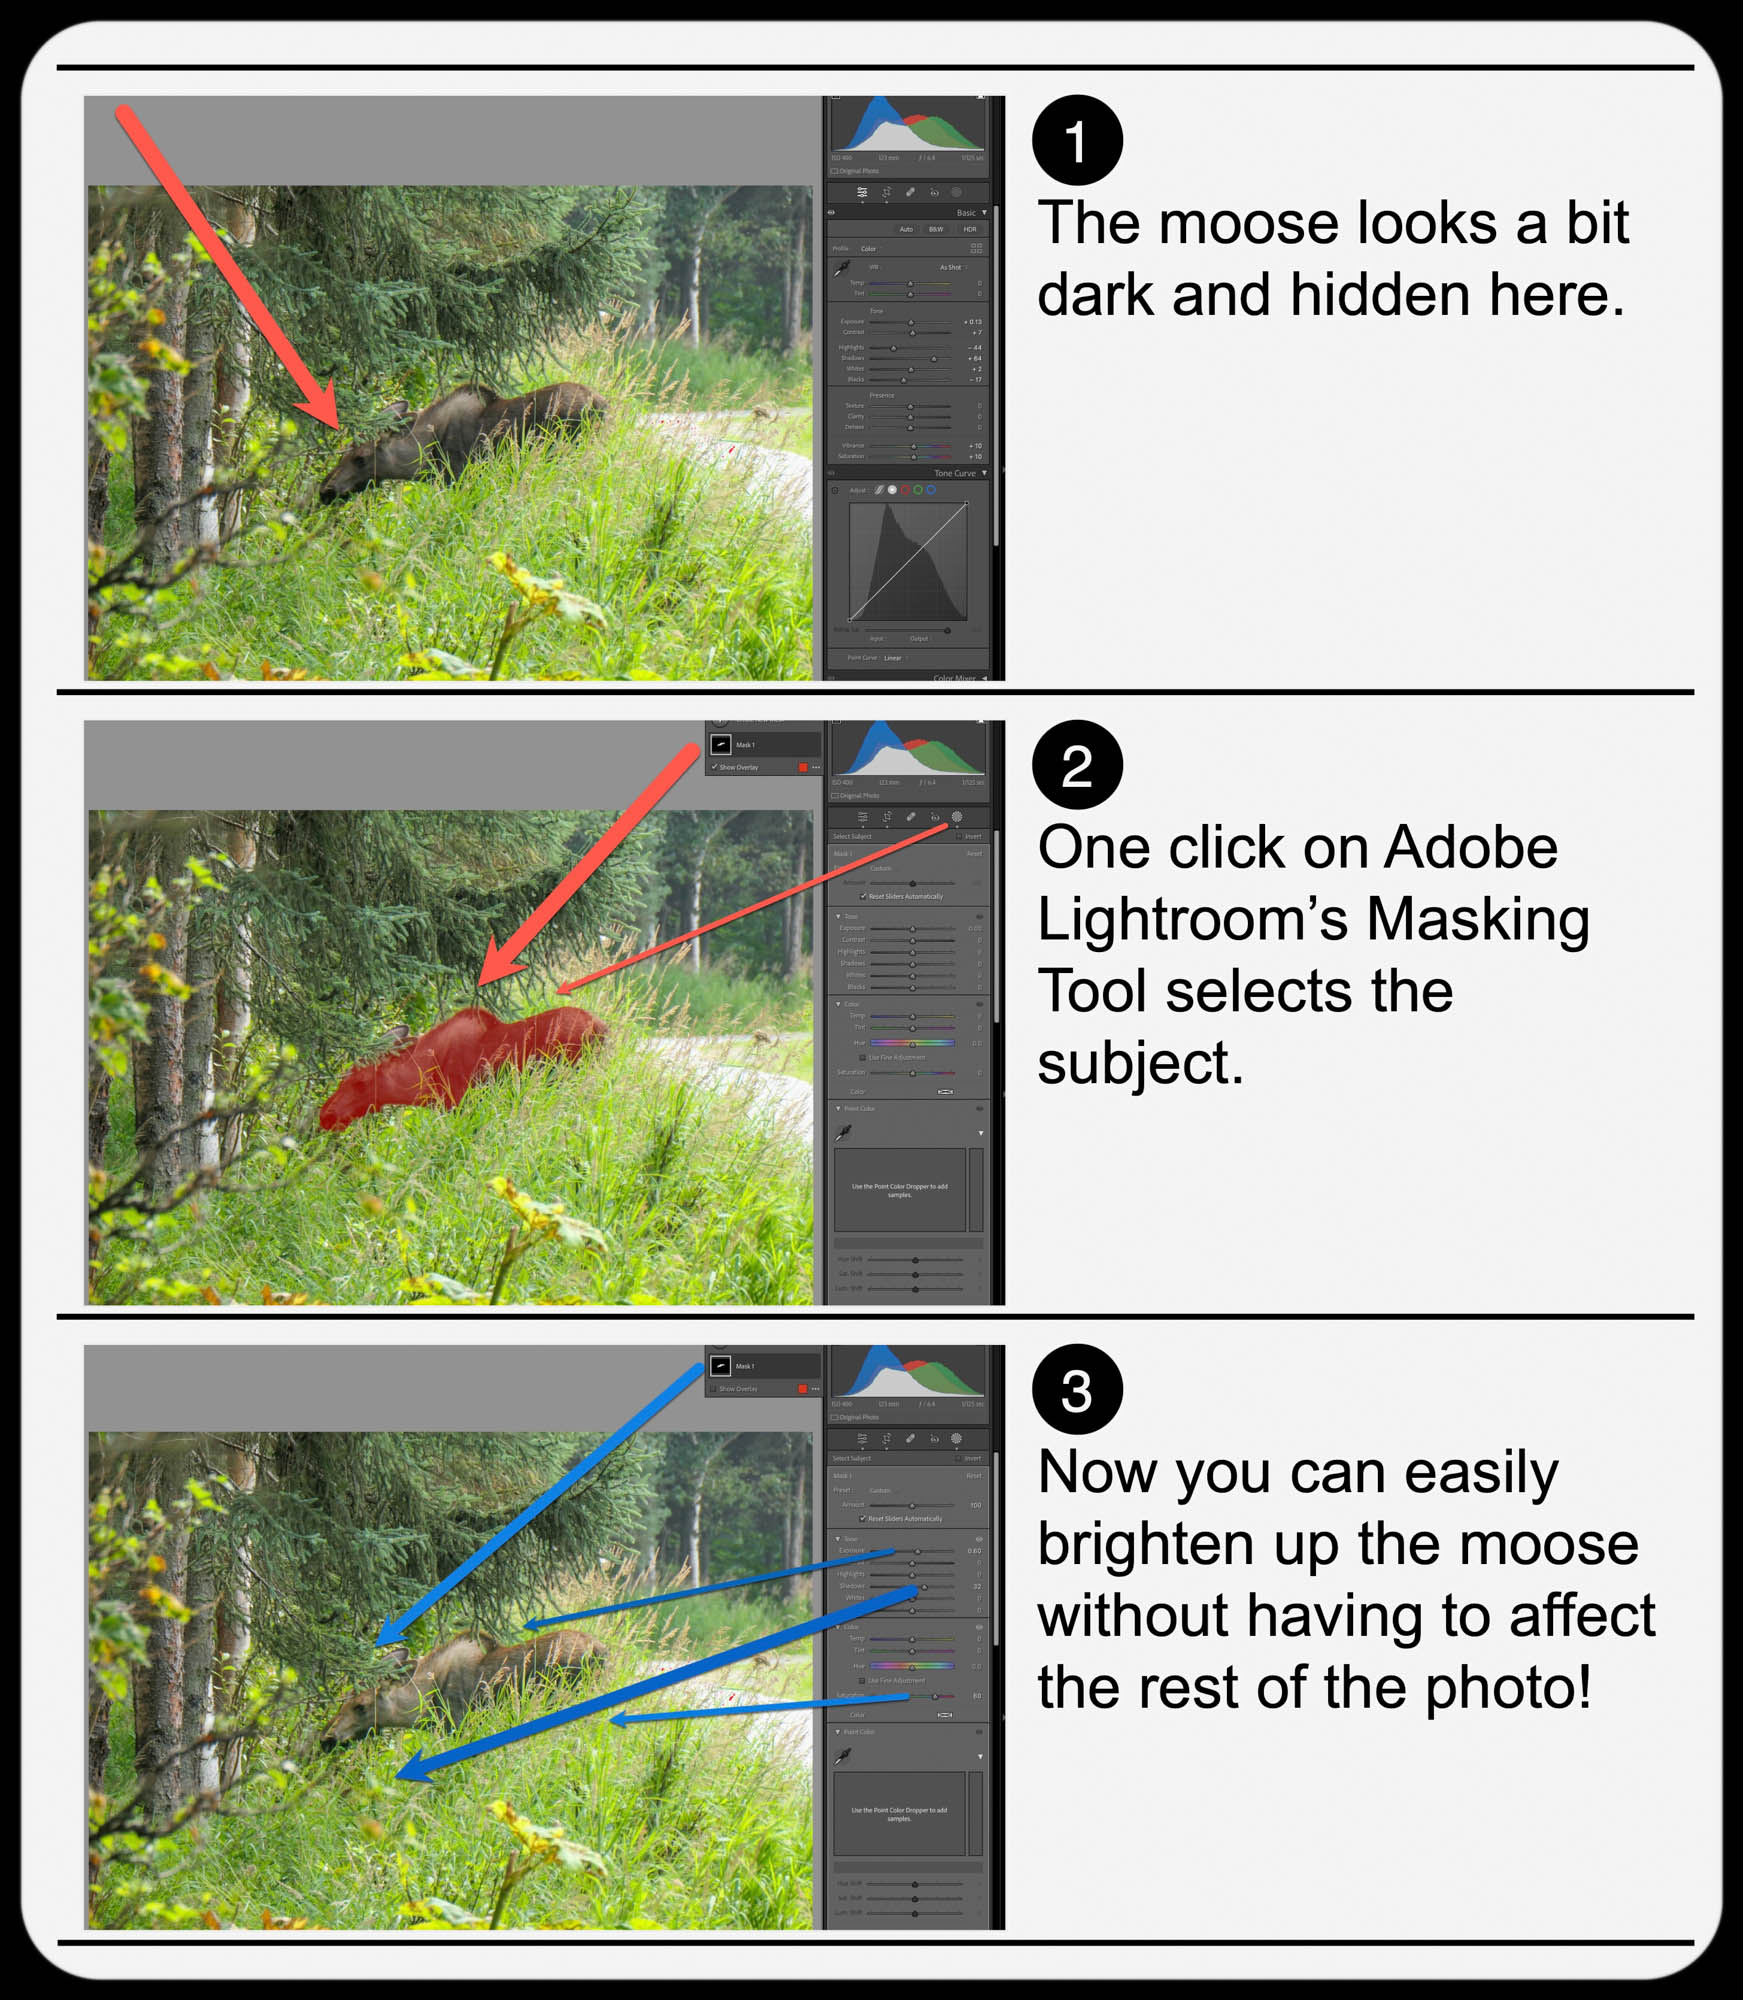
It’s not a perfect shot but being able to actually see the moose more clearly with the help of AI certainly improves it.

  • A warning: Clicking-in more light onto your subjects should be a subtle enhancement. Otherwise, it will look fake. So, sprinkle in your extra light sparingly.

Add Buttery Bokeh Blur Using your iPhone’s Portrait Mode
Once, you’ve got your photo subjects properly ‘re-lit,’ then you can focus on editing the backgrounds in your shots. A relatively new AI trick you can use is adding in background blur or ‘bokeh.’

This nifty visual effect used to be achievable only while taking photos with a more traditional camera in bright light using the right lens and aperture setting. Now you don’t have to be an expert photographer to get some bokeh. AI can create the same effect in post!

An iPhone camera’s Portrait Mode setting is designed to do exactly that. The iPhone’s software in the Photos app isolates the background from your subject, allowing you to dial in your background blur. You can snap away and then later choose to add bokeh (as long as the photo was originally taken in Portrait Mode).

This feature has been a game changer for me.

  • Another warning: You might want to dial back the amount of your iPhone’s auto bokeh level setting (Yes, you can do that.). Sometimes, just a subtle background blur is all you need. Too much may make the background look like it’s a complete digital replacement.

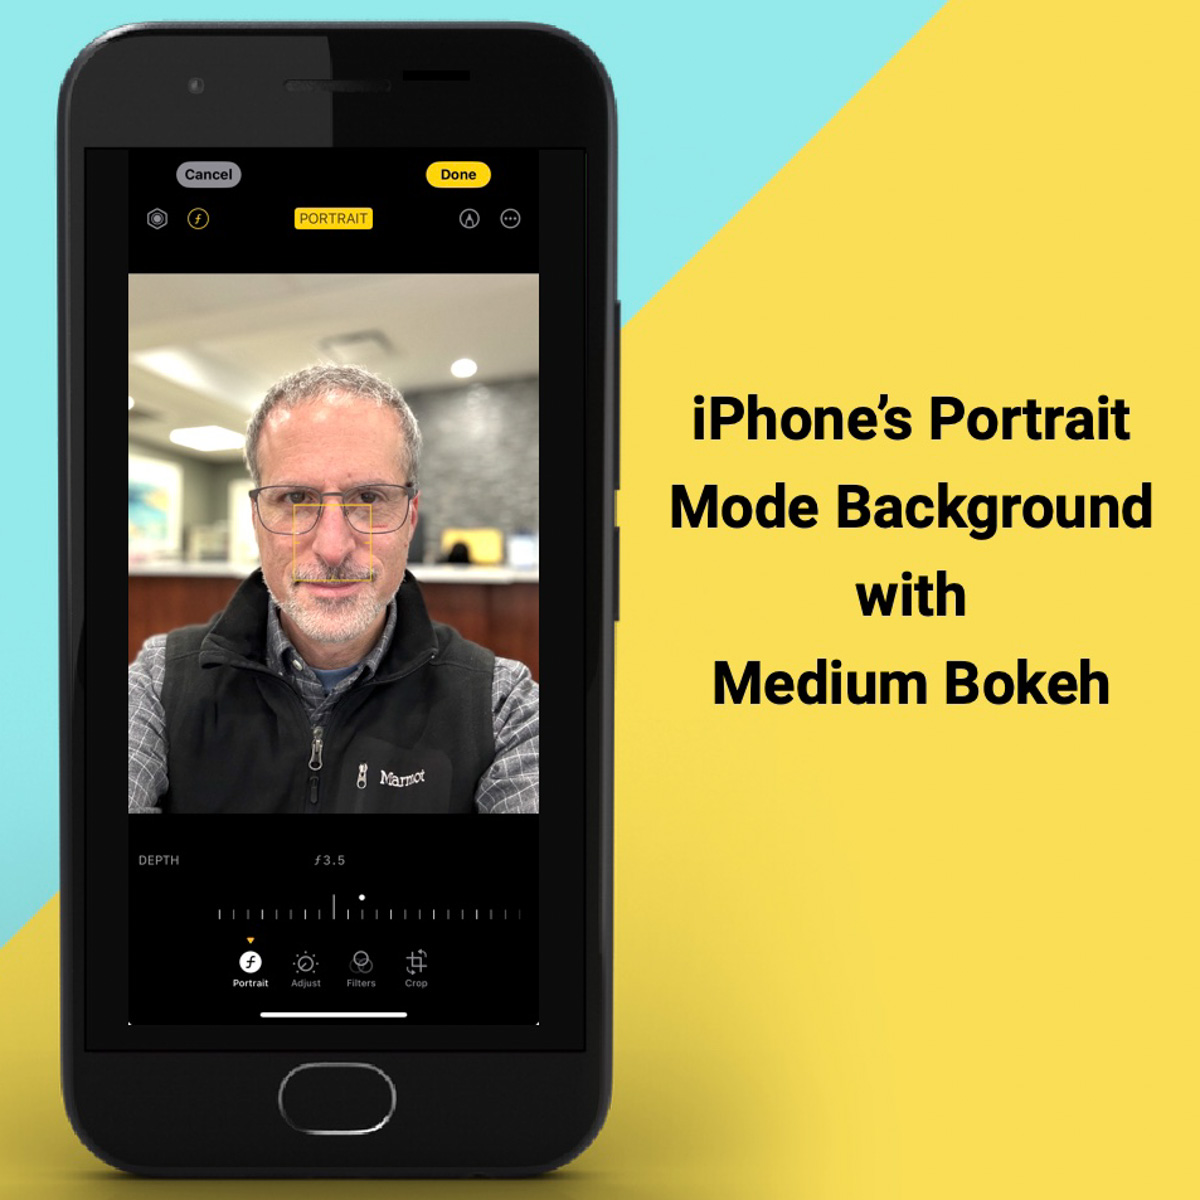
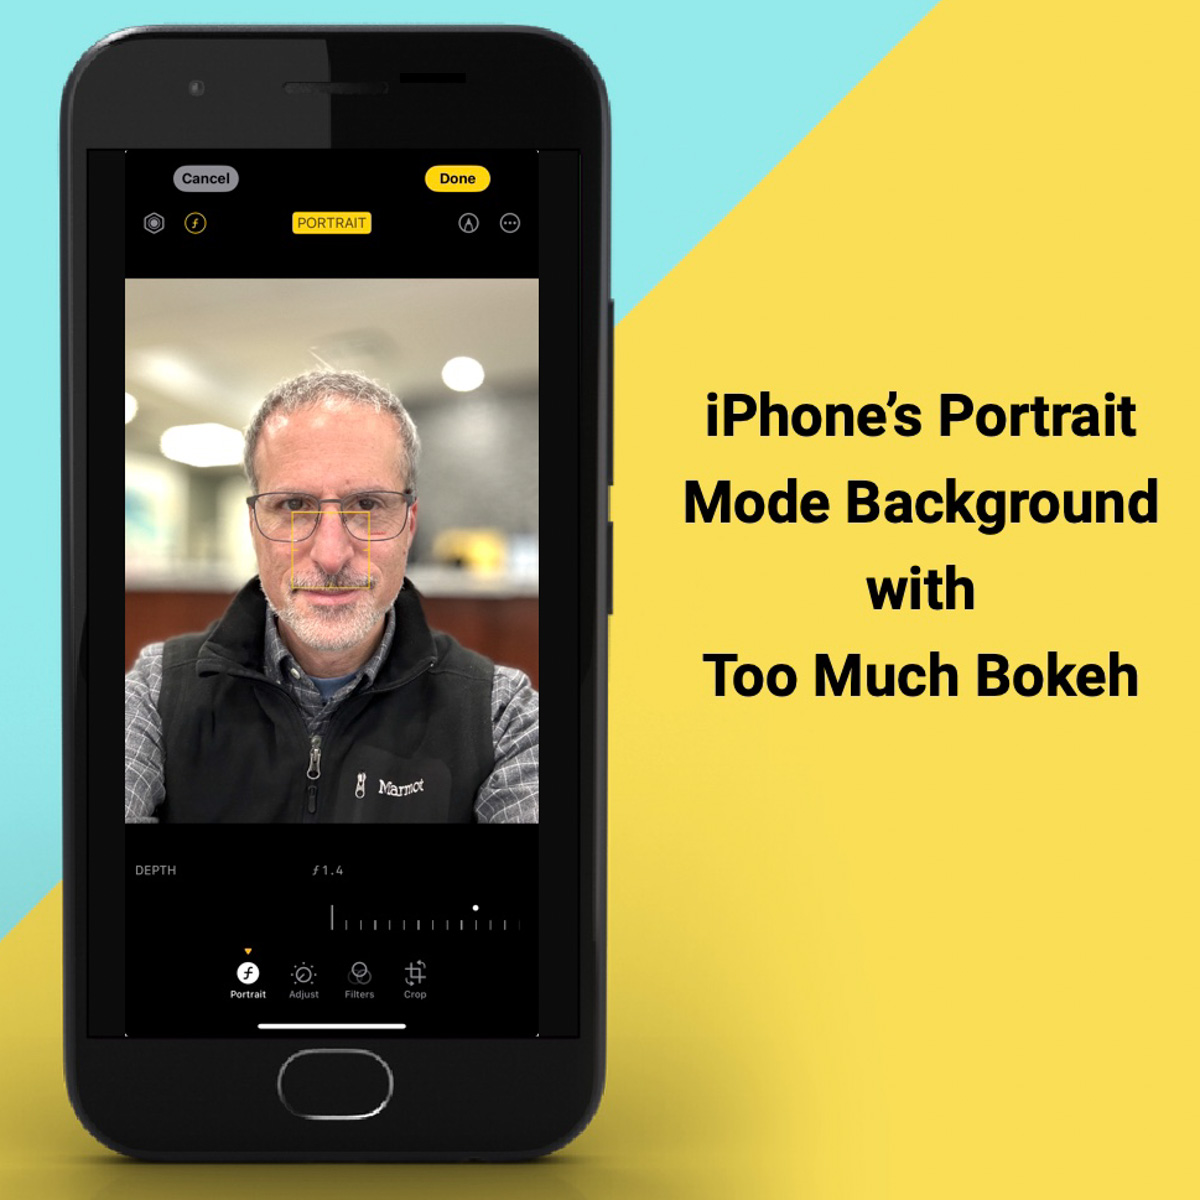
Three Levels of Bokeh
Here are three examples adding different levels of bokeh in Portrait Mode on my iPhone. I took this selfie while I was shopping for a new pair of reading glasses. You don’t need to see the optometrist office background. So, I thought it was a perfect opportunity to blur it out. But how much bokeh is the right level? You decide…

Lens Blur in Lightroom Classic
Adobe Lightroom Classic can perform the same bokeh trick with its new Lens Blur feature. In one click, you can create a depth map of your photo using Adobe Sensei. From that point, you can tinker further to adjust the scope of the blur.

Is It Cheating to Use AI to Improve your Photos?
The technology to digitally adjust your photos has been around for years. But some of the tricks were complex to pull off. The big change now is AI can do much of the same work for you with just a few clicks.

Should you feel like all of this is somehow cheating? Are you not really a good photographer, because you couldn’t originally capture your shot perfectly, and you need AI to save you?

Please.

If you’re a Luddite, maybe. Otherwise, this is simple technological progress.

Time to get on board and use some AI-oomph to make your photos shine brighter!

Why Cropping into your Photos can Save your Shots

When editing your camera’s photos, you might need to look for the shot within the shot. Here are some examples.

After you snap a photo, you may have a good sense whether you’ve captured the image you want. Instant digital review certainly is a wonderful thing. But I would recommend not immediately deleting a photo that didn’t catch the moment or missed its intended focus point. Perhaps there’s a different element in the shot you’re not aware of that is in focus.

If you take a little time to study these photos, it’s amazing what you might find hidden in plain sight. And thanks to those many millions of pixels that are crammed into photos, you can usually crop deep into the image to pull out a detail with clarity.

No, it’s not quite like that scene from “Blade Runner” where Harrison Ford’s Deckard closely examines a digital photo and tells the computer to “move in and enhance.” But it’s amazingly close. You may not be able to print a large poster of your super-cropped photo, but it’ll likely still look great on your smartphone or computer screen.

Follow the Focus
I enjoy snapping flower shots with my Panasonic Lumix LX10. I prefer using manual focus in the attempt to make the flower pop out of its blurred background (bokeh).

But since the area of focus is especially narrow, it’s easy to miss the mark.

Instead of discarding these three pics that missed their focus targets, I followed the camera’s focus and then cropped in to save the shots.
(I use Adobe Lightroom.)
Yes, I missed the center of this flower, but the crisp edge of the petal is still interesting.

Much of this alien-like plant looked blurry, except for the tip of the back blooming stem. So, I zoomed in super tight to center on those crazy red sprouts.

Most of these fallen tree blossoms on my driveway ended up out of focus, but I cropped in tight enough to locate a few that weren’t caught in the blur.

Find your Needle in the Haystack
Even if focus isn’t a problem, you may still want to crop into a portion of a photo to give it some punch. If the entire shot isn’t that special, perhaps there’s a strong section to highlight.

I’ve been doing a lot of hiking with family and friends over the past year, and I’ve discovered that stunning views in nature don’t always translate into a quickly snapped photo. That usually happens to me when I try to take shots of a bubbly stream in a forest. It’s difficult to capture that sparkly view. So, when editing those pics, I sometimes explore the motion in the water.
In this cropped image I snapped with my iPhone, I was drawn to the linear patterns in the water created by the stream’s rush over rocks.

Show a Piece of the Puzzle
Beyond using this photo-cropping technique as a fix, you may find ongoing enjoyment in intentionally creating cropped shots that represent a piece of a larger story. (I certainly have.)

Sometimes a taste is all you need to fill in the rest.

I’ll give you a hint: My 5th grader’s science experiment using salt, hot water and a piece of string

If you’re still left with a mystery, is that so bad?

Less is More
I often like to say that “less is more” in visual storytelling. This perspective comes from my professional experience in video content creation and has certainly held up throughout my personal photography work.

Enjoy your own exploration of all of those smaller spaces in your photos.

How to Remove an Undead Zombie Eye from a Photo

halloween-eye

Sometimes a perfectly good-looking eye won’t reflect its twin in a camera’s flash. That can really ruin a picture. Bring it back to life in seven easy steps with some photo-editing voodoo from Adobe Lightroom!

I call it ‘Dead-Eye Syndrome.’ And it’s a killer. It can unexpectedly strike at the heart of your favorite photos.

We all know how ‘red eye’ is a common problem with flash photography.
And how that devilish defect tends to occur in low-light situations when someone’s pupils are wide open.
(Blue-eyed people have a greater problem with this than brown-eyed folks.)

But barring this complication, eyes tend to normally reflect the flash in the form of a glint or sparkle.
Totally expected…

In certain circumstances though, one eye may unfortunately reflect the flash less directly than the other eye. Or sometimes not at all….
Now that can look really weird!

And the otherwise best photo you’ve taken in years can make somebody look like an undead zombie.

This Dead-Eye Syndrome is definitely going to ruin that pic…

Time for an Eye Job
Red eye is so easy to fix these days. Cameras and computer software have simple tools to magically turn all that red to black.

But what are you supposed to do with a dead eye?!
Well, to bring it back to life, you’ve got to give it the similar glint of its partner.

And that’s going to take a little tech voodoo…

Dead Eye Surgery in Seven Steps
The basic task is to clone the glint from one eye and place it on top of the sickly-looking pupil in the other eye.

Here’s how you do it using Adobe Lightroom 6:

  1. Click on the ‘Spot Removal’ tool.
  2. Click on ‘Clone.’
  3. Adjust the Brush Size to exactly cover the reflection of the good eye.
  4. Move the tiny circular brush to the dead eye and click where the reflection should be.
  5. Lightroom will choose a section from the photo to clone and highlight it with a second circle.
  6. Drag that second circle to hover back over the flash reflection in the good eye.
  7. Click again on Spot Removal to repair the dead eye and lock in the change.

It’s a little counterintuitive, but what you’re essentially doing with ‘Spot Removal’ is removing the ‘dead spot’ that should have the glint in it, and then replacing it with the appropriate flash reflection from the other eye.
(As opposed to copying the glint from the good eye and then pasting it to the dead eye)

Voila! Both of your eyes now have matching reflections.
Normality has been restored in your picture.
You are no longer an undead zombie.

Take a look at this example:

daddy-zombie

This is cropped in from the original photo. I think part of the frame from my glasses is also a contributing culprit that’s blocking the flash’s reflection. But it’s still a good example to use.


no-more-daddy-zombie

After surgery – No more Daddy Zombie…


Illuminating the Darkness
I know there’s lots of debate about the appropriateness of touching up a face in a photo.

I don’t think this falls under the same category of concern.
You don’t really have a non-reflective dead eye.
(Right?)
There is no darkness to your soul.
(I hope.)

It’s more of an aberration created by technology.
(Unless your evil eye always photographs that way… if so, immediately run to your ophthalmologist…!)

We’re simply reversing a little error and letting your true beauty shine through…

You’re welcome.