At Home with Tech

Unlock the power of all your technology and learn how to master your photography, computers and smartphone.

Tag: photography tips

Searching for Silhouettes on a City Street at Sunrise

People walking in Baltimore's Harbor East neighborhood at sunrise

The orange glow of the sun that floods the landscape at sunrise or sunset is a great time to photograph silhouettes and shadows. Here’s how I maximize that opportunity.

If you’re lucky enough to be walking on a city street facing due east or west when the sun is low in the sky, it’s time to take out your camera. That’s when you can easily find magical silhouettes and the shadows of people bathed in sunlight.

Your eyes may only sense a blinding fog of bright orange. But your camera can likely peer through that optical interference and capture enough detail to be later optimized in post.

When editing these photos, I find it ideal to focus on deepening the silhouette effect in a targeted fashion. I accomplish that using Adobe Lightroom with the AI-powered Masking/Objects tool. That allows me to easily select the silhouetted images in the foreground to darken them further without affecting the rest of the photo.

Here are a few examples.

Baltimore, Maryland’s Harbor East (2025)
I snapped this sunrise shot as two men walked to work by the marina.
Two men walk to work in Baltimore's Harbor East neighborhood at sunrise

Facing East at Grand Central Terminal (2012)
Though not technically a street, the Main Concourse at Grand Central channeled the morning’s rays onto New York City commuters as they rushed to their jobs. (I think some of these folks may already be late, as you can tell from the clock.)
Commuters rush through Grand Central Terminal in the morning

Facing West on a Street in Barcelona (2008)
These two women were enjoying their sunset stroll.
Two women walk on a street in Barcelona at sunset

Morning Stretch in Hong Kong (2005)
I captured this quiet moment as I explored the neighborhood during a work trip. Even if the sun isn’t in the perfect position, a shaded space with a bright background can offer your camera a similar silhouette effect.
Man's morning stretch in Hong Kong
The Power of a Good Silhouette
Whether you have your smartphone or a mirrorless camera to compose your photo (I used my Panasonic Lumix DC-ZS200D for my Baltimore pictures), sunrise and sunset are perfect times to capture the landscape.

If you can frame the bright sun in your shot, that’s great. But for me, I’m often more interested in the dark shadows.

Timelapses from our Royal Caribbean Cruise to CocoCay and Nassau

Independence of the Seas and Vision of the Seas docked at CocoCay

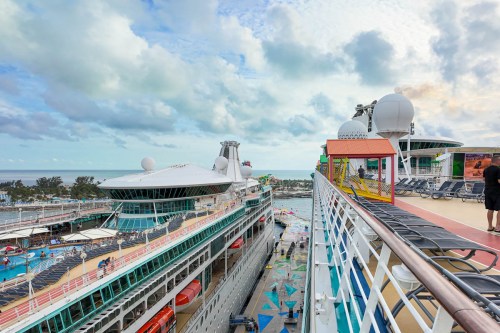
I snapped this moment right before my timelapse that captured the Independence of the Seas’ departure from CocoCay during my family’s Caribbean cruise vacation. Below is the full video along with my other timelapses and the challenges I faced creating them.

My family and I have returned from a fun, four-night cruise on Royal Caribbean’s Independence of the Seas. Our itinerary took us out of Miami, spending the first full day at CocoCay and then another at Nassau. The next day, we were on the water, returning to Florida. And then back in Miami on the final morning.

We had a fabulous time, and I’ll be writing more about it and sharing photos in my posts to come.

If you’ve watched some of my timelapse photography in previous blogs posts, you might assume I would try capturing a few timelapse videos during our cruise. And you’d be correct. I brought along my DJI Osmo Pocket 3 gimbal camera and a Joby GorillaPod for the job.

I didn’t have a plan going in, but it quickly became clear what I needed to do.

Don’t Forget to Include your Ship in your Timelapse
I decided that cruise ship timelapses are optimized when they show your vessel moving through the water as it arrives at port or departs. Just capturing a timelapse at sea isn’t as visually dynamic (though if there’s good cloud action, that dance can be really interesting).

Ideally you should simultaneously see the hull of the ship, the water and the port in your framing. The boat anchors the whole shot (and the rest of the imagery moves).

But it’s hard to frame it all in, because that means having to somehow position your camera a foot or so beyond the hull of the ship.

Sure, it’s simple to stretch your arm out to capture a quick photo (don’t drop your phone). But it’s a different story when you need to use a tripod to steady an extended timelapse. Where are you supposed to place it?

Grip the Railing in the Right Place
The trick is to first do a walk around and review the top deck’s railing design. If you’re lucky, you’ll find a part that extends out a bit next to a low-enough glass barrier. (Shooting through glass doesn’t work.)

I found the railing around the Independence of the Seas’ main top deck (12) was not a perfectly oblong design. It did, in fact, jut out in a few places. I found a great spot by the aft, starboard side.

Joby GorillaPod and DJI Osmo Pocket 3 on cruise ship Independence of the Seas
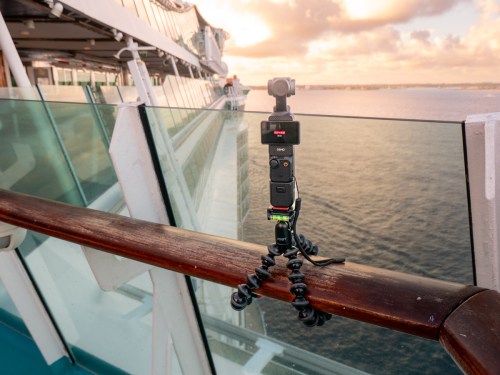
My GorillaPod gripped the railing there for one of my timelapses. Then, I attached the vertical Osmo Pocket, which enabled the Osmo to barely peek over the glass barrier.

My rig held together as it captured this timelapse which showed our arrival at the Nassau Cruise Port.

Find a Flat Surface for your Tripod
I also discovered that a section of Deck 12’s railing ran by two flat metal surfaces located towards the bow of the ship. These were the foundations for the two circular glass roofs covering the Solarium whirlpools a deck below.

Each provided a perfectly flat surface for my GorillaPod and Osmo Pocket 3.
DJI Osmo Pocket 3 records timelapse from cruise ship Independence of the Seas.
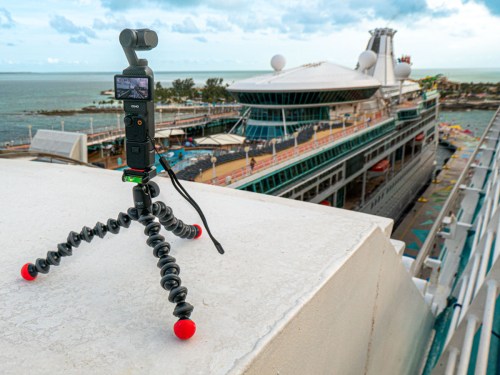
So, when I positioned my Joby and gimbal an arm’s length out from the railing, it offered me the ideal perspective (as if my camera was hovering next to the ship).

Here’s my timelapse leaving CocoCay from that vantage point…
It really helped having another ship (Royal Caribbean’s Vision of the Seas) docked there to provide additional visual context.

This next timelapse utilized the gimbal’s pan function, showing the view while we were docked in Nassau. (That’s the Disney Wish cruise ship in the shot.)

And here’s our departure from Nassau.
(I added a ‘Gaussian Blur’ on the left section in post to mask a couple of travelers who unknowingly walked into my shot.)

Safety Concerns
I ran these timelapses for up to 30 minutes Each frame was recorded at two second intervals. (I sped up some of my timelapses in post). That’s plenty of time to allow for Murphy’s Law to come into play. For the record, this little vacation hobby of mine was a great way to destroy or lose my gear.

There was a constant wind blowing throughout these timelapses. Gripping the railing with my GorillaPod was an unproven strategy under these conditions. Plus, standing my little tripod all on its own outside the railing on the Solarium roof offered no anchor solution (other than my hand nervously holding onto one of the legs).

A lot can happen with no net.

Tempting Fate for Creative Pursuit
My Osmo Pocket 3 could have easily blown over. A big gust of wind would have carried it overboard and into the drink. (I’m sure this would not have been the first time a camera or a smartphone fell into the ocean during a cruise.)

Happily, none of this happened, and my gear survived.

I’m not sure what it says about me that I put my camera at risk like this. I could say I took a ‘calculated’ risk. But that doesn’t change the variables. I think I just wanted the shot, and I felt compelled to try. Perhaps it simply comes from the creative fire that stirs in me and many of us.

So, should you also choose to try something like this, good luck and be forewarned.

And you might want to consider bringing along a roll of duct tape with you… that couldn’t hurt.

Don’t Forget the Basics for a Relaxing Vacation
Beyond the creative achievement and risks to create my timelapses, this simple exercise served another important purpose.

I had to slow down a few times to focus on this singular activity during our cruise, which offered a thousand other possible distractions. These half-hour immersions helped to focus me on the real star of the show… our majestic ship and its own journey. Strangely, this headline is easy to miss.

Some people hang at the pool all day to unwind. I apparently like to shoot risky timelapse videos to recharge.

All that matters is you travel your own path to relaxation… and satisfaction.

How to Use AI to Easily Improve your iPhone Photography

AI can effortlessly and perfectly select the people in your photos to individually brighten and edit. Here’s how to access this superpower using your iPhone and Adobe Lightroom.

I don’t travel about taking family photos with my own team of lighting professionals and a heavy bag of prime lenses (I wish). I typically just use the camera baked into my smartphone, which as you know is my trusty iPhone.

Sure, I sometimes get more ambitious and bring my GoPro, my Panasonic Lumix LX-10 or Lumix ZS200 with its bigger zoom. But my iPhone 15 Pro Max has a great camera system. And best of all, it’s always with me.

So, like the rest of us, most of my photography is generated through my phone.

When the Light is your Enemy
Even though my iPhone’s camera skills are admirable, the world usually doesn’t present perfect conditions to capture an optimal photo. Often, the lighting is not quite right.

Your subject can often look dark. Sure, my iPhone can sometimes handle this challenge. But it has problems (as does any camera) when my subject isn’t as well-lit as other parts of the frame. A similar limitation develops when the background is too bright (such as when your subject stands in front of a window with sun pouring in).

Then you’ve got yourself a silhouette shot, which is the opposite of what you probably wanted.

Yes, you can try to reframe, but that’s not always possible. The only option is to snap the photo and then try to fix it in post.

The Former Limits of Photo-Editing Solutions
There are any number of photo editing software options where you can brighten your photo to pump up how your subject appears. (Your smartphone will do this in one click.) But that can often start to overexpose the other parts of your image that are already sufficiently bright.

Professional photo editing programs can enable you to just select a portion of your photo to enhance, but there’s not been a one-click solution… until recently.

How to Brighten the People in your Photos using the AI in Adobe Lightroom
I use Adobe Lightroom Classic to organize and enhance my photos. The software now offers the ability to perfectly isolate and select people in photos with just one click. Being able to accomplish that used to take years of training and practice with complex software.

But with the power of Adobe Sensei AI, Lightroom does all that for you. Then you can easily pump up how the people in your photo look.

Here’s how:

  • In Develop mode, click on the circular Masking Tool on the top right. That’s your entry point.

On the top of your options, there are three boxes you can click to select:

  • Subject
  • Sky
  • Background

The AI-powered Masking Tool immediately isolates a perfect cut out and adds a mask that you can brighten, darken or adjust in any number of ways. If there are several people in your photo, and you want to enhance the look of just one, you can click on ‘People’ to select that individual.

It’s amazing.

Two Examples of Lightroom’s Masking Tool in Action
Here’s one example of using the Masking Tool to pump up the light and color saturation of just the two people in my shot overlooking Exit Glacier in Alaska’s Kenai Fjords National Park.

Brighten the People

And here’s another example where I used the Masking Tool to brighten this somewhat hidden young moose I spotted while biking near Anchorage.

Brighten the Moose

It’s not a perfect shot but being able to actually see the moose more clearly with the help of AI certainly improves it.

  • A warning: Clicking-in more light onto your subjects should be a subtle enhancement. Otherwise, it will look fake. So, sprinkle in your extra light sparingly.

Add Buttery Bokeh Blur Using your iPhone’s Portrait Mode
Once, you’ve got your photo subjects properly ‘re-lit,’ then you can focus on editing the backgrounds in your shots. A relatively new AI trick you can use is adding in background blur or ‘bokeh.’

This nifty visual effect used to be achievable only while taking photos with a more traditional camera in bright light using the right lens and aperture setting. Now you don’t have to be an expert photographer to get some bokeh. AI can create the same effect in post!

An iPhone camera’s Portrait Mode setting is designed to do exactly that. The iPhone’s software in the Photos app isolates the background from your subject, allowing you to dial in your background blur. You can snap away and then later choose to add bokeh (as long as the photo was originally taken in Portrait Mode).

This feature has been a game changer for me.

  • Another warning: You might want to dial back the amount of your iPhone’s auto bokeh level setting (Yes, you can do that.). Sometimes, just a subtle background blur is all you need. Too much may make the background look like it’s a complete digital replacement.

Three Levels of Bokeh
Here are three examples adding different levels of bokeh in Portrait Mode on my iPhone. I took this selfie while I was shopping for a new pair of reading glasses. You don’t need to see the optometrist office background. So, I thought it was a perfect opportunity to blur it out. But how much bokeh is the right level? You decide…

Lens Blur in Lightroom Classic
Adobe Lightroom Classic can perform the same bokeh trick with its new Lens Blur feature. In one click, you can create a depth map of your photo using Adobe Sensei. From that point, you can tinker further to adjust the scope of the blur.

Is It Cheating to Use AI to Improve your Photos?
The technology to digitally adjust your photos has been around for years. But some of the tricks were complex to pull off. The big change now is AI can do much of the same work for you with just a few clicks.

Should you feel like all of this is somehow cheating? Are you not really a good photographer, because you couldn’t originally capture your shot perfectly, and you need AI to save you?

Please.

If you’re a Luddite, maybe. Otherwise, this is simple technological progress.

Time to get on board and use some AI-oomph to make your photos shine brighter!