At Home with Tech

Unlock the power of all your technology and learn how to master your photography, computers and smartphone.

Your Mission: Find a Way to Drive with Head-Up Display

Apps like HUDWAY (seen here) can augment your view while driving in low visibility conditions. But is this tech ready for mass consumption?

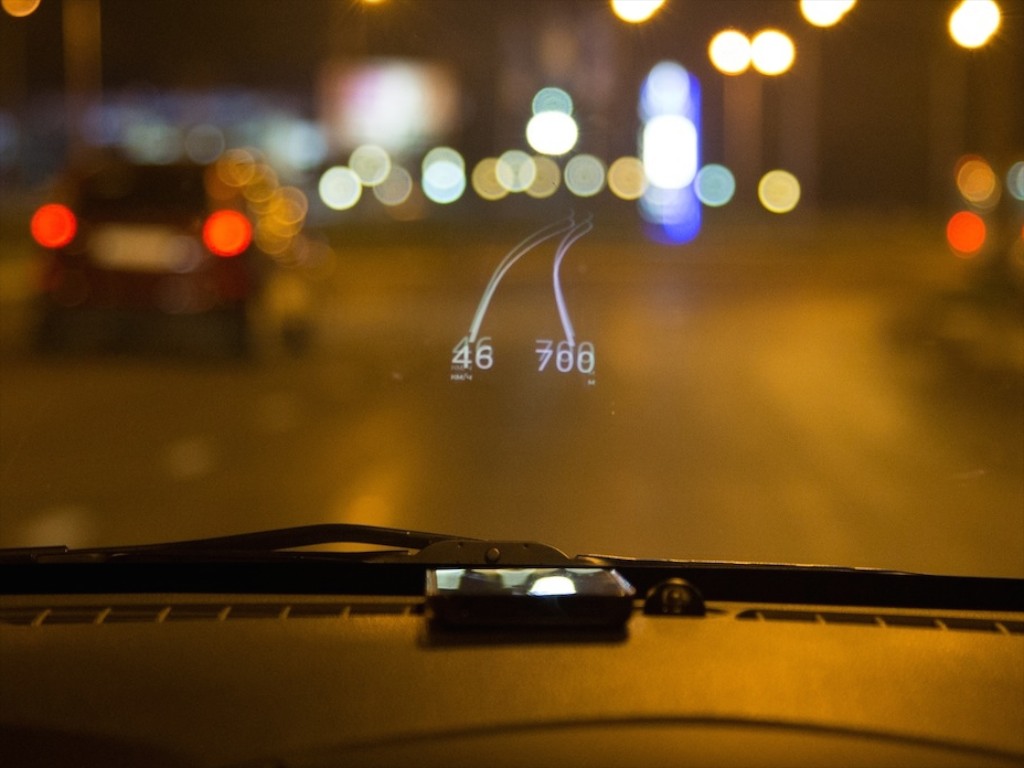
Smartphone apps like HUDWAY (seen here) can augment your view while driving in low visibility conditions. But is this tech ready for mass consumption?

Some drivers like to navigate by memorizing street names.
Others rely on landmarks and a general feel of their surroundings.
(kind of like using the Force)

I prefer the latter.

The problem is the Force doesn’t always get me where I want to go, and as a result, my wife has long been anointed the family navigator.

So let’s just say, I’m always on the lookout for ways to enhance my navigational prowess…

Recently I was watching a Brian Cooley video on CNET about the best car apps for your smartphone.
And at the very end of the segment, the solution appeared before my eyes…

Seconds later, I was ready to add a little augmented reality to my windshield.

Heads Up: Here Comes HUD
I’m already taking full advantage of the GPS tech in my iPhone while driving.
The forward-looking arrow in the Google Maps app (or the native Maps app) is always a helpful buddy to keep me on course.
And Siri calmly reminds me when the next turn is coming.

But when I’m driving at night or in low-visibility conditions, it’s harder to maintain that symbiotic connection, because you can’t see as far ahead as your app can.

So the solution is to add a little HUD technology into your smartphone.

HUD, which stands for ‘Head-Up Display’ projects an image onto your windshield so you don’t have to look down at your smartphone.
(wherever it is you’ve got it perched)

Yes, you simply plop your smartphone on the dash near your windshield, and it illuminates useful car-centric data. The trick is the display uses a mirrored effect.
The image glows in reverse it and bounces off your windshield like a mirror to appear correctly for you to view.

Depending on the app you use, different sorts of data can be projected, but I think the coolest scenario is to see your digital directions and path on your windshield.

Sure, you’ve got to mount your smartphone onto your dash in a way that it doesn’t slide around.

I already had a dash mount with a tacky bottom for my iPhone to use.
So I was ready to begin my search for the perfect app to augment my reality while on the road…

Three Ways to Add HUD to Your Driving Experience

My first step was to watch the CNET video again.
But a problem immediately cropped up.
Brian didn’t actually mention the apps by name.

So I had to do the heavy lifting myself.
But after some intense Googling, all I could find were three options for this type of directional assistance.

1.  HUDWAY
The good news is this free app (99 cents for ad-free) displays the road ahead and your upcoming turns.

The bad news is there’s no voice assistance.
And it pre-maps your route, which is useful if you lose your cell connection, but not so great if you go off course and need the app to recalculate your route on the fly.

It’s also got some negative reviews on iTunes.
And it’s worth noting… a Russian company makes this app…
With the state of geopolitical affairs these days, it doesn’t feel like the time is quite right to download this app…

2.  Sygic
I think this is the app Brian was specifically referring to in his CNET video.

But Sygic is an offline navigation app, which means you’ve got to first download your maps information. And with all the content on my already bloated iPhone, I wasn’t too excited to start feeding it all the roads in the USA.

Plus, even though the app is free, the required map info is a $35 in-app purchase.
(on sale from $80)
And to add insult to injury, the HUD feature is another $8 on top of that.

So it’s a least $43 to give Sygic a test drive.
And that’s a little pricey when you’re used to spending a couple bucks on an app.

3.  ITEQ HUD
If you were wondering who makes a full-on, separate HUD device…. ITEQ makes one.
It’s the ITEQ GPS Car HUD, and it costs $52.99 on Amazon.

I think it’s fair to say this unit hasn’t gone mainstream yet…

Mission Impossible?
So the problem is the perfect HUD driving solution doesn’t exist.
At least, not yet…

You would think that the Google Maps app or Maps would simply have a HUD mode you can click into.

If I’m missing something, please let me know….
But in this particular instance, it would seem the future isn’t closer than you think.

This is still a concept ahead of its time.
(Unless you’re really willing to pay for it.)

Inhabitat.com_Mission Impossible 4 Head Up Display

And if price is really no object
The way to do HUD right is to drive the BMW i8 from
“Mission Impossible: Ghost Protocol.”
That’s only going to cost you $135,925.

No, thank you, Mr. Hunt.

How Easy is E-ZPass?

Using your E-ZPass tag is mostly mindless as long as you don’t totally ignore it.  Otherwise, years will pass by, and your E-ZPass will still think it’s living in the car you owned in a different decade.

Using your E-ZPass tag is mostly mindless as long as you don’t totally ignore it. Otherwise, years will pass by, and your E-ZPass will still think it’s living in the car you owned in a different decade.

A long time ago, in a state far, far away…
(not that far, really)
My wife introduced me to the wonders of E-ZPass.

I have to admit I was a bit skeptical.
I wondered whether technology was up to the challenge of accurately identifying, logging and billing the toll charges on each and every car moving through a toll plaza.

Yes, the century was still young, but my worries were, of course, unfounded.

Perhaps I was secretly mourning the loss of the opportunity to play coin hoops at unmanned tollbooths. After years of practice, I was still finessing my form to match my childhood memory of how my father did it.

He had this certain elegance in his coin toss technique that never compromised on speedy accuracy.
His quarters would hit their mark every time with a definitive ‘clunk!’
There was never a need for the coins to swirl around the basket, because they were always perfectly flung.

But now it was time for me to throw in the towel and stick a strange white cube to my windshield.

I’ve explained before that I usually hold the position of IT Guy in our family, but in this particular moment, I was just a stick-in-the-mud Luddite.
Thank goodness my wife was there to catch me in my tech stumble and keep us somewhat close to the bleeding edge of consumer tech.

Full Speed Ahead!
And the result was pure joy.
Especially back then, when most people didn’t have E-ZPass tags, and there was only one booth in a toll plaza dedicated to the technology.
We’d whisk through, leaving lines of cars in the dust waiting to hand over currency to a live human being.
We felt like we were adding ten to fifteen minutes back to our lives every time we’d pass a toll.

It was just wondrous.

Over the next few years, everyone else eventually got their own E-ZPass tags, and most of the toll lanes bid farewell to their biologic toll collectors.
So the E-ZPass lanes started filling up, and traversing them wasn’t quite as speedy.

But if you didn’t belong to the E-ZPass club, you had the displeasure of waiting in the last line dedicated for citizens with too much time on their hands.

Today, using E-ZPass is a standard way to travel the landscape for most cars.
The good news is you don’t really have to think about it.
(When was the last time you had to worry about exact change?)

It’s simply set it and forget it!
But sometimes, it still pays to check in….

It’s Time to Update Your E-ZPass Account
Recently, the equipment I need as a commuting road warrior has shifted from train to automobile.
Yes, if you were wondering, my recent, ‘fun’ car-buying experience was directly prompted by this development.

My new highway commute places my trek across one of our majestic bridges, and I decided to check out whether I could sign up online as a frequent traveler to receive a lower toll price.
(You can!)

But along the way on the E-ZPass website, I noticed my family’s two cars and their license plate numbers were not listed correctly. The data was years out of date.
In fact, it had not been updated since we opened up our account.
(d’oh!)

In my defense, we’d never had a reason to go to that section of the website to detect the problem.
(And thankfully, nobody else had either.)

Still, it didn’t seem as urgent a problem as the time the credit card on the account expired, (unbeknownst to us)
and we started receiving angry yellow warning flashes at every tollgate.

But the moment had clearly arrived to take some action or invite bad car karma….

If in Doubt, Click “Add Vehicle”
Feeling industrious, I clicked on the ‘Vehicles List’ tab and then clicked on the first of my two former cars.

But when I tried to update the license plate number, as well as the vehicle detail, I discovered that I could only adjust the vehicle information.
The license plate line was grayed out.

Scouring for my problem online did not bring up a solution.

So I decided all I could do was start from scratch and just add in the new car.
And guess what… I think that’s how you’re supposed to do it!

So I clicked- ‘Add Vehicle.’
And then I filled in everything, including the new license plate number.

Finally, I deleted the old car from the expanded vehicle list.

How to Update Your License Plate Number in E-ZPass
It’s extremely straightforward.
(I guess in the battle of Barrett vs. E-ZPass, I’m now 0 – 2.)

That said, I do have small bone to pick with the language used here-
For me it wasn’t really ‘Adding a Vehicle’ as much as it was
‘Adding a License Plate.’

I think the problem also was I was attempting to update both the license plate number and my car information.
(Maybe that would suggest a total do-over right there.)

But if you click on an existing vehicle to edit, the program automatically assumes you’re keeping your license plate and only updating your car.

What happens if you still have your car and just need to freshen up its license plate numbers?

Well, the new ‘Mr. E-ZPass Expert’ has the answer!
Yes, you’ve got to start from the beginning:

  • Click ‘Add a Vehicle’
  • Type in the new license plate number along with your existing car detail
  • Finally, delete the other listing with the old license plate number
  • Continue on with your life

No, I don’t think it’s perfect, but it works.
And that’s as reasonable a way to describe our government on a good day as any!

The Easy Commute Begins?
I’m happy to report, both our cars are now up to date in the E-ZPass system.
I wouldn’t exactly call it easy, but I correctly guessed my way across the finish line.

And I imagine my momentary bout with tech confusion will go a long way towards ensuring future ease every time I cross through an E-ZPass corridor.

Now that I’m a true road warrior, it’s all that really matters!

Don’t Look Too Closely at iCloud’s Shared Photo Streams

It’s always nice to get an invitation to look at family pictures online.  The only problem with Apple’s Shared Photo Streams is the pictures don’t show up in full resolution.  And that could be a problem if you’re planning to use them to create a photo book.

It’s always nice to get an invitation to look at family pictures online. The only problem with Apple’s Shared Photo Streams is the pictures don’t show up in full resolution. And that could be a problem if you’re planning to use them to create a photo book.

I never really got excited when Apple introduced iCloud Photo Streams.
The concept of storing your most recent 1,000 photos in the cloud for 30 days and having them sync across all your Apple devices didn’t do that much for me.

That’s because the functionality in ‘My Photo Stream’ is designed mostly for pictures taken by your Apple devices. The admittedly slick idea is to enable those photos to ‘phone home’ and seamlessly beam themselves back to your mothership.
(But you’ve got to use your computer at least once a month to download the photos to your hard drive before they go ‘poof’ in iCloud.)

Locate Photo #872
Plus the entire mass of pictures you snap end up in your photo stream.
(the good, the bad… and the ugly)

The pictures duplicate themselves to your other devices so you can easily show them off to family and friends.
But the reality that you’ve got to sift through a thousand images to find the one you’re looking for seems a bit half-baked.

I had lunch with a friend recently, and when we pulled out our iPhones to proudly display a few images of our three-year-old boys, I navigated to the picture I wanted in five gestures via my iTunes’ synced folder.
He needed at least fifteen gestures to quickly finger down his long photo stream.

Getting Canon to Play in the Photo-Stream Sandbox
My other problem with Photo Streams is while I do snap the occasional iPhone picture, when I’m really serious, I use one of my Canon cameras.

Then, I download the Canon photos to my iMac and sift through them to separate the wheat from the chaff in Aperture.
(Apple’s more powerful iPhoto cousin)

Only then am I interested in sharing the chosen few across my Apple devices and with others.

And I’ve traditionally loaded up my iPhone by syncing my photo folders via iTunes.
And yes, that takes an extra step….

While this workflow keeps my best photos close to me, nobody else gets to benefit.

Your Favorite Unseen Photo in Your Computer is a Terrible Thing to Waste
Sharing my best pictures in a timely manner has continued to prove itself an elusive tech challenge.
I’ve tried lots of solutions:

  • Recently, I bought the nixplay Wi-Fi Cloud Frame to stream my favorite photos for my wife and son to enjoy at home.
  • A year ago, I did the same for my father with a Pix-Star Wi-Fi frame.
  • Of course, I’ve got a few family Flickr albums, but I often forget to update and remind people about them.

Time for the Wife to Pick Up Your Slack
The current nut I’m trying to crack is simply finding a workflow to move my ‘best’ photos over to my wife’s Macbook Pro laptop, so she can have some fun working with them as well.

Her goal is to quickly create small event-driven family photo books.
(as opposed to my more globally-focused yearly photo book collections, which have unfortunately proven to take years to create)

I totally welcome this divide-and-conquer strategy.

But getting the photos over to her laptop and into iPhoto has been at an imperfect process at best.

I’ve traditionally exported the photos to a thumb drive and then transferred them via sneakernet.

I’ve also used Air Drop and Dropbox, but there’s got to be a better way to get those photos over…

Shared Photo Streams
(Cue up the angelic harps.)
Apple introduced iCloud Photo Sharing over a year ago.
These newer, ‘shared’ Photo Streams were designed for viewers beyond your eyes only.
They’re kind of like the MobileMe photo galleries of the good old days.

With Shared Photo Streams, you can easily create online photo albums to share with your family and friends.
(Though only up to 100. Larger families and friendship groups require another solution.)

But for me, the more enticing factor is that Shared Photo Streams allow your invited guests to view your photos directly in iPhoto, and then easily download whatever they want!

So I decided to designate my wife as the singular special guest for my new Shared Photo Stream. While this is certainly not a cutting-edge plan, and I’m admittedly quite late to the party,
I’m not embarrassed to report I finally gave this photo-stream ecosystem a whirl…

If You Want to Catch Up, You’d Better Run
In no time at all, I created my shared family photo stream, and the invitation went out to my wife’s iCloud email address.

I ran over to her laptop.
Click.

Nothing happened.

Click again.
Zippo.

Then I read the fine print:

To view a shared photo stream in iPhoto, your computer needs to be operating on at least the Mountain Lion OS.

D’ohhhhh!

I’d been running Lion on my wife’s laptop since we bought it a few years back.
So I decided this was as good a time as any to finally upgrade to the Mavericks OS…
(I’d really been meaning to get around to it.)

Click.

Two hours later…
(after the Pre-OS upgrade prep and a smooth Mavericks install)
I again attempted to connect my wife’s computer to my Shared Photo Stream.

Click.
Success!

Now, the possibilities seemed endless!
(Though there are inevitable limits.)

Here’s what Apple gives you:

  • Maximum photo (or video) uploads per hour: 1,000
  • Maximum shared streams you can share: 100
  • Maximum subscribers per shared stream: 100
  • Maximum photos and videos in a shared stream: 5,000

And all of these uploads do not count against your 5GB iCloud storage limit.

I can live with that.

But there was still one problem…

Why Optimize What is Already Perfect?
When I dragged the photos from my Shared Photo Stream over to iPhoto, I realized they had been…
(Cue the organ.)

‘OPTIMIZED!’

(This means the file sizes had been chopped down from their original pixel resolution to something more ‘manageable’.)

I scoured the web for confirmation of this unwelcome development.
And indeed, I found that Apple does reduce the file sizes for iCloud-shared photos.

Khannnnnn!!

Look, I simply want to easily move full-resolution photos over to another computer.
(This shouldn’t be so hard!)

I couldn’t locate Apple’s official position on their photo-slimming practices.
But I discovered some intelligent speculation that Apple’s resizing logic has to do with the native screen resolution on Apple devices. It’s simply unnecessary to view a photo containing a higher resolution than what the screen can display.
The image won’t look any better…

And the typical 2048 x 1536 optimized pixel resolution should also be adequate if you want to print a photo up to 5” x 7” in size.

Plus, it’s a ‘helpful’ storage-saving strategy for iOS devices with limited storage capacity.

So what’s there to complain about?!
(The humble Home IT Guy raises his hand in the back of the room…)

The Purity of My Photo Stream
And do all photos get stunted in the Apple’s photo-stream universe?
Not if you’re working in the non-sharable ‘My Photo Stream.’
Those pictures still get clipped on your iOS devices, but ‘My Photo Stream’ shows up in full resolution when viewing it on your own computer.
(Even Apple acknowledges the importance of these photos finding their way home in their original condition.)

The Wife Must Now Save History
So where does all of this leave the future of my wife’s photo-book projects?
Well, I’m not exactly sure…

The Shared Photo Stream integration with iPhoto on my wife’s laptop can’t be beat.

Plus my own copy of this Shared Photo Stream automatically shows up on my iPhone, negating the need to sync these photos via iTunes.
(Nice!)

No, I’m not exactly thrilled with the idea of having watered-down duplicates of my best photos on her laptop, but I’ve got back ups of the originals elsewhere…

As long as my wife doesn’t aspire to create huge photo books,
my little plan could still work.

I’d call all this progress…
And At Home with Tech, sometimes that’s just enough to declare victory!