At Home with Tech

Unlock the power of all your technology and learn how to master your photography, computers and smartphone.

Category: Tech How To

How to Improve your Zoom Background at Home

Making sure you’re properly lit in your Zoom shot isn’t always enough. What about the supporting cast in your webcam’s view?

It’s clear we’re at a point where participating in Zoom meetings is a permanent part of home life and a necessary tool to communicate with our world. So, it’s important to create a ‘remote video communications’ home set-up that really works for you and your viewers.

I hope most of us are beyond the chaotic experience of working from home and participating in meetings all day. During those early pandemic months, simply finding a quiet spot to open up your laptop for a Zoom, Skype or Teams meeting was a challenge.

How your shot looked understandably may not have been your priority.

Keeping it Real
But as we’ve settled into our new routines, many of us have improved our Zoom look.

I’m sure you know the basics by now:

  • Make sure you’ve got enough light on your face.
  • Don’t sit with a window behind you.
  • Position your webcam perpendicular to your eyes, not looking up your nose.
  • Declutter your background.

I know many folks are fond of using virtual backgrounds. While that’s okay, I like to keep my shot as authentic as possible.

I’ve tried digital and blurred backgrounds, but I always felt like I was in a science fiction movie.

Can you See my Robots?
So, even though my home office is hardly an ideal space to create the perfect video shot for my Zoom meetings, I’ve continued to tinker with my background throughout these many months.

Recently, I moved the furniture around in my home office, and to a certain extent I’ve created something of a blank canvas to work with.

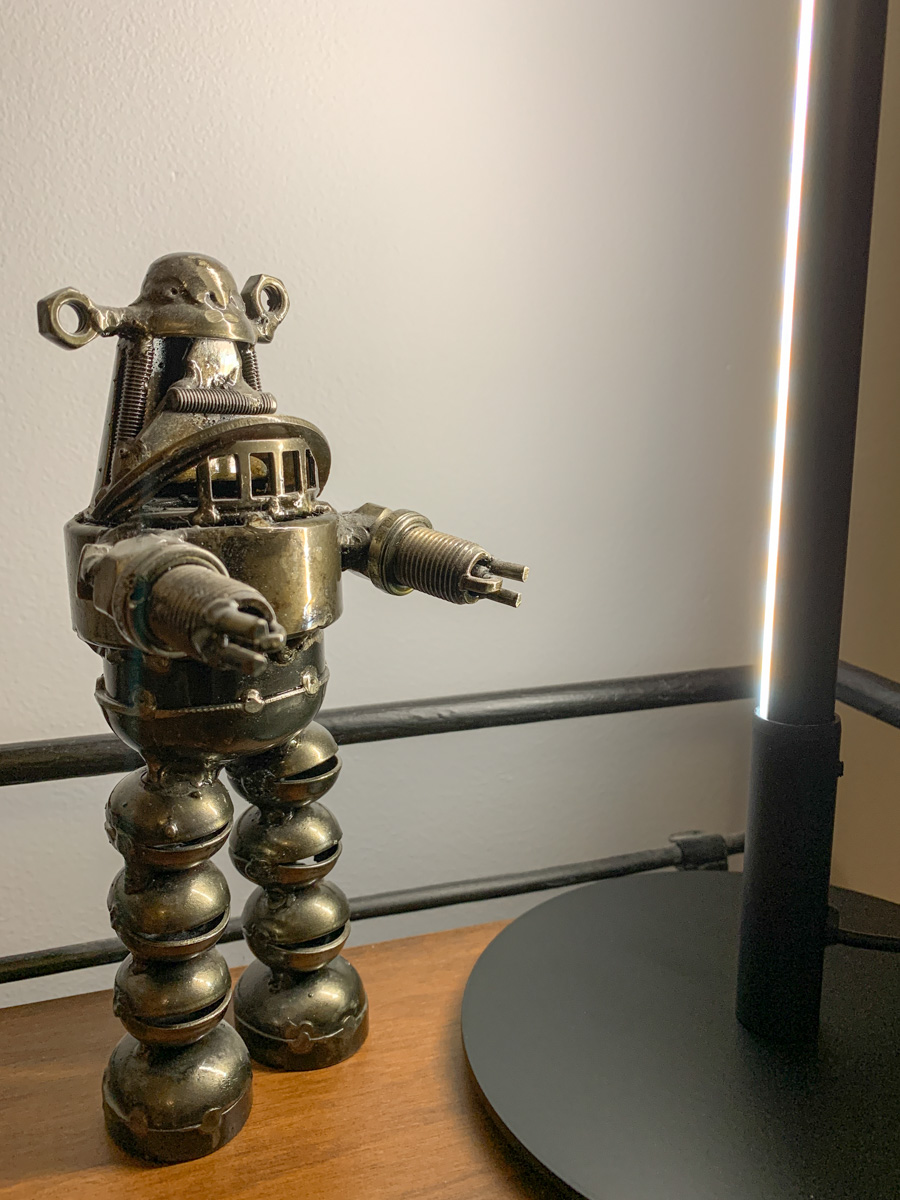
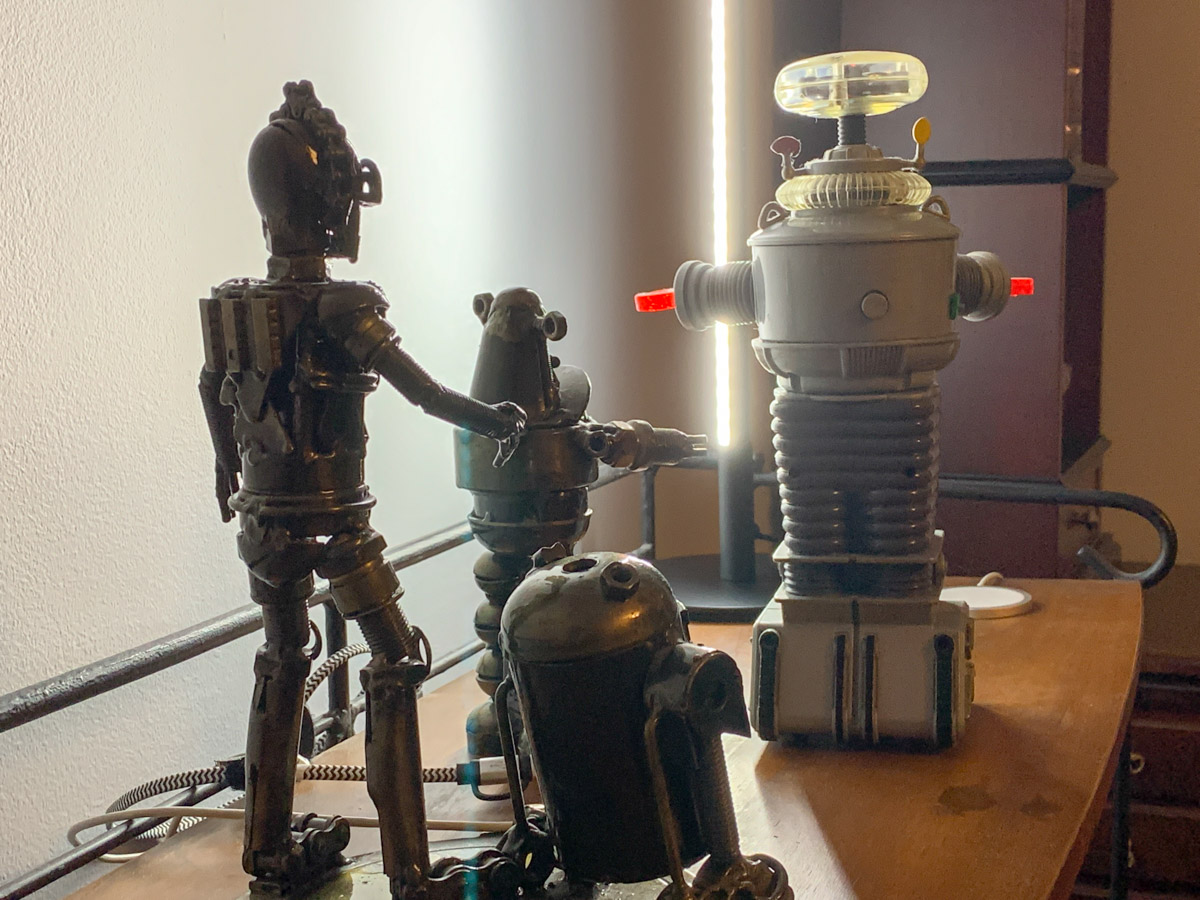
I repositioned a short bookshelf into my Zoom background, and I used the top shelf to display a few robot statues I’ve collected over the years. (R2D2, C3PO, Robby the Robot and Robot from the original “Lost in Space”)

They’re also nice ice breakers as people sometimes ask about them when they spot my metal robots in my Zoom shot.

The only problem is my robots looked like shadows in my background. That’s because my back wall didn’t have a lot of light hitting it.

Time to Add More Light
Like any professional studio TV set, you’ve got to properly light your entire space, and that includes the background. Otherwise your environment will look drab, no matter what it contains.

And webcams are usually happier if your lighting is more even throughout the entire shot. That means you’ll look better and not over exposed.

So, I needed to figure out how to throw more light on that back wall and my little robot display.

Vertical LED Table Lamp
There are any number of ways to do that. A floor lamp next to the bookshelf would be an easy solution. That said, I didn’t want to clutter my background (or my home office). Instead, I looked for a lighting solution with a smaller footprint: some sort of lamp that could sit on the end of the book shelf just outside of my Zoom frame.

I found a small vertical LED table lamp made by Edishine on Amazon.
It was the perfect solution. It added the background fill light I needed without overwhelming my shelf. The lamp’s cold, minimalistic look also blended nicely with my little metal companions.

Think of it more like an under-cabinet lighting solution, but designed as a self-standing vertical glow.

Now, my robots are easy to spot in my Zoom background. Plus the extra light also helps my back wall pop.

Zoom-Optimized Rooms
If you want to really show up for your close up during Zoom meetings from home, you’ve got to do more than light your face and wear a nice shirt. Your environment is an extension of you, and it’s important to give it the same attention as you set up your webcam shot.

That means your whole room (or at least the part people see) needs enough light.

I know we don’t live in TV studios (well, most of us don’t). But I think it’s fair to say that when you think about how to decorate your living spaces moving forward, it’s not crazy to plan for the creation of Zoom-optimized rooms.

It’s not science fiction. Yes, reality has caught up.

My Timelapse Videos from National Parks in Arizona and Utah

My goal was to capture sunrise and sunset timelapses from our Southwest vacation to three amazing national parks. Here’s what I saw.

I’m not proud to admit that I carried four cameras throughout our Southwest vacation to be prepared for whatever wonders awaited us. I packed my Panasonic Lumix GH5 II, my smaller Panasonic Lumix LX10, my tiny GoPro and my little DJI Osmo Pocket gimbal. Plus I had my iPhone. So that actually makes five cameras.

Good Things do Come in Small Packages
The good news is with the exception of my larger Micro Four Thirds GH5 II, the rest had small profiles and were easy to pack or throw in a pocket. I’m also happy to report that I did find moments to put all of my gear to good use.

That said, besides my iPhone which was always there for me in my front right pocket, my most useful camera proved to be my tiny but mighty Osmo Pocket with its magical timelapse creation abilities… perfect for sunrises and sunsets.

I popped it on top of my Manfrotto Befree Live travel tripod, set up the timelapse for 20 or 40 minutes and let it run while I took photos with my other cameras.

My Osmo Pocket captured some really satisfying timelapse videos.
Timelapse from 3 Southwest National Parks
This edited timelapse video contains my shots from Zion Canyon, Bryce Canyon and Grand Canyon… all amazing places. (Here’s our itinerary.)

Deconstructing my Shots
I took the first Grand Canyon sunset timelapse at the overlook near the Yavapai Geology Museum at the South Rim. This is not the most popular place to go for sunsets, which meant there were fewer people packed into the good spots and more room for me to spread out with my gear.

I positioned the second Grand Canyon sunset timelapse steps away from our room at the Bright Angel Lodge. It was already too dark to start the timelapse and really see inside the canyon, but the cloud movement was magnificent.

I think the second Bryce Canyon timelapse really works because you can see tiny, ant-like hikers moving around in the bottom left corner. It give the perspective the shot needs.

Plan your Timelapse Shoots into your Family’s Vacation Schedule
When you’re traveling with your family, plopping yourself in a space for 30 minutes to capture your next timelapse can be disruptive.

A word of advice: Don’t be spontaneous. Plan ahead and announce your intentions. And don’t do too many across a vacation.

It’s all about balancing your family’s vacation time so that everyone gets an opportunity to do what’s special to them!

3 Rules I Learned while Taking Photos at Grand Canyon

If your pictures aren’t capturing the majesty of this incredible space, you’re not alone. Here are a few tricks that will help while shooting at Grand Canyon.

Sure, my family’s bucket-list trip to Grand Canyon was a fantastic vacation I’ll never forget. But parts of our adventures in the Southwest also kicked my butt.

First off, I overpacked my camera gear and still felt underprepared to capture the photos I really wanted in the three glorious national parks we visited.

As I’ve previously mentioned, in addition to Grand Canyon, we also hiked in Zion and Bryce Canyon National Parks.

Now, how hard can it be to snap a good photo among such natural beauty? As it turned out, pretty hard. Zion and Bryce Canyons were easier, but Grand Canyon was simply ridiculous. (We visited the South Rim.)

Why? These places are just too big. Too awesome.
Grand Canyon
Bryce Canyon
Zion Canyon

How the Massiveness of Grand Canyon Flattens its Depth
I must admit, when you look out over Grand Canyon and see sections of its 227-mile length… it seems almost surreal. The huge space actually feels flat… almost 2-D, like a painting. The massive rocks’ muted colors flatten the imagery even more. (If you’re into conspiracy theories, you might even feel inclined to suggest that Grand Canyon is a giant green-screen set.)

Trying to capture a ‘representative’ photo to match your ocular perception is really difficult, because it’s almost impossible to capture the scale in a 4×3 or 3×2 frame. Even wide angle or pano shots seem only to miniaturize the massiveness.

So, the enormity of this place upended so many of my sensory norms. And my camera gear felt woefully inadequate to capture the canyon’s stunning beauty. (I eventually acknowledged my gear was just fine.) I just had to step up my game and figure out how to visually adapt.

My Equipment List
Yes, I brought along all of my gear:

  • My beefy Panasonic LUMIX GH5II Micro Four Thirds camera (primarily for landscape videos)
  • My older but more compact Panasonic Lumix LX10 (especially good over the neck during our rim mule ride)
  • My trusty GoPro for wider angle views
  • My tiny DJI Osmo Pocket camera with its nifty timelapse-capture skills
  • And of course, my iPhone’s camera

I brought it all with me and schlepped it in my Peak Design V2 30L Everyday Backpack throughout our hours of hiking, because I knew I didn’t know what I didn’t know.

Now, that concept may seem clever, but it’s also an excuse that’s not going to win me any photography awards.

The irony is some of my family’s most successful shots were captured by my 12-year-old son using my wife’s iPhone 13 in pano mode.
Impressive. Most impressive.

Barrett’s 3 Camera Rules when Shooting Massive Canyons
Still… I did succeed in capturing a number of solid shots and some fun timelapses.

But not before I figured out these three key rules to follow while shooting at Grand Canyon.

#1
Include Context in the Imagery
I tried to capture closer objects in my photos to provide some context against the impossibly large landscape. Nearby trees or people can work nicely for this. That little trick really helped to fight the Grand Canyon’s visual flatness and create a more 3-D perspective.

#2
Use The Sun’s Shadows for Contrast
I looked to include any shadows I could find on the canyon’s walls. These darker regions instantly created more contrast in my shots. So, early and late-day sunlight provided prime-time opportunities. Lunchtime was mostly a washout.

#3
Don’t Shoot on a Cloudless Day
It quickly became clear that partly-cloudy days were the best times to take pictures. Those wonderful billowy white clouds or even incoming storm clouds were much more interesting than a bland blue sky. Total cloud cover was no good either, but partial cover added critical texture to the flatness I was fighting against.

Take in the Total Experience
By following these framing techniques, you should be able to include enough visual variety in your Grand Canyon shots to allow the scope of the canyon to really stand out.

But I must admit, there’s probably not a photo that can capture the almost incomprehensible nature of Grand Canyon. To truly experience it, you’ve got to go there and just open your eyes.

It’s simply amazing.

But don’t only focus on the destination.

Next time, I’ll share how we maximized our journey