At Home with Tech

Unlock the power of all your technology and learn how to master your photography, computers and smartphone.

Category: Technology

NYC Tourism Tips from a Native New Yorker

If you want to pretend that you are a tourist visiting New York City for the very first time, where would you take your family? Well, you can’t go wrong starting with Lady Liberty. Here are my ‘Do’ and ‘Don’t’ notes from my recent weekend as a tourist in NYC.

Who am I? Well, I consider myself a native New Yorker, because I grew up as a kid in New York City in the ‘60’s and 70’s. That said, I’ve actually lived out of town for the bulk of my life… after college in the greater Boston area and for the past fourteen years in Connecticut.

Still, I’ve worked in Manhattan for most of the past decade, (though I’m currently in Stamford, CT) and I regularly have dinner with my father at the ‘3 Star’ diner across the street from the apartment building on the Upper East Side where I grew up.

So, I guess I’m always a New Yorker… just hanging out in the ‘burbs.

Be a Tourist in Your Own Town
Not to over-stereotype, but I think that one trend New Yorkers tend to follow is they don’t visit many of the famous landmarks that tourists frequent. As a kid, I didn’t go to a lot of the obvious NYC destinations.
(I think this phenomenon is probably true of other locals in their own cities.)

All this said… I’d like to remind all of you not to forget what makes your city special.
Be a tourist in your own town!
(A public service message brought to you by the Barrett Tourism Board)

Two Days in New York City
Having kids certainly helps you to focus on area landmarks you might have ignored over the past few decades.

Recently, my wife and I planned to host a NYC weekend for a Boston family we’re friends with.
(They also have a boy in third grade.)

We settled on visiting these iconic landmarks:

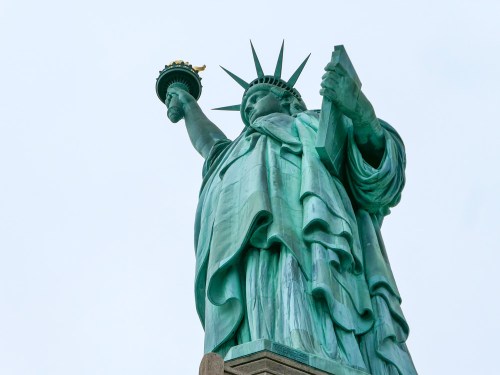
  • The Statue of Liberty
    (I vaguely remember visiting Lady Liberty as a kid.)
  • Ellis Island
    (As crazy as it sounds, I’ve never been to the place where over 12 million immigrants entered our country.)
  • The Brooklyn Bridge ‘walk’
    (I never knew this was an activity, but my wife used to do this for fun years ago when she lived in Brooklyn.)

Take a Tour to the Statue of Liberty and Ellis Island
Visiting these two landmarks takes some planning, especially if you want to get inside and up into the copper statue. Tickets to Lady Liberty’s crown sell out months in advance! We also discovered that regular tickets to the pedestal section weren’t available to book even a few days out.
(It probably didn’t help that we were scheduling this over a holiday weekend.)


Sure, you can take a ferry over to Liberty Island, but you can’t just walk into the monument.
Unless…
You pay a little more and book a guided tour.

We went with TripAdvisor’s 4.5- hour guided tour,
which was run by NewYorkTour1.

The online booking process was a snap… and we nabbed our tickets, which included pedestal access almost at the last minute.
(A big shout out goes to my wife, who put it all together.)


The extra cost was so worth it…

  • Our tour guide, Steven helped our tour group to move quickly through the crazy-long lines at the Battery Park Ferry and on Liberty Island.
  • We didn’t have to aimlessly wander about, because Steven knew where to go and all of the shortcuts to take.
  • His commentary on all of the history was top notch.
  • Though our tour time on Ellis Island at the Immigration Museum was relatively brief, (only about an hour) we were free to stay and spend as much time as we wanted on our own after the tour disbanded.
  • I think we effectively covered the equivalent of two ‘independent’ visits during our half-day tour.


It was a full and very efficient experience… plus the third graders loved it.

And for the record, there were about 25 people on the tour, and we were the only ‘New Yorkers.’
(Proud to represent my city)

Think Twice About Walking Across the Brooklyn Bridge
We all joined another visiting Boston family the next day, and our expanded team set off to walk across the Brooklyn Bridge as our ‘fun’ Sunday activity.

I think all of the kids enjoyed the experience, or the idea of the experience. They certainly appreciated the views.

But I’ve got to say…
As much as our Statue of Liberty/Ellis Island trip was so transformative, our expectations for our Bridge walk weren’t met.

Why?

It was just too crowded.
The whole walk felt like we were waiting online to get into a sold-out rock concert.


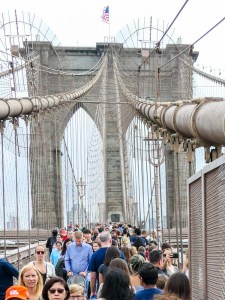
We were all jammed into a narrow path, and if we strayed slightly we risked being hit by the occasional cyclist who insisted on traveling through as fast as possible.

Sure, there are a few sections of the walkway around the two iconic stone towers where there’s more area to simply hang out, but everyone around you is taking pictures or selfies. So, there’s never an opportunity to really feel the amazing open space and the massive bridge around you.

Again, the problem was compounded by the timing of attempting this on a nice weekend day over a holiday weekend. A cold winter’s day would likely offer a more solitary and fluid experience.

So, if you’re thinking of spending time at the Brooklyn Bridge as a fun and relaxing weekend activity, consider yourself warned…

Time to Plan Your Next Trip!
Still, I now enjoy the fact that I can now say I walked across the Brooklyn Bridge, though it wasn’t on my bucket list.

I may not have liked the experience so much, but I’m happy I did it… once.

As for the Statue of Liberty and Ellis Island… home run!
(Thank you, Trip Advisor.)

We’ll be back… the crown awaits…

It’s so much fun being a tourist in your own town.
I say go plan your next local adventure right now!

Best Lifetouch School Portrait Looks for 2018

If ordering your Lifetouch school photos feels a bit like the complexities of AP calculus, then I’ve got a few shortcuts to the best Portrait Looks…

It’s Picture Day! Your child is having his or her photo taken by Lifetouch at school. Congratulations. Now, it’s time to order your pictures. Are you overwhelmed with all of your Lifetouch photo choices? Well, join the party…

Last year, I rolled up my sleeves and tried to figure out which photo package was the best one to go with. If you’re interested, here’s my exceptionally detailed book report on the subject.

If you’d prefer to read the CliffsNotes version…
…Then, I say you should go with the Premium Package for $49.

You get:

  • Twelve 2×3
  • Four 3×5
  • Four 5×7
  • Two 8×10
  • One 8×10 Calendar
  • One 8×10 Class Picture
  • And the Portrait CD

No, you’re probably not going to be able to hand out all twelve of those 2×3” wallet photos, but you’ll get less value with the less expensive packages. Plus, none of the cheaper packages include the Portrait CD with all of your digital photo files. And for me, that’s the most important item!

In this digital age when thousands of pictures can be taken of your little darlings for free using your own tech, It does feel a little crazy to be spending this much money for one picture. But granted, it’s a ‘professional’ shot, and yes, you’re paying for some photo paper stock.

So let’s move on and figure out how to make the most of what you’re getting…

Choose a Variety of Portrait Looks
I think the hidden trick to the ordering process is to pick as many different backgrounds (Portrait Looks) as you can. It’s easy to do that by selecting a different background in each of the photo sizes. And then… they all show up on the Portrait CD!

So that’s where you’re getting additional value, because suddenly you’ve got eight different photos on the CD. Granted, they’re all using the same shot, but they feel different with the variety of all the digitally inserted backgrounds.

Now, you’ve got a wide range of choices when you want to print any additional pics yourself…

The other important detail to keep in mind is some of the Portrait Looks use a wider version of your child’s photo and others use a cropped version. I think it’s nice to include both.

You Can’t Copy Last Year’s Choices!
Since I did my exhaustive research on this last year, I figured I would just copy my choices and be quickly done with the ordering process this time. But guess what…?

They changed the numbering for the Photo Looks this year!
Argh!
(That’s worse than “my dog ate my homework!”)

So, I had to go through it all over again online at mylifetouch.com.
But that wasn’t necessarily a bad thing, because there’s been some evolution to my thinking on the best Portrait Looks…

Go with the School Backgrounds
I say the backgrounds for the Portrait Looks you choose should specifically reflect the fact that these are actually school photos. And you should include Photo Looks that reflect the year or grade. Generic-colored backgrounds are so… generic. They can be taken anywhere at any time.

Sure, a colored background doesn’t date as quickly, but then again… why would you really want someone to be looking at last year’s photo anyway?
(You know how I feel about sharing old pictures of your kid.)

Barrett’s 2018 Lifetouch Order

Here’s what I ordered in my Premium Package
to celebrate my son’s third-grade year.
Please feel free to copy my homework…


Eight 2×3 Wallets
Choose: Look #112 in ‘Pick Your Grade ‘
Blackboard with 3rd grade/Tight/Horizontal
(You need a tight shot of your child here, because these are so small.)

Four 2×3 Wallets
Choose: Look #78 in ‘Outdoor’
Edge of brick building/Sidewalk and tree/Tight/Vertical
(An outside shot is nice as long as it looks real!)

One 8×10
Choose: Look #140 in ‘Pick Your Grade’
Blackboard with 3rd grade/Wide/Horizontal
(This is the ‘money shot’ I like to frame at home. It says it all.)

The Other 8×10
Choose: Look #54 in ‘School Days’
Bookcase and window/Wide/Vertical
(Go with a vertical option, since the other 8×10 is horizontal.)

CD High and Low Resolution
Choose: Look #90 in ‘Special Edition’
Grey background/Wide/Vertical/2018/2019
(Go for a wide shot… that gives you the most flexibility in cropping.)

Four 3×5’s
Choose: Look #50 in ‘School Days’
Blackboard with year and apple/Tight/Horizontal
(Again, because it’s a small print.. go with a tight shot.)

Two 5×7’s
Choose: Look #1 in ‘Featured Looks’
Blue Background/Tight/Vertical
(Okay… for this one, I’m going with the classic blue background. You’ve got to have one, right?)

The Other Two 5×7’s
Choose: Look #67 in ‘School Days’
Classroom background with American flag and window/Wide/Vertical
(Go wider on this set.)

One 8×10 Calendar
They don’t give you a choice here. Please move on!

Pencils Down!
Phew! I hope that helped you get quickly through this complicated homework assignment. Enjoy your photos!

How to Choose an Indoor/Outdoor Digital Thermometer and Hygrometer

Don’t fall for all of the extra data that weather stations offer. Here is what’s important to me…

If you must know my particular kryptonite… It’s humidity. No, I’m not big on heat. But I simply can’t stand humidity. And I spend a fair amount of time monitoring the humidity in the outside air to ensure it doesn’t invade the air in my house. There’s just nothing worse than coming home after a long day at work to a house that’s humid.

Arghhhhh!

Of course, that’s more likely when I’ve left the windows open and the temperature outside isn’t forecast to be that hot.

The flip side of the equation is deciding whether to open my windows at night to let in cool fall air… as long as it’s not humid.

I think you get the point…

The Right Tool for Weatherman Barrett
The easiest way to address this humidity aversion…
is to set up an indoor/outdoor digital thermometer and humidity gauge.

It’s a simple and inexpensive solution but be careful not to buy a unit with more bells and whistles than you need. I tried not to but that’s exactly what I did when I bought an Oregon Scientific Advanced Weather Station three years ago.

Don’t over-engineer!
(You’re not trying to build a complete weather station, right?)

I say you should stick with a battery-operated digital gauge that displays four and only four numbers-

  • Indoor temperature
  • Outdoor temperature
  • Indoor humidity
  • Outdoor humidity

Everything else is a distraction and clutter.
(Why do you need your thermometer to tell you what time it is?)

My New Thermometer/Hygrometer
Recently, my Oregon suddenly stopped pairing with its outdoor companion sensor that lives on the other side of my home office window. I tried replacing the batteries on both units, but these things never last forever.

So, I had the opportunity to buy a simpler device that just targets the information I really need.

This time, I went with the…
ThermoPro TP60S Digital Hygrometer- Indoor/Outdoor Thermometer Humidity Monitor.
$17.99 on Amazon

It’s got four numbers and is easy to read at a glance.
Plus, the ThermoPro has a smaller footprint than the Oregon and is a third of the price!

  • Simple
  • Inexpensive
  • No clutter on the display

It’s all I need.

Click.

Thermometer. Hygrometer. Done.

Don’t Sweat the Details
There’s so much data and information that you’re otherwise consuming throughout your day.
(Thank you, new Apple Watch.)

For a quick temperature/humidity check and indoor/outdoor comparison, my new ThermoPro is perfectly straightforward.

Sometimes… actually more often than you’d think…

Less is more.