
Green Bubble Texting Fix if You Use the Messages App on a Mac
The color of your texting bubbles may not matter so much when using your iPhone, but it can be a big problem if you’re using the Messages app on your Mac. Here’s how to erase this pesky issue…
Lately, I’ve been trying to fix a little flaw in my ongoing role as the family photographer. It has to do with what happens after I take my photos…
I bring them back to my iMac, import them into Adobe Lightroom, choose the best ones, tweak and color balance, and then finally I share the few gems with family and friends. Of course, the big problem with my process is it takes time… sometimes lots of time to get to the finish line. It can be a week… sometimes two.
These days, everyone expects almost instantaneous sharing of pics.
Clearly, I need to keep up.
And I’m happy to report that I’m doing better, and here’s why…
Emailing Vs. Texting Photos
Now, I force myself to quickly find the best few pics in a batch and singularly focus on them to get them ready to share. And if I never get to the rest… well, maybe that’s okay, because perhaps all that really matters are those few best photos anyway.
(Are you feeling a disturbance in the Force?)
One other important detail to my evolving photo-management process is how I’m sharing my pics… Usually, I email them about. If I have more than a few to share, I create a Dropbox folder to house them. And then I forward along the Dropbox link in my email.
How easy is that?!
Well, not easy enough…
Because it still requires folks to click on the link and then download the photos.
And that’s takes time.
I’ve noticed that some of my friends prefer to text their photos, and I’ve experienced the simplicity of saving a photo that’s been texted to me directly to my iPhone.
Hmmm…
And while I didn’t want to move my photo sharing process to my iPhone (like the rest of the world), I realized I could take advantage of a texting workflow while still using my iMac…
…by using the ‘Messages’ app.
A Problem with Using the Messages App on Your Mac
You may recall, I’ve recently focused on my son’s 9th birthday and what to get him…
(My gift was a build-your-own computer kit!)
Immediately after his birthday party, I wanted to send out some party pics to our friends, and I figured this was the perfect opportunity to try out my iMac’s Messages app as my distribution method…
But I immediately ran into a roadblock with one of the phone numbers I used…
The photo just didn’t go through!
Huh.
After a moment, I realized my friend wasn’t part of the Apple ecosystem (no iPhone or Mac). So he didn’t have iMessage functionality…
(The blue bubble type)
And my Mac isn’t as clever as my iPhone which can simply convert an iMessage with a photo to a MMS text with a photo.
(The green bubble type)
So now what???
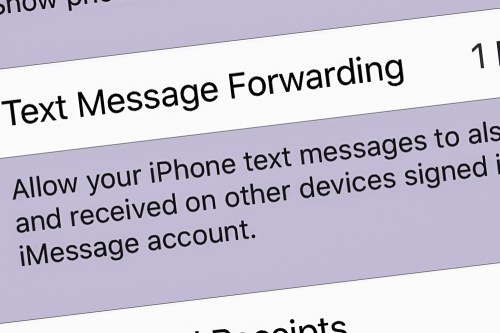
Text Message Forwarding
Well, the fix was to change a buried iPhone setting to better use Messages on my iMac. You simply turn on the ‘Text Message Forwarding’ feature…
Here’s how you do that on an iPhone:
- Go to ‘Settings’
- Tap on ‘Messages’
- Tap on ‘Text Message Forwarding’
- Then select the device you want to connect (iMac)
And as soon as I made this adjustment, I resent the photo, and it immediately went through.
Problem solved!
Green-Bubble Fix
With my iMac and iPhone now teamed up in this particular way, the path had been cleared for me to freely share my photos without worry using the Messages app on my iMac.
And the result…?
I received almost instant feedback that my pics had been received and were appreciated.
Now that’s satisfaction!
Text Message Forwarding is an easy fix for your green-bubble moments.
I highly recommend activating it…


